System Efficiency - Lab-First Principles
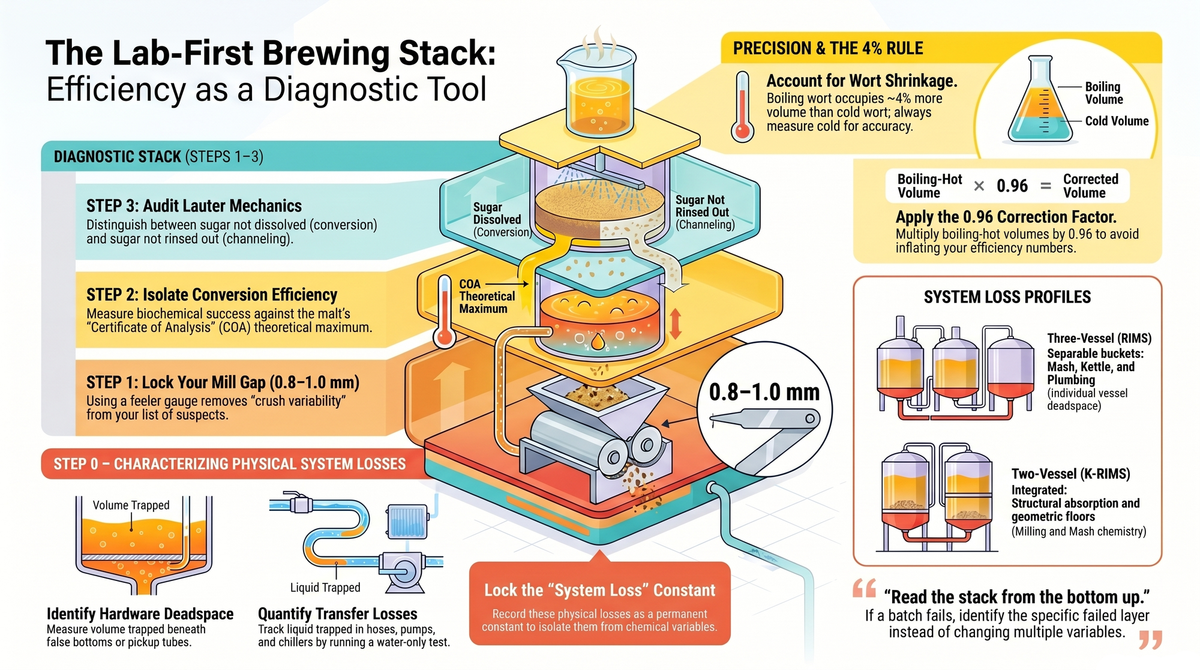
In the "Lab-First" brewery, efficiency is not a high score to brag about. It is a diagnostic tool for variable isolation. If you do not know exactly where your sugars are being lost, you cannot reliably replicate a recipe — and replication, not bragging rights, is the entire point.

Apologies in advance, this is a long one!
This is worth stating plainly because the homebrewing culture around efficiency is mostly backward. Forums are full of people chasing 80%, then 85%, then 90% brewhouse efficiency as if it were a personal best at the gym. It isn't. A brewer running a rock-steady 72% every single batch has a more useful system than one who bounces between 68% and 84% and calls the good days "good." The first brewer can design a recipe and hit their numbers. The second is gambling.
Efficiency, treated correctly, is a stack of nested measurements. Each layer isolates one physical or biochemical process. When a batch comes in low, a properly instrumented brewer doesn't shrug and add more base malt next time — they read the stack from the bottom up and find the exact layer that failed. That is the difference between a recipe and a ritual.
Here is how to break the system down, from the dry grain to the cold fermenter.
A Note for the Mead Crowd
Much of this site is about mead, so let me be honest about scope before we dive in: efficiency in the sense we're about to dissect is largely an all-grain problem. When your fermentable sugar arrives in a jug labeled "honey" with a known sugar content, there is no mash, no grain bed to rinse, and no conversion step to fail. Your "efficiency" is essentially a dilution calculation, and it is trivially reproducible. Of course, keep in mind that honey has variable water content, and different glucose/fructose ratios.
If you brew all-grain beer alongside your mead — as many of us do — the rest of this is for you directly. If you're mead-only, read it as a case study in how to think about any system where you're trying to account for every gram of sugar. The reasoning is the product, not the barley.
Step 0: System Profiling (Finding Your Baseline Losses)
Before you analyze a single point of chemistry, you must quantify your physical system losses. This is the step almost everyone skips, and skipping it poisons every measurement that follows. If you ignore your mechanical losses, you will spend months blaming your mash for wort that was simply stuck in a hose the entire time.
The reason this matters is subtle. Efficiency calculations divide sugar collected by sugar available. But "collected" is measured by volume and gravity in the fermenter or kettle, and any sugar-bearing liquid that never made it there looks identical to sugar that was never extracted in the first place. A liter of perfectly good 1.050 wort abandoned in your chiller is, as far as your spreadsheet can tell, conversion that never happened. You cannot fix a problem you've misattributed.
So, before chemistry, you characterize the plumbing.
Identify Deadspace
Deadspace is the volume of liquid left behind in a vessel that physically cannot be drained through the outlet. Every mash tun and kettle has some. The pickup tube sits a few millimeters off the bottom; the false bottom traps a layer beneath it; the kettle floor isn't perfectly flat.
To measure it directly: fill the empty vessel with water to the point where liquid just begins to flow from the outlet, then measure how much water is below that line. Pour in a known volume — say, add water 250 mL at a time from a graduated pitcher — until flow starts, and record the total. On a typical 10-gallon (38 L) round cooler mash tun with a braid, expect somewhere between 0.5 and 1.5 L. A kettle with a pickup tube a centimeter off the floor can hide a surprising amount, especially if the floor is dished.
Do this once, carefully, and write it on the side of the vessel in permanent marker. It is a constant for that piece of equipment.
Track Transfer Losses
Transfer loss is the wort trapped inside hoses, pumps, plate or counterflow chillers, and any tubing between vessels during a transfer. This is the sneakiest category because it scales with how much hose you own. A plate chiller and its associated silicone lines can easily hold 0.5 to 1 L of wort that drips out as foam or stays behind entirely.
The measurement trick: run your full transfer with water, catch everything that comes out the far end, and compare to what you put in. The difference (after subtracting evaporation, which is negligible for a cold-water test) is your transfer loss. Or, more crudely but effectively, transfer your post-chill wort, then disconnect and drain every line into a measuring cup and see what falls out.
Two Systems, Two Different Loss Profiles
It's worth grounding this in real, commercially-built rigs, because where your losses live depends heavily on how the system is architected. Two popular turnkey systems — the Sabco Brew-Magic V350 and the Blichmann BrewEasy — handle deadspace in almost opposite ways, and seeing the contrast makes the whole concept click. (Full disclosure for regular readers: I brew on a Brew-Magic, and I've written about its efficiency and calibration before, I also brew on a Blichmann BrewEasy Electric system. The point here isn't to crown one system — it's to show that the loss profile is a property of the architecture, and you have to characterize whichever one you own.)
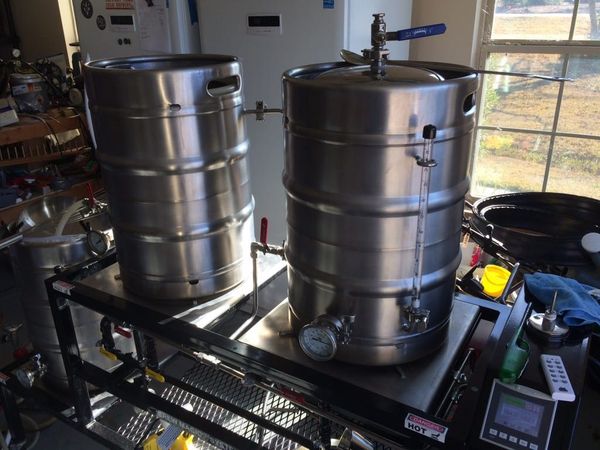
The Brew-Magic V350: a three-vessel RIMS with classic, separable losses.
The V350 is a hybrid RIMS system built on three Sabco keggles (converted kegs) with false bottoms in the mash tun and boil kettle, a pump, and a recirculation tube. Because it sparges and uses separate vessels, its losses fall into the textbook categories, and — crucially — each one lives in its own place where you can measure it independently:
- Mash/lauter tun deadspace: the volume beneath the false bottom and below the pickup. On my own V350, calibrating with water, this comes out to roughly 1 quart (about 0.95 L) trapped under the false bottom. That's the number that goes into the "Lauter Tun Deadspace" field in your recipe software.
- Boil kettle deadspace + trub loss: the keggle's dished bottom and center pickup leave a layer of liquid and break material behind. Whirlpooling concentrates trub in the center, but the dip tube draws from there, so there's a real trade-off to dial in.
- Recirculation + RIMS-tube holdup: the pump, the RIMS tube, and the recirculation plumbing all hold wort. On a recirculating system this volume cycles back during the mash, so it isn't lost during the mash — but it becomes a transfer loss at knockout when you drain to the fermenter.
The lesson the V350 teaches is separability. Because the architecture keeps mashing, lautering, and boiling in distinct vessels, you can attribute each loss to a specific step — which is exactly the diagnostic stack this article is built around. The recirculation, incidentally, is also why V350 brewers can run a coarser crush (I run mine in the 0.040″–0.050″ range): the pump rinses the bed continuously, so you lean less on a fine crush for extraction and more on flow.
The Blichmann BrewEasy 10-gallon: a two-vessel K-RIMS where "deadspace" means something else entirely.
The BrewEasy is a fundamentally different animal. It's a two-kettle "Kettle-RIMS" (K-RIMS) system: the mash tun sits on top of the boil kettle, and wort recirculates from the bottom kettle up through the grain bed and back down. The headline design choice is that it eliminates sparging entirely — it's a full-volume, no-sparge process.
That single decision rewrites the loss accounting:
- There is no separate lauter step to lose efficiency in. With no sparge, "lauter efficiency" in the traditional sense nearly collapses into conversion efficiency plus grain absorption. You don't channel a sparge because there is no sparge — you simply accept the sugar absorbed by the grain as a fixed, structural loss. (This is also why no-sparge systems generally post lower brewhouse efficiency than a well-run sparging rig: you're deliberately trading a few points of extraction for simplicity and clarity.)
- The "minimum kettle volume" is a hard geometric floor, not a loss. Blichmann specifies that the 10-gallon BrewEasy must keep a minimum of 5 gallons in the bottom kettle at all times for the recirculation to function and the element/pickup to stay covered. This isn't deadspace in the lost-sugar sense — it's all good wort — but it behaves like a constraint on your volume math. It dictates your minimum batch size and your water-to-grain relationship in a way the V350 simply doesn't impose. You have to design your recipe around that floor.
- Genuine deadspace is small and lives in the bottom kettle and AutoSparge plumbing. The BoilerMaker kettle's pickup, the AutoSparge float assembly, and the connecting tubing hold the actual unrecoverable volume — typically less total plumbing holdup than a three-vessel rig simply because there are fewer hoses and no third vessel.
The lesson the BrewEasy teaches is the opposite of the V350's: integration hides the seams. Because mashing and recirculation share vessels and there's no sparge, you lose the ability to cleanly separate lauter loss from conversion loss — they're fused. That's not a flaw; it's a design trade for simplicity. But for the Lab-First brewer it means your diagnostic stack has fewer independent rungs, so when efficiency drifts you have fewer places to look — and the crush (Step 1) and mash chemistry (Step 2) carry proportionally more of the diagnostic weight, since there's no sparge technique left to blame.
The takeaway across both: a "premade" system doesn't exempt you from Step 0 — it just predetermines the shape of the answer. The V350 hands you three neatly separable loss buckets to measure; the BrewEasy hands you one big structural absorption loss and a geometric volume floor. Either way, you still have to put water in the empty vessels and find your own numbers. The manufacturer's manual gives you the architecture, not your specific deadspace.
If you use brewing software like BeerSmith or BrewFather, take the time to look at your System settings to ensure you are editing your equipment profiles to match your system, losses, etc. Usually the profile selections are a good starting point, but honestly need some adjustment as they feed all of the automatic calculations.
Mitigation
You don't have to accept these losses — you have to know them, and then reduce the ones that are cheap to reduce:
- Shorten pipework. Every centimeter of 1/2" silicone tubing holds roughly 1.3 mL. That sounds trivial until you realize a sloppy setup might run six feet of line between three vessels. Cut your hoses to the actual length you need.
- Install bottom-draining pickup tubes. A pickup that follows the contour of a dished kettle bottom, or a weldless bulkhead that sits as low as the geometry allows, can cut kettle deadspace dramatically.
- Tilt the kettle as it empties. The single highest-return, zero-cost fix. A small shim or a tilt jig under one side lets the last liter pool over the pickup instead of spreading across the floor. I keep a piece of scrap hardwood cut to the right angle exactly for this.
The goal of Step 0 is a single number — call it your system loss volume — that you subtract from your accounting before you ever start judging your mash. Once it's characterized, it becomes a constant, and constants are what let you isolate variables.
Step 1: Milling (The Physical Constant)
Milling is your first controllable variable, and it deserves the same treatment as deadspace: measure it, lock it, and turn it into a constant so it stops contaminating your other measurements.
The mechanics are simple. A finer crush cracks the husk more thoroughly and exposes more of the starchy endosperm to your enzymes and your sparge water. More exposed surface area means faster, more complete conversion and easier extraction. But there is a hard limit: crush too fine and you shred the husks that form your grain bed's natural filter, and you get a stuck sparge — a grain bed so compacted that liquid won't flow through it. You are trading extraction against drainage.
The Precision Method
Do not rely on visual inspection. "Looks about right" is how you end up chasing ghosts three batches later. The crush you eyeball today is not the crush you'll eyeball in February when the light in your garage is different and you're in a hurry.
Use a digital feeler gauge or a caliper to set and record your mill gap. Most two-roller mills land in a useful range of 0.8 mm to 1.0 mm (roughly 0.030" to 0.039") for a system with a traditional sparge and a static grain bed. Set it, measure it with the caliper across both ends of the rollers — they drift out of parallel — and write the number in your brew log.
One important caveat that ties back to the previous section: the right gap depends on your architecture. A recirculating RIMS like the Brew-Magic continuously rinses the grain bed with the pump, which offsets much of the need for a fine crush — so a coarser gap (I run mine in the 0.040″–0.050″ / ~1.0–1.3 mm range) gives up little extraction while protecting against the recirculation-killing stuck bed that a fine crush invites. A no-sparge BIAB-style system, by contrast, can crush quite fine because it's not relying on bed permeability for a sparge at all. The number isn't universal; what's universal is measuring it and locking it.
Here is the payoff, and it is the whole reason this step exists in a Lab-First framework: by locking in the gap as a known physical constant, you remove the crush from your list of suspects. If your conversion efficiency drops on a future batch and your mill gap is documented at 0.9 mm, you know with certainty the problem is not your crush. It lives downstream — in the malt's biological potential, your mash chemistry, or your technique. You have isolated a variable. That is the entire game.
A small instrumentation note, since this is the Lab-First series: if you buy pre-milled grain, you have outsourced this constant to your supplier and you can no longer guarantee it batch to batch. That is a legitimate trade-off for convenience, but it means crush variability quietly re-enters your system as noise. If you're serious about repeatability, owning the mill is one of the higher-leverage purchases you can make.
Step 2: Conversion Efficiency (The Biochemical Step)
Now we get to the chemistry. Conversion efficiency measures how effectively the enzymes in your mash converted the available starch into soluble, fermentable (and unfermentable) sugars. It is the biochemical heart of the process, and critically, it is measured independently of how well you later rinsed those sugars out. This separation is what makes the diagnostic stack work.
The Benchmark: Reading the COA
You cannot measure conversion against an absolute, because no malt contains 100% extractable sugar — the rest is husk, protein, lipids, and moisture. Instead, you measure against the malt's theoretical maximum, which the maltster publishes on the Certificate of Analysis (COA) as Extract, Fine Grind Dry Basis — usually abbreviated FGDB or DBFG.
This is the single most underused document in homebrewing, and learning to read it is a quiet Lab-First superpower. FGDB is typically expressed as a percentage — say, 80.5% for a typical pale base malt — meaning that under ideal laboratory conditions, with a lab-fine grind and perfect mashing, 80.5% of the malt's dry weight can be dissolved into the wort as extract. That is your ceiling. You will never hit it (your grind is coarser than the lab's, and your mash is not a controlled instrument), but it is the honest number to measure yourself against.
If your maltster doesn't publish a COA for your specific lot, you can fall back on a generic figure, but understand that you've just injected an assumption into your measurement. The whole point of the COA is to replace an assumption with a measured value for the actual grain in your actual sack.
The Math, Worked
Let's run a real conversion efficiency calculation so the abstraction has teeth.
The setup:
- Grain bill: 5.00 kg of a single base malt
- FGDB from the COA: 80.5% (so 0.805 as a fraction)
- Malt moisture from the COA: 4.0% (so the malt is 96% dry matter)
- Mash + first runnings, measured cold: 20.0 L at a gravity of 1.045
Step A — Theoretical maximum extract available.
First, account for moisture. Only the dry matter contains extractable potential:
Dry weight = 5.00 kg × (1 − 0.04) = 4.80 kg dry matter
The maximum mass of extract (dissolved solids) the malt can yield:
Max extract = 4.80 kg × 0.805 = 3.864 kg of potential extract
Step B — Extract you actually dissolved.
This is where gravity meets volume. A gravity of 1.045 means the wort is 45 "gravity points" above water. To convert points and volume into a mass of dissolved sugar, we use the relationship that one liter of wort at 1.040 contains very close to 96.8 g of extract per °Plato, but the cleaner working approach is to convert gravity to °Plato (mass percent) and multiply by the wort's mass.
A gravity of 1.045 corresponds to approximately 11.18 °Plato (using the standard polynomial; the rough rule of °P ≈ (SG − 1) × 1000 / 4 gives 11.25, close enough to sanity-check). °Plato is, by definition, grams of extract per 100 g of wort.
The mass of 20.0 L of 1.045 wort:
Wort mass = 20.0 L × 1.045 kg/L = 20.90 kg
The mass of dissolved extract within it:
Dissolved extract = 20.90 kg × 0.1118 = 2.337 kg
Step C — Conversion efficiency.
Conversion efficiency = Dissolved extract / Max extract
                      = 2.337 kg / 3.864 kg
                      = 0.605 → 60.5%
Wait — 60.5%? That number should make you sit up, and it illustrates exactly why this layered approach matters. A conversion efficiency that low isn't a conversion problem at all; in this worked example it's an artifact of measuring conversion against the full grain bill's potential while only having collected the first runnings (20 L) and not yet sparged. Conversion efficiency, measured correctly, requires you to either (a) account for the sugar still held in the wet grain, or (b) measure a fully-sparged, well-mixed sample.
This is the trap, and it's instructive: the number is only meaningful if you know precisely what liquid it describes. Let's do it correctly.
Measuring it correctly — the no-sparge / full-volume method.
The clean way to measure pure conversion efficiency at home is to mash, then collect all your liquid (full sparge to near-zero residual sugar, or a deliberate measurement that captures the total dissolved extract including what's trapped in grain absorption). Suppose after full collection you measure:
- Total collected + grain-absorbed extract equivalent: 38.0 L at 1.038, cold
Wort mass = 38.0 L × 1.038 = 39.44 kg
1.038 ≈ 9.49 °P
Dissolved extract = 39.44 kg × 0.0949 = 3.743 kg
Conversion efficiency = 3.743 / 3.864 = 0.969 → 96.9%
Now that is a healthy conversion number — it tells you the enzymes did their job and dissolved nearly all the available starch. The 96.9% is the biochemistry. What happens to that sugar next — how much of it you actually carry into the kettle versus leave behind in the wet grain — is a separate, mechanical question, and it's the subject of Step 3.
The Diagnosis
If your conversion efficiency (measured correctly) comes in below ~90%, the problem is biochemical, and there are only a handful of suspects:
- Mash temperature out of range. Too cool and the enzymes are sluggish and slow; too hot and you denature them before they finish. Verify your thermometer against a second reference — a stuck or miscalibrated thermometer is one of the most common silent failures in a homebrewery.
- Mash pH out of range. Conversion enzymes (alpha- and beta-amylase) work best around 5.2–5.6 at mash temperature. Outside that window, conversion slows and stalls. Measure it with a calibrated pH meter on a cooled sample, not pH strips.
- Insufficient time. A coarse crush or a cool mash may simply need longer. An iodine test (starch turns iodine blue-black; full conversion leaves it amber) is the classic, cheap, lab-grade check for completeness.
- Dough balls. Clumps of dry flour at the center of a poorly-mixed mash never see enough water or enzyme. They are pockets of unconverted starch hiding in plain sight. Stir thoroughly when you dough in, and stir again.
Notice that every one of these is a variable you can instrument and isolate — and because you locked your crush in Step 1 and your deadspace in Step 0, you can trust that the problem genuinely lives here and not somewhere you already ruled out.
Step 3: Lauter Efficiency (The Mechanical Step)
Conversion told you the sugar got dissolved. Lauter efficiency tells you how successfully you rinsed it out of the grain bed and into the boil kettle. These are completely different failure modes with completely different fixes, and conflating them is the most common diagnostic error in all-grain brewing.
Here's the intuition. After conversion, your sugar is dissolved in two places: the free liquid you can drain off (the wort), and the liquid clinging to and absorbed by the grain (which carries dissolved sugar with it at the same concentration). Lautering — running off the first wort and then sparging with fresh water — is the process of separating and rinsing. No matter how well you sparge, some sugar-laden liquid stays absorbed in the grain and goes to the compost. Lauter efficiency quantifies how much of the dissolved sugar you successfully recovered versus how much you left behind in that wet grain.
The Process
This step isolates the purely mechanical separation of liquid from solids. Grain absorbs roughly 1.0 L of liquid per kilogram of grain (about 0.5 qt/lb), and that absorbed liquid is at full wort concentration. So with a 5 kg grain bill, you're going to lose about 5 L of sugar-bearing liquid to absorption no matter what — that loss is structural. The efficiency question is whether you rinsed the remaining sugar out cleanly, or whether you channeled water straight through and left recoverable sugar behind.
The Math, Worked
Continuing the earlier example — conversion dissolved 3.743 kg of extract. Now let's see how much reaches the kettle.
The setup:
- Pre-boil volume collected in the kettle, measured cold: 28.0 L at 1.045
- (The rest stayed absorbed in the ~5 kg of grain.)
Wort mass into kettle = 28.0 L × 1.045 = 29.26 kg
1.045 ≈ 11.18 °P
Extract into kettle = 29.26 kg × 0.1118 = 3.271 kg

Lauter efficiency = Extract into kettle / Extract dissolved in mash
                  = 3.271 kg / 3.743 kg
                  = 0.874 → 87.4%
So conversion was excellent (96.9%) but lautering recovered only 87.4% of that dissolved sugar — meaning about 12.6% of your converted extract is sitting in the spent grain. Some of that is unavoidable absorption loss; the question the number forces you to ask is whether 87.4% is as good as your system can do, or whether you're leaving recoverable points on the table.
The Diagnosis
Poor lauter efficiency points at the flow of liquid through the grain bed, and the usual culprits are:
- Channeling. Liquid finds a low-resistance path and tunnels straight through the bed, rinsing a narrow column thoroughly while leaving the rest of the grain barely touched. The fix is a gentle, even sparge and avoiding disturbances that crack the bed.
- Sparging too quickly. Rinse water needs contact time with the grain to dissolve and carry sugar. Blast it through in two minutes and it exits before it's done its job. A slow, steady runoff — many brewers target a full lauter over 45–60 minutes — gives the water time to work.
- A poorly designed lauter manifold or false bottom. If your collection geometry pulls liquid from only one region of the bed, the rest never gets rinsed. Even coverage in, even collection out.
- Insufficient or maldistributed sparge water. Batch spargers in particular need to think about water splits; fly spargers need even distribution across the top of the bed.
The beautiful thing about separating Steps 2 and 3 is what it tells you to stop doing. A brewer who sees low overall numbers and "fixes" it by mashing hotter or longer, when the real problem is channeling in the lauter, is adjusting the wrong knob entirely. They might even make conversion worse chasing a lauter problem. Measure them separately and the fix announces itself.
Step 4: Brewhouse Efficiency (The Final Tally)
Brewhouse efficiency is the ultimate "into the fermenter" metric. It is the number recipe software asks you for, and it accounts for the combined success of everything upstream — conversion and lautering — minus your physical system losses: trub, deadspace, and boil-off. It is the product of the layers beneath it, which is exactly why it's useless as a first diagnostic and invaluable as a summary one.
The relationship, loosely, is:
Brewhouse efficiency ≈ Conversion efficiency × Lauter efficiency × (volume retention through boil & transfer)
The Math, Worked
Let's carry our example all the way into the fermenter.
The setup:
- Grain bill potential extract (from Step 2): 3.864 kg maximum
- After a 60-minute boil and chill, into the fermenter, measured cold: 23.0 L at 1.052
- (Boil-off concentrated the wort; trub and chiller losses took their cut.)
Wort mass into fermenter = 23.0 L × 1.052 = 24.20 kg
1.052 ≈ 12.86 °P
Extract into fermenter = 24.20 kg × 0.1286 = 3.112 kg

Brewhouse efficiency = Extract into fermenter / Max extract available
                     = 3.112 kg / 3.864 kg
                     = 0.805 → 80.5%
There's your headline number: 80.5% brewhouse efficiency. But look at what the stack tells you that the single number cannot. Conversion was 96.9% (excellent — the chemistry is dialed). Lautering was 87.4% (good, with maybe a little room). And the drop from the 3.271 kg that reached the kettle to the 3.112 kg that reached the fermenter (a loss of 0.159 kg) is your kettle-and-transfer tax — trub and deadspace, the Step 0 losses made visible at the end of the process.
If next month this same recipe comes in at 74%, you don't guess. You re-run the stack. Is conversion still 97%? Then your chemistry is fine — look at the lauter. Did lauter drop to 80%? You channeled. The diagnosis is mechanical and you go inspect your sparge, not your mash schedule. That is what efficiency is for.
The 4% Rule: Accounting for Wort Shrinkage
There's a quiet error woven through everything above that I've been silently correcting, and now it gets its own section because it's the difference between honest numbers and flattering ones. Every single volume measurement in this article was specified as taken cold. That was deliberate.
The Physics
Liquids expand when heated and contract when cooled. Wort at a boil occupies meaningfully more volume than the same wort at room temperature — the commonly cited figure is about 4% more volume at boiling than at 20 °C (68 °F).
Let me put the real physics behind the rule of thumb, because "4%" is a working approximation, not a law of nature. Water's volumetric thermal expansion is not linear; the expansion coefficient itself rises with temperature. Going from 20 °C to 100 °C, water expands by roughly 4.0% — which is where the number comes from. But the same wort measured at 40 °C is only expanded about 0.8% over its 20 °C volume, not 4%. The 4% figure is specifically the boiling-to-room-temperature correction. If you measure your wort warm-but-not-boiling, the correction is smaller, and blindly applying 0.96 will now over-correct in the other direction.
The honest Lab-First move is to measure cold whenever you can, so no correction is needed at all. When you must measure hot — checking pre-boil volume to decide whether to extend the boil, for instance — apply the correction that matches the actual temperature, and recognize that 0.96 is only correct near boiling.
The Precision Trap
Here's how this silently inflates your ego. Suppose you measure your post-boil volume hot, straight off the flame, and read 24.0 L. You plug 24.0 L into your efficiency equation alongside your gravity reading. But that 24.0 L of hot wort is only 23.0 L once it cools (24.0 × 0.96 = 23.04). You've just told your spreadsheet you collected a liter more sugar-bearing wort than actually exists. Your gravity-times-volume product — your total extracted sugar — is inflated by about 4%, and so is your calculated efficiency. You'll record an 84% batch that was really an 80% batch, feel great, design your next recipe around 84%, and come up short.
It compounds with the gravity reading, too. If you're using a refractometer (which reads near-instantly and is popular for hot samples), remember it has its own temperature handling and, separately, requires a wort correction factor — a refractometer reads sucrose and over-reads wort by a few percent unless you apply your instrument's correction. A hot, uncorrected refractometer reading feeding a hot, uncorrected volume is two errors stacked in the same direction. This is exactly the kind of compounding the Lab-First series exists to stamp out: control your conditions, or correct for them explicitly, but never leave them unstated.
The Solution
Three rules, in order of preference:
- Measure cold. Best option. Take your volume and gravity readings after the wort has reached a known, stable temperature (ideally the ~20 °C your gravity instrument is calibrated to). No correction, no ambiguity. This is why every worked example above said "cold."
- If you must measure hot, correct for the actual temperature. Multiply boiling-hot volume by ≈ 0.96. For warm-not-boiling wort, use a smaller correction — don't reflexively apply 0.96 to 50 °C wort.
- Correct your gravity instrument, too. Hydrometers are calibrated to a specific temperature (commonly 20 °C / 68 °F); a reading on warm wort reads low and needs a temperature correction. Refractometers need a wort correction factor (and ideally automatic temperature compensation). State which instrument you used and which corrections you applied, in your brew log, every time.
Closing: The Stack Is the Point
Walk back up what we built. Step 0 turned your plumbing into a known constant so it would stop masquerading as a chemistry problem. Step 1 turned your crush into a documented constant so it would drop off the suspect list. Step 2 measured the biochemistry in isolation — did the sugar dissolve? Step 3 measured the mechanics in isolation — did you rinse it out? Step 4 summed it all into the number your software wants. And the 4% rule made sure none of those numbers were lying to you about temperature.
The reason to do all of this is not to post a big number on a forum. It's that when a batch goes sideways — and one will — you can read the stack from the bottom and point at the exact layer that failed, instead of changing three things at once and learning nothing. A brewer who runs a documented, boring, repeatable 78% understands their system. A brewer who averages 82% with a wide spread does not. In the Lab-First brewery, the second number is worse, no matter how it looks on paper.
Keep in mind, precision is a spectrum. My favorite commercial brewers, who I know are very technical, still get variability. So if you are + or - a few percentages off your expected Brewhouse Efficiency, don't worry. If you are consistently seeing problems, run the stack again. Or start over with a clean baseline. Keep in mind that large hop doses also adsorb wort, and you might have a spill or two. If you change things up - say going from an immersion chiller to a counter flow, rerun your equipment losses. Predictable consistency is the goal here.
Measure the thing. Isolate the variable. Correct your temperature. Write it down. Then you can remake the beer — which was always the whole point.