Refurbishing a Sabco BrewMagic V350
Sabco is out of business, but your BrewMagic isn't dead

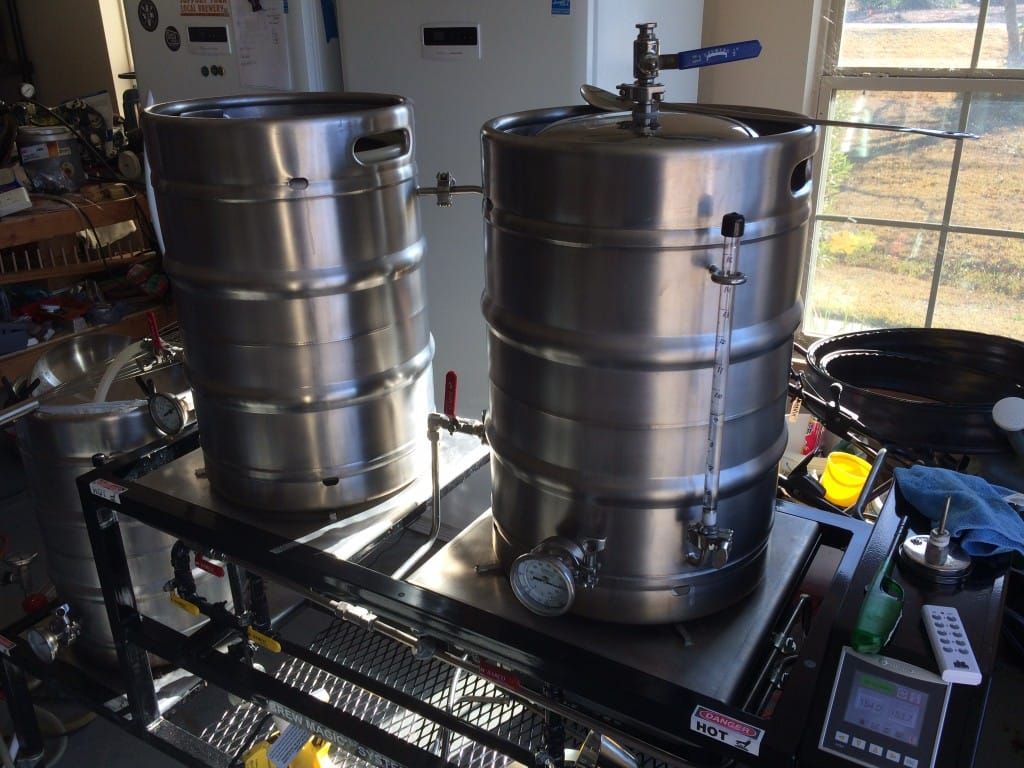
TL/DR: Below you will find instructions to refurbish a BrewMagic V350 brewing rig, as well as a tool to unlock the license key for the software on the PLC.
Disclaimer & Terms of Use: This article, license calculation, and refurbishment advice are provided strictly "as-is" for informational and archival purposes only, without warranties or guarantees of any kind. The author assumes no liability or responsibility for any errors, software malfunctions, system failures, property damage, personal injury, or financial loss resulting from the use of this widget, license keys, or referenced refurbishment procedures. Work on electrical panels, high-voltage systems, heating elements, and gas assemblies carries inherent risks; you perform all modifications, repairs, and operations entirely at your own risk.
BrewMagic V350 License Key Recovery
Follow the steps below to clear the lock screen and restore your controller after replacing the mainboard coin battery and rebooting your system.
- Locate the Error Code currently displayed on your V350 screen.
- Enter the code below to generate your unique License Key.
- Type the resulting License Key back into the BrewMagic controller prompt and confirm.
Sometime around June of 2026, Sabco quietly closed its doors. There was no announcement, no farewell email, no liquidation sale. Just a website that stopped resolving and realization, rippling out through homebrew forums and a few commercial breweries that never fully migrated off their original hardware, that the company behind the BrewMagic systems was simply gone. For a machine as iconic as the V350, that's a strange way to go. This was the system Dogfish Head built its earliest batches on, and Sam Calagione spent years as its most visible evangelist. I bought mine in 2012, and if you dig through this blog's archive, you'll find over a decade of scars, fixes, and mash schedules built around it.
Here's the good news: the V350 was engineered to be serviceable. Nothing about it depends on Sabco continuing to exist, with one significant exception I'll get to. If you're eyeing a used unit, or trying to bring one back from a garage where it's been sitting since a brewery closed, this is what I know from thirteen years of keeping mine running.
What You're Actually Buying
Strip away the branding and the V350 is a three-vessel, half-barrel (19.5 gal / ~74 L) converted-keg brewstand with a manual gas manifold for independently firing the hot liquor tank, mash tun, and boil kettle, plus a distributed valve system to route water and wort between them. The mash side adds a RIMS (Recirculating Infusion Mash System) loop, available in 120V or 240V configurations, that pulls wort from the mash tun, runs it past a heating element, and returns it to hold or ramp temperature without direct-firing the mash tun itself.
None of this is proprietary. Every connection is a 1.5" tri-clamp fitting or silicone/braided tubing, which means the entire plumbing side of the system is off-the-shelf and trivially serviceable. The RIMS tube, its heating element, and the circulation pump are all replaceable, though getting at the element takes some patience with tri-clamp unions in tight quarters. In my experience, these components are durable when maintained, and mine has needed almost nothing beyond the emergency-stop switch, which hard-cuts power to the RIMS element, pump, and gas solenoid simultaneously. I've used it exactly once, on a 115°F (46°C) Texas summer afternoon that still haunts me.
The PLC Is the Whole Story
Everything that makes the V350 more than a fancy manifold, and everything that makes a dead unit genuinely dead rather than just dirty, lives in the Unitronics Vision350 PLC (V350-35-R2 and closely related revisions, depending on when your unit was built). Sabco licensed its control software to that specific controller, and the license key is tied to the hardware itself, not to any account or server Sabco controlled. That's actually the reason this system survives its manufacturer at all: there's no license server to go dark.
But the license validation depends on the PLC's onboard clock and memory, which run off a CR2032 3V lithium coin cell on the mainboard, accessible through the side maintenance door. When that battery dies, the PLC loses its ability to hold the license state, throws an error, and refuses to run, not because the software vanished, but because the controller can no longer confirm it's allowed to. Given how long most of these units have been in service, a dead coin cell is by far the most common failure mode you'll encounter, and it's also the cheapest and easiest to fix: swap the battery, restart the unit, and you'll get an error/unlock code on screen that can be used to regenerate the license.
Sabco's software went through at least one major revision, roughly 2014–15, and earlier PLC hardware doesn't support the upgraded version. The original interface was minimalist: set a target mash temperature, read the mash-return PID thermometer, toggle the pump and RIMS loop, run a basic timer. The later version added a genuinely useful automated step-mash function with programmable ramps and holds, and if memory serves, a more sophisticated dual-PID control scheme using both thermoprobes.
The catch is that RIMS heating rate is inseparable from flow rate, and flow rate on the V350 is still set manually via the mash-outlet and return-circulation valves. Slow the flow too much and the RIMS element sits in contact with a smaller volume of wort for longer, which is exactly the condition that causes localized scorching; the same Maillard-and-caramelization chemistry that gives crust its color, except here it's happening to sugars sitting on a hot metal surface instead of bread in an oven, and it shows up as off-flavors and stuck sediment rather than anything you want. Too much flow and you lose your heat-band accuracy because the PID loop is compensating for a moving target, and you likely compacted your mash bed. On my 120V unit, the element alone often couldn't out-run the heat loss from an uninsulated stainless stand, and I'd supplement with direct fire under the mash tun. It is workable, but it demands attention, because you're now managing two heat sources against one temperature target.
I leaned hard on the automated step-mash function, mostly because I was working through a lot of traditional multi-rest schedules at the time and it was genuinely convenient to let the system handle the ramps. I stored those schedules in the recipe module but never touched the ingredient-tracking side of it. BeerSmith and BrewFather did that job better, and still do. If there's one recurring complaint I've heard from other V350 owners over the years, it's this exact flow-rate-versus-temperature-band relationship: it's not intuitive on day one, and the manual doesn't detail the underlying mechanism, just the button sequence.
Evaluating a Used Unit
Cosmetic wear is the least of your concerns. Stainless scratches and scuffs with normal use, and you'll almost certainly find surface rust on the gas burner orifices from ambient humidity; compressed air and a brass brush usually clear them. The gas safety valve is a more meaningful wear item and sometimes needs replacement, but here's the complication: the PLC has to be functional to electronically unlock the gas valve for testing, which means you often can't fully verify the gas system until you've already confirmed the controller works. Check that you're getting three keg-derived tuns, the tri-clamp fitting set, the gravity-feed L-tube to the boil kettle, and lids for the mash tun and hot liquor tank — a complete used system should have all of it.
Before powering anything on, open the maintenance door and actually look inside. You're checking for chewed or damaged wiring, rodent or insect nesting material (a shockingly common issue on stands stored in barns or garages), and any scorch marks on the board or its connections that would indicate a past short. Trace the steel plumbing and hose runs to the RIMS tube, the pump, and the bottom dump outlet while you're in there, looking for damage or apparent leaks.
Then power it on. If the PLC boots and displays, enable gas and confirm the burners will actually fire. From there, fill the hot liquor tank, close every valve except the HLT outlet and the mash-tun inlet, and let the lines fill — you may need to crack the bottom dump valve briefly to clear an air lock. Confirm the pump moves water from the HLT into the mash tun cleanly, and watch every valve, the RIMS tube, and the pump body for weeping or active leaks.
The RIMS-specific test comes next. Shut off that transfer, reconfigure the valves so the mash inlet stays open, the boil-kettle gravity feed stays closed, and the bottom mash-tun return opens into the RIMS loop, then start the pump. Set a target roughly 10–15°F (5.5–8.5°C) above ambient water temperature and watch two things: whether the displayed temperature reading tracks plausibly with what you'd expect, and whether the RIMS element is actually firing and raising it. You want steady flow into the top of the mash tun with a little pooling, and a climb of roughly 1–2°F (0.5–1°C) per minute. If you're seeing that, the heating system is fundamentally sound. If the PLC won't power on or complete this sequence at all, start with the coin-cell swap and the license-key decode before assuming anything is structurally wrong. Dead batteries have a way of looking like dead systems.
Bringing One Back to Life
Assuming the electronics check out, I'd replace every gasket and section of flexible tubing before doing anything else. They're cheap, they're the most likely source of small leaks, and you have no idea how old the existing ones actually are.
For the initial clean, fill both the mash tun and hot liquor tank, heat to roughly 160°F (71°C), and dose with PBW (Powdered Brewery Wash) at label rates. Let the HLT sit, but actively circulate the hot PBW solution through the RIMS loop for at least an hour — the RIMS element should hold that temperature without much drift, which is itself a useful confirmation that the heating system is stable under sustained load. The condition of that circulated water will tell you a lot about how well the previous owner maintained the system. Drain that batch into the boil kettle to soak, then reroute the (now-cooled) HLT water back through the same mash-tun/pump/RIMS loop and watch the ramp back up to 160°F. This second heating curve is diagnostic: if it's noticeably slower than expected, or the temperature won't climb at all, you're likely looking at a degraded RIMS element or a compromised wire — check the latter only with the system fully unplugged. Re-inspect for leaks that the cleaning cycle may have exposed; sustained hot circulation tends to reveal what a quick static test misses.
If you're dealing with beer stone, a hard, chalky buildup that's mostly calcium oxalate and precipitated proteins from years of wort contact, a cold rinse followed by a full circulated cycle of a dedicated beer-stone remover or acid-based descaler will handle the plumbing and RIMS tube. The boil kettle usually needs manual soaking and scrubbing, since stone tends to bake onto the kettle wall in a way circulation won't touch. I had commercial-grade chemical access for this in my meadery days; homebrewers should expect to research and follow label rates carefully rather than improvise concentrations. Whatever scrub pad you use, make sure it's rated safe for stainless. An aggressive pad will scratch through the passive chromium oxide layer that keeps stainless from corroding, which defeats the entire point of the material. Scotch-Brite's blue "stainless-safe" pads are the standard recommendation.
Finish with a cold circulated cycle of Star San or SaniClean, and the system should be sanitary and ready to brew.
The V350 is thirteen years into my ownership and still the most technically satisfying system I've brewed on. Sabco going quiet doesn't change any of the engineering that made it good in the first place — it just means the maintenance is entirely on you now. That's not actually a bad trade.
Best of luck out there. And if your PLC is throwing a license error after a battery swap, the decode widget above will get you the rest of the way.