Cereal Mashing Adjuncts
Unlocking Starch That Doesn't Want to Be Unlocked

The Mash Steps for Modern Malt article was about malted kernels that had already done most of the work for you, modified past the point where your rest schedule barely matters. This one is about the opposite problem. Adjuncts such as raw corn, raw rice, raw wheat, and the rest of the unmalted grain family haven't done any of the work. They haven't been steeped, germinated, or kilned. Their starch is still locked inside a granule structure that your amylase enzymes cannot touch, no matter how long you hold them at 152°F (67°C) or how patient you are. Mashing them the way you mash malt doesn't convert them. It just wets them.
Cereal mashing is the fix, and it's worth understanding at the mechanism level rather than as a recipe step you copy from a competition-winning cream ale, because the temperature that matters isn't your usual conversion range. It's a completely different threshold that depends on which grain you're using, and getting it wrong doesn't give you a slightly worse beer. It gives you a hazy, under-attenuated one with a stuck lauter and a layer of unconverted starch sitting at the bottom of your kettle, wondering what it did wrong.
Using raw adjuncts has become much more popular in the craft beer scene, and even professionals struggle with them. There is an attraction to using local grains or heirloom grains that are not available in processed forms where they are pre-gelatinized. If you really want to make a blue corn lager from an heirloom corn, you will need to mill it and do a cereal mash.
Warning: This is another long post that goes into detail about what is happening with a cereal mash and why it is necessary to look at each adjunct individually. My apologies, sort of!
What "unmalted" means
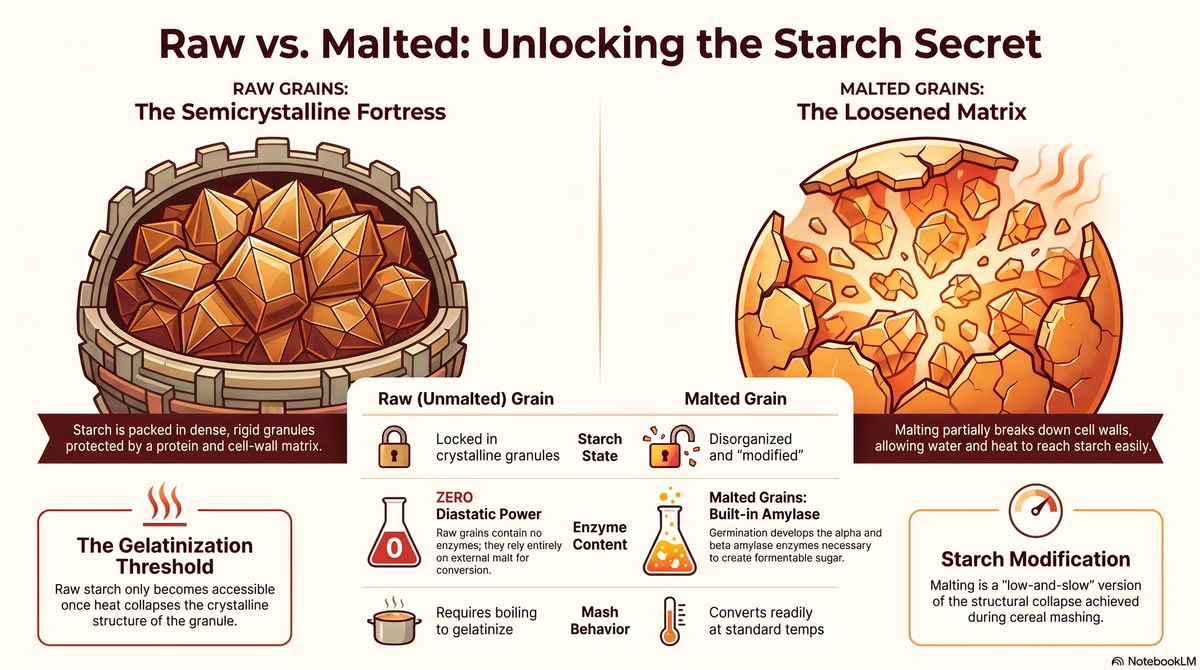
Malting does two things to a kernel, and homebrewers tend to only think about the second one. It builds enzymes: the alpha and beta amylase that will eventually break starch chains into fermentable sugar, and it partially breaks down the endosperm's cell walls and protein matrix, loosening the whole structure so that when you finally mash the grain, water and heat can get at the starch granules without much resistance. That second part is modification, and it's the part step-mash schedules were originally built to compensate for on less-modified malt.
Raw, unmalted grain has done neither of these. There's no diastatic power in a bag of corn grits or a scoop of raw wheat berries. Whatever enzyme conversion happens to that grain in your mash tun has to come entirely from somewhere else, almost always a base malt with enzyme reserves to spare. And the starch itself is still packed into dense, semicrystalline granules, the way it was in the living plant, protected by a matrix of protein and cell wall material that a 60-minute infusion mash barely dents. Of course, you can add exogenous enzymes, but those can be difficult to find as a homebrewer, and you need the right enzymes that won’t immediately degrade in the mash tun.
Starch granules are not simply sugar waiting to be extracted. Each granule is built from two polymers, amylose and amylopectin, arranged in alternating crystalline and amorphous layers. Think of it less like a sponge and more like a tightly wound spool of thread with sections cross-linked into a rigid lattice. Amylase enzymes need access to the chain ends and glycosidic bonds inside that structure, and in its native granular form, that structure simply won't let them in. Water can penetrate the amorphous regions a little, which is why a raw-grain mash isn't inert. It'll absorb liquid, swell slightly, maybe start to feel a bit less dry. But the crystalline regions holding the whole thing together stay intact until you apply real heat, and "real heat" for most of these grains is well above your usual mash temperatures.
That threshold is gelatinization: the point where the crystalline structure of the starch granule collapses, the granule swells dramatically as it absorbs water, and the starch chains become disorganized and soluble enough for amylase actually to reach them. Below gelatinization temperature, you can hold raw corn at 152°F (67°C) for six hours, and you will get nothing for your trouble. No fermentable sugar and lots of haze precursors. Above it, the same starch converts about as readily as malt starch does. The whole discipline of cereal mashing exists to cross that threshold deliberately, on purpose, before blending the gelatinized mass back into a mash that has enough spare enzyme to do the actual converting.
The threshold moves depending on the specific grain
The threshold varies by species, variety, and growing conditions, so knowing these ranges helps you choose grains that suit your brewing goals and builds confidence in your process.
Corn starch gelatinizes across a range commonly cited around 62–72°C (144–162°F), though practical brewing sources push the working target closer to a full boil to liquefy grits in a reasonable time. Rice runs higher still, with onset around 68°C (154°F) and a range extending up toward 78°C (172°F). Wheat is the outlier on the low end, where its gelatinization range sits considerably lower, commonly cited around 53–64°C (127–147°F), which puts it close to, or even inside, the temperature range you're already using for saccharification with malted barley. Sorghum behaves more like corn and rice, with a range running roughly 68–78°C (154–172°F), which is part of why it shows up as a cereal-mash adjunct in gluten-free brewing rather than a direct-add one. Oats and rye sit in the middle, generally overlapping the low end of the corn/rice range.
That spread is the whole reason a single mash-in temperature doesn't work for "raw grains" as a category. Wheat's gelatinization window overlapping with normal mash temperatures is precisely why raw wheat is the one grain on this list that experienced brewers will sometimes mash directly, skipping a separate cereal step entirely — not because wheat doesn't need heat to gelatinize, but because the heat it needs is heat you were already applying. Corn and rice are a different story. Their gelatinization windows sit meaningfully above where you'd ever want to hold a saccharification rest, which means there's no single-infusion mash temperature that both gelatinizes the adjunct and preserves your enzymes. You have to gelatinize first, separately, then bring the temperature back down into range before the enzymes ever meet the starch.
Corn: grits, milled, and why a boil is necessary
Corn is the classic American cereal-mash adjunct, showing up in cream ales, classic American pilsners, and the pre-Prohibition lager tradition it descends from, and it earns that history by tolerating the process well. Corn grits, coarsely milled dent or flint corn, not the flaked maize you'd buy for a direct-add adjunct, need real heat to gelatinize completely, and in practice that means bringing the cereal mash to a full boil and holding it there, not just touching the upper end of corn's gelatinization range and hoping. Part of this is granule structure, part of it is that a thick corn slurry behaves like a rapidly thickening starch paste as it gelatinizes, and getting full conversion of every granule through that mass benefits from the extra margin a boil provides rather than a rest that's technically above onset temperature but not by much.
Degermination matters here more than most homebrew recipes mention. Corn germ carries a disproportionate share of the kernel's lipid content, and lipids in your mash and boil are a slow-motion flavor liability. They contribute to staling character over the life of the beer and can interfere with head retention. Corn grits sold for brewing are typically degermed for this reason; if you're milling your own from whole dent corn, you're taking on that tradeoff deliberately; know what you are and are not gaining by choosing raw over pre-processed at that point.
Flavor-wise, corn's contribution is genuinely mild, and the folk narrative "corn beer" carries baggage about cheap, thin, and characterless. Well-executed corn adjunct beers aren't corn-flavored so much as they're lighter-bodied and cleaner than an all-malt equivalent, with maybe a faint sweetness at moderate usage rates. That lightening effect is a real style tool, not a defect, which is why American lager tradition leaned on it rather than stumbling into it by accident.
Rice: the highest bar, the lowest flavor footprint
Rice asks for the same treatment as corn, a fine mill down to something resembling coarse flour or grits, then a full gelatinization boil rather than a rest near the low end of its range. Still, its gelatinization window runs higher than corn's on average, which makes the boil step even less optional. Broken rice, milled fine, is standard practice here; whole rice grains resist full gelatinization within a reasonable cereal-mash timeframe in a way that milled rice doesn't, simply because milling increases surface area and lets water and heat penetrate the granule structure faster.
Where rice earns its keep is in how little it asks for in return. Its flavor contribution is close to neutral. Brewers generally describe it as adding almost nothing perceptible beyond a further lightening of body and a crisper finish, which is exactly why it became the signature adjunct for a certain style of clean, highly attenuated American lager. If corn nudges a beer toward a faint sweetness, rice mostly just gets out of the way. That makes it the right tool when the goal is dilution of malt character and improved physical stability, less protein and polyphenol per unit of extract, without introducing a flavor signature you then have to account for. And if you opt for fragrant rices, such as Jasmine, you can bring a hint of that flavor and aroma into your beer if you don’t bury it in hops.
I have good luck using dry store bought rice, crushing it to grits and cooking it until I have something the texture of rice pudding, and tossing that into main mash. I know a few homebrewers that use boxed instant rice which is pre-cooked and dehydrated. There are a lot of options here.
Wheat: the grain that almost mashes itself
Raw wheat is the interesting exception on this list, and it's worth spending real time on why, because the mechanism explains something that otherwise looks like an inconsistency in brewing literature. Some sources treat raw wheat as a cereal-mash grain, others treat it as something you can pitch directly into a normal infusion mash.
Both are right, depending on what temperature you're actually mashing at. Wheat's gelatinization range sits low enough that a mash held in the upper end of a typical saccharification rest at 156–158°F (69–70°C) is doing double duty, gelatinizing the raw wheat starch and converting the malt starch more or less simultaneously. This is genuinely different physics from corn and rice, where the gap between "converts malt" and "gelatinizes adjunct" is 15–20°F (8–11°C) or more. With wheat, that gap can be small enough to ignore, which is exactly why traditions like lambic brewing get away with a substantial proportion of raw wheat without a dedicated cereal-mash step. The base mash schedule, run hot enough and long enough, does the gelatinizing on the way to the converting.
That doesn't mean raw wheat is free of complications, and this is where the caution has to live. Wheat, malted or not, is high in beta-glucans. These long-chain polysaccharides don't convert to fermentable sugar and instead thicken your mash, sometimes dramatically, turning what should be a fluid grain bed into something with the consistency of wet oatmeal. A stuck lauter on a wheat-heavy grain bill is beta-glucan gum, not a milling problem; be careful second-guessing your crush. Commercial brewers lean on beta-glucanase enzyme additions or a dedicated low-temperature rest (in the neighborhood of 95–113°F/35–45°C) specifically to manage this before ramping toward conversion temperatures; homebrewers working with meaningful proportions of raw wheat should treat that rest, or a rice-hull addition to physically open up the grain bed, as cheap insurance rather than an optional flourish. You can also do the beta-glucan rest only on the wheat addition with a small portion of milled malt, and then blend it into your main mash for additional conversion.
A side note: It would be convenient if you could simply use whole wheat flour as an alternative. But there is an issue with staling and LOX. In most cases, you have no control over the freshness of the wheat, the heat generated during fine milling, and the oxygen exposure through that process, germ removal, packaging, and transportation. If you freshly mill your raw wheat, you can smell it side by side with whole wheat flour and immediately tell the difference. It is also the reason many craft bakeries either buy freshly milled flour each week or mill the grains themselves. It makes a tremendous difference in the end product.
The rest of the raw-grain family
Sorghum behaves like a taller, gluten-free cousin of corn — a gelatinization range running into the high 60s and 70s Celsius that puts it firmly in cereal-mash territory, which is exactly why it shows up as a serious adjunct in gluten-free brewing rather than a direct-add convenience grain. Its whole appeal in that context is that it isn't wheat or barley, and the tradeoff for that is accepting the same boil-and-blend discipline corn and rice require.
Raw oats and raw rye sit closer to wheat's end of the spectrum in gelatinization temperature, which tempts brewers into treating them the same way — mash them directly, skip the cereal step. The temperature math often supports that. What doesn't is the same beta-glucan and pentosan gumminess problem wheat carries, in some cases worse, which is the real reason raw oats have a reputation for turning a mash into cement if you're not careful with proportions, rest schedule, and grain bed management. The gelatinization threshold and the lautering-viscosity threshold are two separate problems that happen to show up together in this grain family, and it's worth keeping them mentally separate even when your process addresses them at the same time.
The shortcut that already exists, and when it's the right call
None of this is a mandate to mill your own corn or hand-process raw rice, and it's worth saying plainly. For the overwhelming majority of the grains discussed above, a pre-gelatinized commercial product already exists, and reaching for it isn't a compromise so much as a legitimate process choice.
Flaked maize, flaked rice, flaked wheat, flaked barley, flaked oats, and torrified wheat have all already crossed the gelatinization threshold before they ever reach you, through mechanical rather than in-mash processing utilizing steam conditioning followed by rolling between pressure rollers for flaked products, or rapid heating that causes the kernel to pop and expand for torrified grain. Either process ruptures the starch granule structure the same way your cereal-mash boil does, just at an industrial scale with better process control than a homebrew kettle offers. Malted wheat and malted oats accomplish the same thing through the malting process itself, which is functionally a low-and-slow version of the same gelatinization-and-modification story that applies to malted barley. Any of these can go directly into your main mash, at your normal strike temperature, with no separate cereal step at all — that's the entire point of the processing they've already undergone.
So why cereal mash raw grain at all when the flaked equivalent exists on the shelf? A few honest reasons, none of which is "it's objectively better in every case." Availability is real: heirloom corn varieties, specific rice cultivars, or a particular raw wheat lot from a local grower often simply don't exist in flaked form, and if the grain itself is the point, cereal mashing is the only path to using it. Freshness and lipid stability are a real factor too. Flaked grains carry more exposed surface area than the intact kernel, which means more exposed lipid, and a bag of flaked oats or maize that's spent months in a warehouse and another few on a shelf is further along a slow staling curve than grain you milled and gelatinized yourself an hour before mash-in. And for some brewers, the reason is simply intellectual and procedural through process control, or the satisfaction of understanding your ingredients from a genuinely raw state rather than trusting someone else's rollers. That's a legitimate reason to do it. It's just not a flavor or yield argument, and it shouldn't be dressed up as one.
Running a cereal mash without fighting it
The mechanics, once you understand the temperature logic above, are less complicated than the reputation suggests. Mill the raw grain very fine, closer to grits or coarse flour than a standard malt crush, since surface area is what lets heat and water penetrate the granule in a reasonable timeframe. Dough it in with a modest proportion of your base malt, typically 10–20% of the cereal mash's total grist by weight. This isn't optional seasoning; it's there to provide a small initial charge of enzyme and, more importantly, to thin the mash and reduce scorching risk as you ramp toward a boil, since a straight raw-starch-and-water slurry left alone over direct heat will burn onto the bottom of a kettle with startling efficiency. Of course, make sure to account for both the total water and total grist in the process.
From there, bring the cereal mash up gradually rather than slamming it straight to boiling. A brief rest somewhere in the 148–155°F (64–68°C) range on the way up gives the small malt addition a chance to liquefy and thin the mash slightly before the starch fully gelatinizes and the whole mixture thickens into paste. Skip this, and you're more likely to scorch a thick, half-gelatinized slurry directly onto your kettle bottom. Once past that point, take it to a full rolling boil and hold it there for roughly 20–30 minutes. This is the step that actually crosses the gelatinization threshold for corn, rice, and sorghum with margin to spare, and it's not a step to rush or shorten on the theory that you're already above the published onset temperature. Full conversion of a whole batch of starch granules, not just the easiest ones, is what that hold time buys you.
The blend-back is the part that trips people up procedurally, not chemically. You're combining a boiling-hot, fully gelatinized cereal mash with your room-temperature-adjacent main mash, and the goal is a combined temperature that lands in your normal saccharification range — not scorching-hot, not so cool that you've diluted your way out of an effective rest. This is a strike-water-style calculation, not a guess: know the volume and temperature of both mashes going in, and either work the math in advance or add the cereal mash gradually while monitoring the combined temperature, adjusting with a little extra hot or cold liquor as needed to land where you want to be. Once combined, the main mash's enzyme reserve, which needs a genuine surplus, since raw adjunct dilutes total diastatic power without contributing any of its own, takes over the actual conversion, exactly as it would with an all-malt grist. Still, now there's a substantially larger and previously inaccessible pool of starch for it to work through.
Trading the boil for pressure or Sous Vide
A stovetop boil isn't the only way to cross a gelatinization threshold, and it's worth talking about the two common substitutes homebrewers reach for, because they solve the problem in genuinely different ways and deserve different levels of trust. I’ve seen discussion in the homebrew community that praises both sous-vide and pressure cookers for specialized mash steps.
A pressure cooker — including multicookers like an Instant Pot — gets you there faster because it changes the physics, not just the convenience. Water boils at a fixed temperature only at a fixed pressure; raise the pressure and the boiling point rises with it. A standard stovetop pressure cooker running around 15 psi holds water at roughly 250°F (121°C), and a consumer multicooker on its high-pressure setting typically runs somewhat lower, in the neighborhood of 230–235°F (110–113°C) at 10–12 psi. Either number sits well above every gelatinization threshold discussed above, corn and rice included, with real margin to spare. That margin is the whole appeal: it doesn't just gelatinize the starch, it does so faster and more completely than an atmospheric boil, because you've pushed the medium's temperature past what boiling water can reach at sea level in the first place.
In practice, this means a cereal mash that would want a 20–30 minute boil on the stove can often be fully gelatinized in less time under pressure, with less risk of scorching on the bottom of the vessel since the cooking liquid itself is hotter. The sealed environment distributes heat more evenly than a kettle over a direct flame. The tradeoff is that you're now working blind. You can't stir, taste, or visually check progress mid-cycle the way you can with an open boil, so it pays to build in a small margin on cook time rather than trying to hit the exact minimum, and to let pressure release naturally rather than forcing a quick release into a still-thickening starch slurry, which can spit hot paste through the valve. Otherwise the logic is similar to a stovetop cereal mash: mill fine, dough in with a modest portion of base malt to thin the mash, maybe use a bit more strike water than normal to reduce scorching risk, then bring the cooled result back into your main mash and let the base mash's enzyme reserve do the actual converting. If the pressure-cooked cereal is too gluey, let it cool to standard mash temps and add a handful of crushed base malt and stir vigorously. You might also need to add a small amount of strike water. The malt enzymes will liquify the gel!
Sous vide circulators are a different case, and worth being genuinely cautious about rather than treating as a drop-in substitute for either of the above. A circulator's entire mode of operation depends on immersing a sealed bag in a large, actively circulated water bath so that heat transfers evenly around the whole surface of the bag. Applied to a cereal mash, that means the raw grain and its liquid need to be vacuum-sealed or otherwise fully sealed into a bag, with enough water inside that bag to actually cover and hydrate the grain, not a thin slurry pressed flat against the bag wall, which will gelatinize unevenly and leave dry or under-hydrated pockets of starch that never cross threshold no matter how long the bath runs. Get that ratio wrong, and you've built a mash that looks converted on the outside of the mass and isn't in the middle of it, which is a worse failure mode than a slightly under-boiled stovetop cereal mash because it's much harder to detect before you've already blended it into your main mash. It’s worth noting that despite homebrewers putting the immersion circulator directly into the mash, there is a high risk of scorching on the circulator elements and breaking the warranty.
The other real constraint is temperature ceiling. Most consumer circulators are rated well below boiling, commonly capped somewhere in the 195–210°F (90–99°C) range, which comfortably clears corn, rice, and sorghum's gelatinization windows with margin, but removes the option of pushing to a full boil if you want it. That's usually fine, since none of these grains need boiling-water temperatures specifically, just temperatures above their gelatinization onset held long enough for full conversion of the batch, and a sous vide bath actually offers tighter, more even temperature control than a rolling boil does. But it does mean sous vide cereal mashing rewards patience over brute force. A longer hold at a controlled, fully-immersed temperature rather than a short, hot boil, and it only works at all if the bagging step is done properly. If you can't get the grain fully sealed with sufficient water for real immersion, skip the circulator and go back to a pot or a pressure cooker instead; a sous vide cereal mash done with an underfilled or poorly sealed bag is a way to fool yourself into thinking you gelatinized grain that you didn't.
What "fermentability unlocked" actually means.
It's worth closing on the mechanism, because it's easy to treat cereal mashing as a hoop to jump through rather than understanding what it's actually buying you. Before gelatinization, the starch in a raw grain is chemically identical to the starch in malted grain. The same glucose polymers, same amylose-to-amylopectin ratio in the ballpark for a given species, but physically inaccessible, locked inside a crystalline granule structure that enzymes can't penetrate. That starch isn't fermentable in any practical sense. Left ungelatinized and pushed through a mash anyway, it either passes through largely intact, contributing haze, a chalky or raw-grain texture, and a beer that underperforms its calculated gravity because a meaningful fraction of the "extract" you counted on was never actually extracted, or it partially swells without properly gelatinizing and creates a starch haze that won't clear no matter how long you cold-crash.
Gelatinization is the step that converts "chemically present" into "physically available." Once the granule structure collapses and the starch chains disperse into solution, amylase enzymes can do to that starch exactly what they do to malt starch: break it down into the mix of fermentable sugars and residual dextrins that define your final gravity and mouthfeel. The cereal mash isn't creating the flavor and fermentability; they were always latent in the grain. The cereal mash is just the step that makes them reachable, and skipping it doesn't make the starch disappear; it just means that starch shows up in your finished beer as haze and a stuck gravity reading instead of as alcohol and body.
That's the honest case for cereal mashing raw grain: not that it's required for every recipe, not that flaked adjuncts are a lesser choice, but that if you're committed to using true raw, unmalted starch for authenticity, for availability, for the satisfaction of doing it the harder way. The gelatinization threshold isn't negotiable, and understanding where that threshold sits for your particular grain is the difference between unlocking that starch and just getting it wet.
Sources
Peer-reviewed / academic
- Briggs, D.E., Boulton, C.A., Brookes, P.A., & Stevens, R. (2004). Brewing: Science and Practice. Woodhead Publishing / CRC Press. — the standard reference textbook; source of the wheat pre-soak guidance and the enzyme-inactivation and gelatinization-temperature framework used throughout the piece.
- Palmer, G.H. (1989), as cited in MacGregor, A.W. & Fincher, G.B. (1993), and reproduced in ScienceDirect Topics: Gelatinization — comparative maize (70–80°C) vs. wheat (52–54°C) gelatinization ranges; useful for the "wheat is the outlier" claim specifically. [sciencedirect.com/topics/immunology-and-microbiology/gelatinization]
- Correia, P.R. et al. (2021). "Brewing with Starchy Adjuncts: Its Influence on the Sensory and Nutritional Properties of Beer." Foods (MDPI). — ties gelatinization temperature directly to whether an adjunct needs a separate cereal-mash boil vs. can go straight into the main mash. [mdpi.com/2304-8158/10/8/1726]
- Goode, D. et al. "Gelatinization Properties of Different Cereals and Pseudocereals" (ResearchGate/conference paper) — direct experimental gelatinization-temperature data for rice adjuncts and malt, tied to brewhouse yield outcomes.
Industry / trade reference
- Brew Your Own — "Adjuncts Explained" (byo.com/articles/adjuncts-explained) — good secondary source for the corn/rice/wheat/unmalted-barley temperature bands and flaked-vs-torrified processing distinction.
- BeerSmith Home Brewing Blog — "Cereal Mash Steps for All Grain Beer Brewing" — solid for the flaked/torrified-already-gelatinized claim specifically.
- Winning Homebrew — "Cereal Mash: Brewing with Adjuncts" — good tabulated gelatinization ranges across barley, wheat, rye, oats, corn, rice; also source for the 10–20% base-malt dough-in ratio.
- Milk the Funk Wiki — "Cereal Mashing" — useful specifically for the raw-wheat pre-soak/beta-glucan caution and lambic-tradition context.
- Brewing Forward Wiki — "Adjuncts" — good for the 70–75°C cereal-mash rest convention and torrified-cereal yield notes.
- beer-brewing.com — "Classification of Cereal Adjuncts" — useful specifically for the wheat foam-stability/tannin-absence claims tied to unmalted wheat.