Introduction to Mead Making
I've seen so much bad advice given to first-time mead makers that I feel like I should offer a primer that is more respectful, open, and encouraging.

I've also been guilty of the "this is the right way" mentality — expecting someone to dive in, research, and plan before making something. I remember all of the questions and seeking out advice when I started brewing and making mead. So here goes.
What Is Mead, Exactly?
Mead is both simple and very complex. By definition, it is honey, water, and yeast fermented to create a wine-like finished product.
For millennia, humans have fermented honey — long enough that we were almost certainly doing it by accident before we were doing it on purpose. A fallen log, a flooded bee cache, wild yeast doing what wild yeast does. That's all it takes.
Today's mead makers have borrowed tools and techniques from the worlds of home winemaking and homebrewing: yeast selection, temperature control during fermentation, clarifying agents, and nutrient additions. We will get to all of that. But first, let's make some mead.
The Main Styles
You will hear a lot of names thrown around. Here's a quick map so they don't trip you up:
- Traditional mead — honey, water, and yeast. Nothing else. It is what we're making today, and it is the truest test of your honey and your process.
- Melomel — mead made with fruit.
- Metheglin — mead made with spices or herbs.
- Cyser — mead made with apple juice in place of, or alongside, water.
- Bochet — mead made with caramelized honey, which is a gorgeous rabbit hole I've written about separately and absolutely should not be your first batch.
We're starting with traditional for the same reason you learn to drive in an empty parking lot. Master the fundamental and every variation becomes a small, confident step instead of a leap.
A Myth Worth Killing Early
If you spend any time on brewing forums or the mead corners of Reddit, you will be told — confidently, repeatedly, by well-meaning people — that mead takes a year to be any good, that you just need to "let it age," and that patience cures all sins.
This is half true, which makes it dangerous.
Aging is real and does real things: it integrates flavors and smooths out rough edges. What aging does not do is fix a fermentation that was broken from the start. It will not rescue a batch that fermented too hot. It will not feed yeast that starved halfway through. Time is a finishing tool, not a repair tool.
The flavor of your finished mead is largely decided in the first two weeks. That's what everything in this guide is about.
The Ingredients and Gear
Here's the full shopping list for Batch One. It is short on purpose. Double it if you want to do Batch Two!
Ingredients
- A 1-gallon jug of spring water — this will double as your fermenter, so don't throw the jug away.
- 2 to 3 pounds of good, raw, unfiltered honey — a local beekeeper is ideal. Much of the grocery store honey is over-filtered and lacks character, but work with what you can find. The honey is the flavor, so it's the one ingredient worth caring about.
- One packet of wine yeast — I recommend Lalvin 71B-1122. It's forgiving, ferments clean, and softens some of mead's naturally harsh notes. Get something that doesn't require cold fermentation. Your local homebrew shop will have it, or order online.
Basic Equipment
- A kettle or saucepan for warming water
- A clean bowl for hydrating the yeast
- A small piece of aluminum foil
- A tub or bucket to set the fermenter in, just in case fermentation gets enthusiastic and overflows
That's it for Batch One. No airlock, no special sanitizer, no hydrometer required — though we'll talk about adding a hydrometer in Batch Two, because it unlocks some genuinely useful information.
A note on sanitation: We're not going for surgical sterility here. Just wash everything that will touch the mead carefully with hot soapy water and rinse well. Your goal is to tilt the odds in your yeast's favor, not to build a clean room.
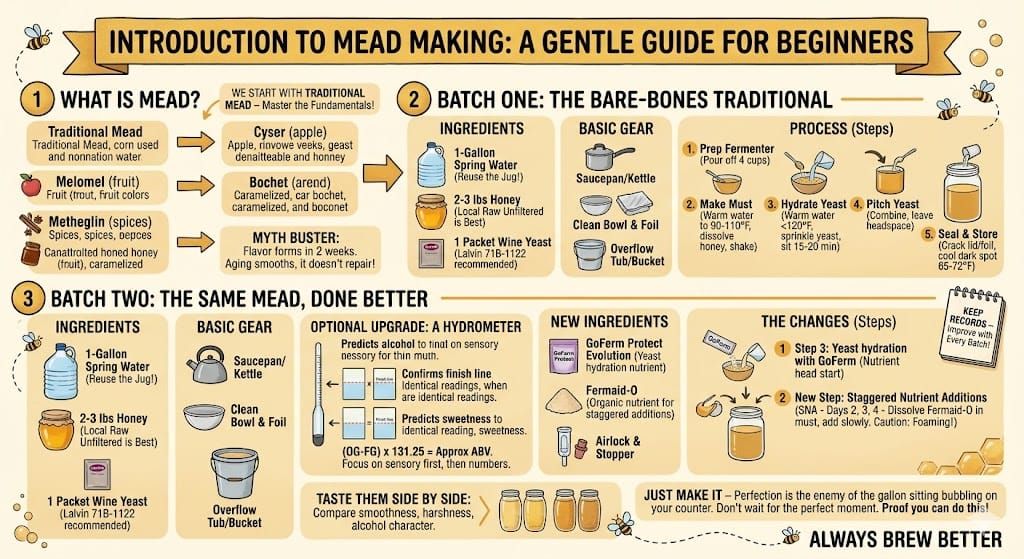
Batch One: The Bare-Bones Traditional
This is a deliberate starting point. No nutrients, no airlock, no measurement tools. Just honey, water, yeast, and you. The goal is to make something real, see how fermentation works, and taste what mead is before we start optimizing it.
(My experienced maker friends are already composing their strongly-worded responses. Hold on — I'll address you in a moment.)
The Steps
1. Prep your fermenter.
Pour about 4 cups of the spring water out of the jug and into your kettle or pan. You'll use this water to dissolve the honey. Set the original jug — now about 3/4 full — aside. This is your fermenter.
2. Make the must.
"Must" is the name for your unfermented honey-water mixture. Warm the water in your kettle to between 90–110°F — warm enough to dissolve honey, not hot enough to cook it. Pour the honey into the spring water jug and stir or swirl to incorporate. If the honey is crystallized, warm it in a bowl of hot water first to loosen it up. Pour a cup of the warm water into the empty honey container, swirl to pick up the rest, and add that to the fermenter. Put the lid on firmly and shake to combine. A little honey at the bottom is fine.
3. Hydrate the yeast.
In a clean bowl, pour in about 1½ cups of the remaining warm water. Make sure it's not above 120°F — that will kill the yeast. Sprinkle the yeast packet over the water, give it a gentle stir, and cover the bowl loosely with foil. Let it sit for 15–20 minutes. You should see a little foaming or bubbling, which tells you the yeast is alive and active. Let it cool until it feels close to the same temperature as the fermenter — you don't want to shock the yeast with a big temperature difference when you combine them.
4. Pitch the yeast.
Swirl your yeast solution gently and pour it into the fermenter, leaving about 3 inches of headspace. You may have extra yeast solution — discard it rather than topping up.
5. Seal it up and find it a home.
Cap the fermenter firmly and gently tip it end-over-end a few times to incorporate the yeast. Then place it somewhere cool and dark — a closet, a basement corner, anywhere that stays reasonably stable between 65–72°F. Crack the lid ever so slightly, or lay a loose piece of foil over the opening to let CO₂ escape. Set the whole thing in your tub or bucket as insurance.
What to Expect
Within 24–48 hours, fermentation will kick off visibly: bubbles rising through the must, a foam raft on top, possibly some chunky bits moving up and down with the CO₂. This is completely normal. Leave it alone.
Over the next 3–4 weeks, fermentation will slow and eventually stop. The foam will subside, the must will begin to clear, and sediment will settle at the bottom.
Tasting and finishing: Once things have quieted down for a week or so, taste it. This is where judgment comes in.
- If it's too dry for your taste, add a small amount of honey — dissolve it in a little warm water first — and let it sit another week.
- If it's too sweet, let it ferment for another few weeks and taste again.
You'll notice a rough, hot alcohol note. That's normal for a young mead at 12–13% ABV. Some of that will smooth out with time.
Cold Crash and Package
Once you're happy with the sweetness, put the lid on firmly and move the fermenter to the refrigerator. This encourages the remaining yeast to fall out of suspension, improves clarity, and makes the mead brighter. Leave it there for at least a week. More time doesn't hurt.
When you're ready to bottle, carefully pour or siphon the clear mead into clean, sealable bottles — screw-top wine bottles, flip-top bottles, or even mason jars all work. Pour slowly to leave the sediment behind. If you accidentally stir it up, just return the fermenter to the fridge for a few more days and try again.
Fill the bottles with minimal headspace, seal them, and keep them refrigerated. Because this batch isn't stabilized, cold storage is important — it prevents any remaining yeast from restarting fermentation and creating pressure in the bottles.
Taste it young. Taste it again in a month. Watch what time does to it. That's a real education right there.
Why Are My Experienced Makers Yelling at Me?
I hear you. Let me address the objections, because they're all valid ones.
"You didn't take a hydrometer reading!"
Correct. In Batch One, I want you to focus on the process and the sensory experience, not the numbers. We'll add the hydrometer in Batch Two, where you'll see exactly why it's useful.
"You overpitched the yeast!"
Intentionally. With no added nutrients, using a little extra yeast helps compensate for the lean environment. It's not ideal practice, but it works here.
"Why no airlock?"
The loose foil works fine in this situation, assuming there's adequate headspace in the fermenter. An airlock is a better long-term habit — and we'll add one in Batch Two.
"You didn't use GoFerm or TOSNA!"
Nope. I want you to taste the difference between an unfed and a properly fed fermentation firsthand. That is coming in Batch Two.
"You didn't stabilize with metabisulfite and sorbate!"
That's a longer conversation, and a very important one once you're ready to back-sweeten and package at room temperature. The Mead Stability Manifesto covers this in full when you're ready for it.
The point of Batch One is to get mead in front of you without drowning you in technique. Batch Two is where we take the same ingredients and show you what a little more care produces.
Batch Two: The Same Mead, Done Better
Same honey. Same water. Same yeast. This time, we're adding three things: GoFerm, Fermaid-O, and — optionally but strongly recommended — a hydrometer.
The Optional Upgrade: A Hydrometer
A hydrometer is a simple, inexpensive tool (around $8–12) that measures how much sugar is dissolved in your must. That one measurement unlocks three things that guesswork can't give you:
-
Predicted alcohol. By comparing your reading before fermentation (your Original Gravity, or OG) to your reading when fermentation is done (your Final Gravity, or FG), you can calculate roughly how strong your mead is. The math is simple: (OG − FG) × 131.25 = approximate ABV. An OG of 1.100 finishing at 1.000 gives you about 13% ABV.
-
A reliable finish line. The airlock stopping is not a reliable sign that fermentation is done — CO₂ can escape through seals, or the process may have just slowed. Taking three to five identical gravity readings over several days is the real confirmation that your yeast have finished their work and it's safe to package.
-
Sweetness prediction. A higher FG means more residual sugar remains — a sweeter mead. A FG near 1.000 means the yeast ate nearly everything, producing a dry result. This gives you control over the final character rather than tasting and hoping.
If you choose to use one, take a reading before you pitch the yeast and record it. You're aiming for an OG around 1.095–1.110 for this batch. Then take readings when fermentation appears to slow down, and trust the numbers over the airlock.
Accidentalis Tip: Keep a simple notebook — paper or digital — from Batch Two onward. Record your OG, your nutrient additions, your temperatures, your gravity readings, and your tasting notes. The maker who keeps records improves with every batch. The one who doesn't tends to make the same mistakes for a long time. I'm repeating the importance of measurement on purpose. I feel it is required.
The New Ingredients
Same base ingredients as Batch One, plus:
- GoFerm (sometimes labeled GoFerm Protect Evolution) — a rehydration nutrient for the yeast
- Fermaid-O — an organic yeast nutrient for staggered additions during fermentation
- An airlock and a drilled stopper sized to your fermenter — these replace the loose foil lid. You can also just drill the cap and tightly fit the airlock into that!
What Changes and Why
Step 3 — Yeast hydration with GoFerm:
When hydrating your yeast, add about 2 teaspoons of GoFerm to the warm water first and stir to dissolve before adding the dried yeast. GoFerm loads the yeast with nutrients and minerals during that vulnerable rehydration window, giving them a head start before they hit the sugar-rich, nutrient-poor must. This step alone produces meaningfully healthier yeast.
The staggered nutrient additions (SNA):
The day after you pitch the yeast, place a scant teaspoon of Fermaid-O into a small, clean bowl, add a spoonful of fermenting must to dissolve it, then pour the whole thing into the fermenter. Do this three times total — on days 2, 3, and 4 after pitching.
A word of warning: when Fermaid-O hits actively fermenting must, the dissolved CO₂ in the liquid will rapidly bubble out. Do this over a sink. If you're using a narrow-neck glass jug, be ready — it will foam dramatically. No lid on the fermenter during this step.
This staggered approach gives your yeast the nitrogen and micronutrients they need most during the critical early growth phase. Honey is almost pure sugar and nearly devoid of these things, which is why unfed mead can come out hot, harsh, and sulfury. A well-fed fermentation produces a cleaner, softer result.
Everything else — fermentation monitoring, cold crashing, packaging — proceeds the same as Batch One.
Taste Them Side by Side
This is the whole point of making two batches. Once both are packaged and have had a little time, pour them next to each other and compare. You'll likely notice that Batch Two is smoother, less harsh, and cleaner in its alcohol character. That difference is what GoFerm and Fermaid-O do, and tasting it is worth more than anything I can write about it.
Make up your own mind. Don't let experienced makers — including me — bully you into buying a lot of kit because mead "has to be made our way." If you get the mead-making bug after these two batches, then plan and budget for better gear that will actually serve your process, and start exploring recipes and styles.
When You're Ready to Go Deeper
Once both batches are behind you and you're hooked, here's where to go next:
- Yeast selection — there's a lot more to 71B than "it's beginner-friendly." The Homebrewer's Mead Yeast Master Table covers the main options and what each one brings to the glass.
- Optimizing your nutrient additions — the SNA approach above is a simplified version of two well-developed methods with real science behind them. The full SNA vs. TOSNA comparison is the next stop.
- Stabilizing and back-sweetening — before you ever add honey to a finished mead and bottle it at room temperature, read The Mead Stability Manifesto. The difference between a stable bottle and a pressurized mess in your closet is understanding Delle units.
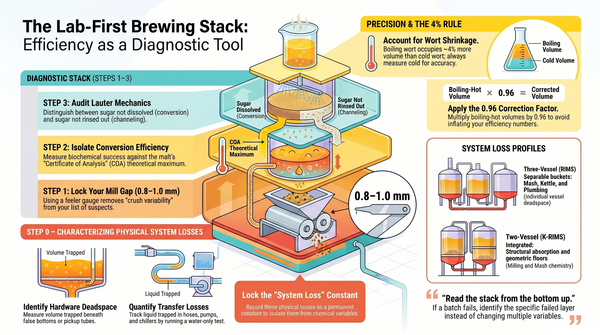
- The bigger picture — everything I do here flows from a single philosophy about measurement and repeatability. The Lab-First Paradigm explains why, and how it turns lucky batches into consistent ones.
Just Make It
The most important thing I know about mead making has nothing to do with gravity readings or nutrient schedules.
Just make the batch.
I've watched more people talk themselves out of mead than I've ever watched fail at it. They research and price out equipment and wait for the perfect honey and the perfect free weekend, and the batch never happens. Your first mead will not be your best mead. It's not supposed to be. It's supposed to prove to you that you can do this — that it's real and drinkable and yours.
Perfection is the enemy of the gallon sitting bubbling on your counter. Don't let it win.
Always brew better.