Walkthrough - Bru’n Water Subscriber Edition, V 5.3
Overview of the Bru'n Water Spreadsheet Subscriber Edition, V 5.3, a major update released in July 2018.

The Bru’n Water Spreadsheet is a tool to help manage your mash and water chemistry in your brewery. Over the years, Martin Brungard has made many refinements to the spreadsheet and incorporated highly detailed features. While the spreadsheet and water chemistry can be daunting, once you understand the basics and use the sheet a few times, it becomes straightforward. Do not be intimidated, take the walkthrough!
As a subscriber to Bru’n Water Spreadsheet, I received this edition of the spreadsheet at the end of July 2018. It takes Martin Brungard time to notify everyone, so be patient. Version 5.3 represents a significant update and warrants a new top-down walkthrough, given many changes. Warning, this post will be lengthy! If you are a free version user, you will see how much more flexibility and detail you can obtain by becoming a subscriber/donor.
I am an enthusiastic Bru’n Water user, not an employee. I believe that you will make better beer with a key understanding of mash chemistry, and Bru’n Water is, in my opinion, simply the very best tool for mash chemistry stoichiometry and mash pH estimation. I highly encourage you to visit https://sites.google.com/site/brunwater/ and make a donation to get the Subscriber Edition.
Why Mash Chemistry?

Beer is mostly water, and water’s constituent ions (anions and cations) have a significant influence on flavor and mouthfeel perceptions in the finished beer. In addition, proper mash pH ensures efficient conversion of starches to sugars, minimizes tannin (polyphenol) extraction, which may influence astringency, and affects malt flavor. Beer mashing is a system of organic chemical reactions influenced by the grain bill, mash pH management, and water (or ion content). We are seeking an optimum that maximizes good flavors and reduces or eliminates off-flavors, off-aromas, and undesirable mouthfeel, which may vary depending on the beer style you are brewing.

Historically, regional beer styles likely evolved from the local water sources; for example, pale hoppy pilsners worked well with the very soft water from Pilz, and darker beers worked naturally with moderately mineral-hard or alkaline water sources. There are always exceptions. Be aware that many regional water profiles are unbalanced and do not come from a rational brewer's perspective. Use a reliable source.
I know many brewers who balk at my recommendation to use a blank slate of Reverse Osmosis (Ro) or Distilled, De-ionized (DI) water for liquor, as brewing with local water supplies will force the brewer to learn to explore styles that best suit their water. My water sucks, with tremendously high sodium and bicarbonate levels, and I struggled for several years to figure this out. I recommend skipping that frustrating right of passage, but it is a hallmark of a good brewer to find what styles best fit their local water.
I brew exclusively with Reverse Osmosis water at home. I have a high-efficiency, high-flow-rate system set to 1:1 exchange: a gallon of good water for a gallon of brine. I capture the very salty alkaline rejection water in a bin and use it to water plants (those that love alkalinity anyway) and for cleaning. Even with 96% filter efficiency, I get a tiny bit of residual ions that must be augmented with calcium, chloride, and sulfate for brewing. Because the alkalinity of my water is so low, I use far less acid than someone with moderate alkalinity, since the RA (buffering capacity) is very low. I recommend a large carbon block pre-filter to avoid chlorine poisoning your RO stages.
Many brewers have great water for a broad spectrum of beers. Some will blend their existing water to dilute alkalinity or other -ion levels to their preference. How you approach this is a personal choice, and you should consider your tolerance for wastewater, investment in a filter system, and the kit needed to measure tiny salt amounts against the expected results.
Sanitation chemistry from your water source must be removed! Most public water providers use chlorine or chloramines to deliver safe and contamination-free drinking water to your home. Chlorine and chloramines are safe for human consumption at the regulated dosing rates; however, all chlorine chemistry could ruin your beer in the mash, boil, or fermenter.
This is easily accomplished by using 1 Campden tablet (Sodium Metabisulfite) per 20 gallons, which will rapidly dechlorinate the water. Activated Charcoal filters will work for chlorine at a slow flow rate, but the contact times for chloramines require a painfully slow flow, and may still break through the pre-filter. A typical off-flavor in homebrew competitions is the presence of chlorophenols, most often attributed to exposure to chlorine/chlorinated compounds or to contamination with spoilage bacteria. It can bring medicinal, plastic, or band-aid-like off-flavors.
Bru'n Water allows you to input your source water report, grain bill, and generate mash pH estimates, as well as make educated additions of mineral salts, acids, and bases, to optimize your desired flavor and mash pH contributions. It is not automated, but it is a simple matter to make small changes to match a target profile.
You can use this spreadsheet without using a pH meter. To do so is to put a lot of confidence in the Mash pH Estimate, without a confirmation measurement. While I highly recommend using a high-quality pH meter, BWS will get you very close to that optimum mash pH and mineral content. It certainly is better than just ignoring water chemistry altogether!
All pH values are given at room temperature.
The Spreadsheet

Bru’n Water is a Microsoft Excel spreadsheet and now uses macros, which may cause a warning box on opening. Make sure to click “Enable Macros." If you do not have Excel, consider LibreOffice as a free alternative. If in Excel, you will want to click on the Formulas tab and check the “Enable iterative calculation” box.
For LibreOffice, go to Tools, Options, LibreOffice Calc, Calculations, and check the “Iterative References” box. These actions prevent a warning box from appearing when opening the spreadsheet and ensure proper functionality.
This demonstration uses the Mac version of Office, and the screenshots will look a little different from those in Windows. The spreadsheet opens in Compatibility mode. Upon opening, I suggest you “Save As” immediately as an “Excel Macro-Enabled Workbook (.xmls)” to work fully native and avoid potential macro issues with compatibility mode. You will still need to enable macros each time you open the spreadsheet.

Otherwise, we will assume a basic understanding of spreadsheets.
Bru’n Water’s workflow is tab-driven. At the bottom of the page, you will see the following tabs, which are iteratively used to create a mash water solution:
0. Instructions
1. Water Report Input
2. Sparge Acidification
3. Grain Bill Input
4. Water Adjustment
5. Adjustment Summary
6. Data Manager
Raw Text Summary
Water Knowledge
At the end of this walkthrough, I will highlight some Tips and Tricks.
Tab 0: Instructions

Please read this. It covers the spreadsheet's practical functionality and links to the Bru'n Water Knowledge website. We will essentially follow these steps in order.
Tab 1: Water Report Input
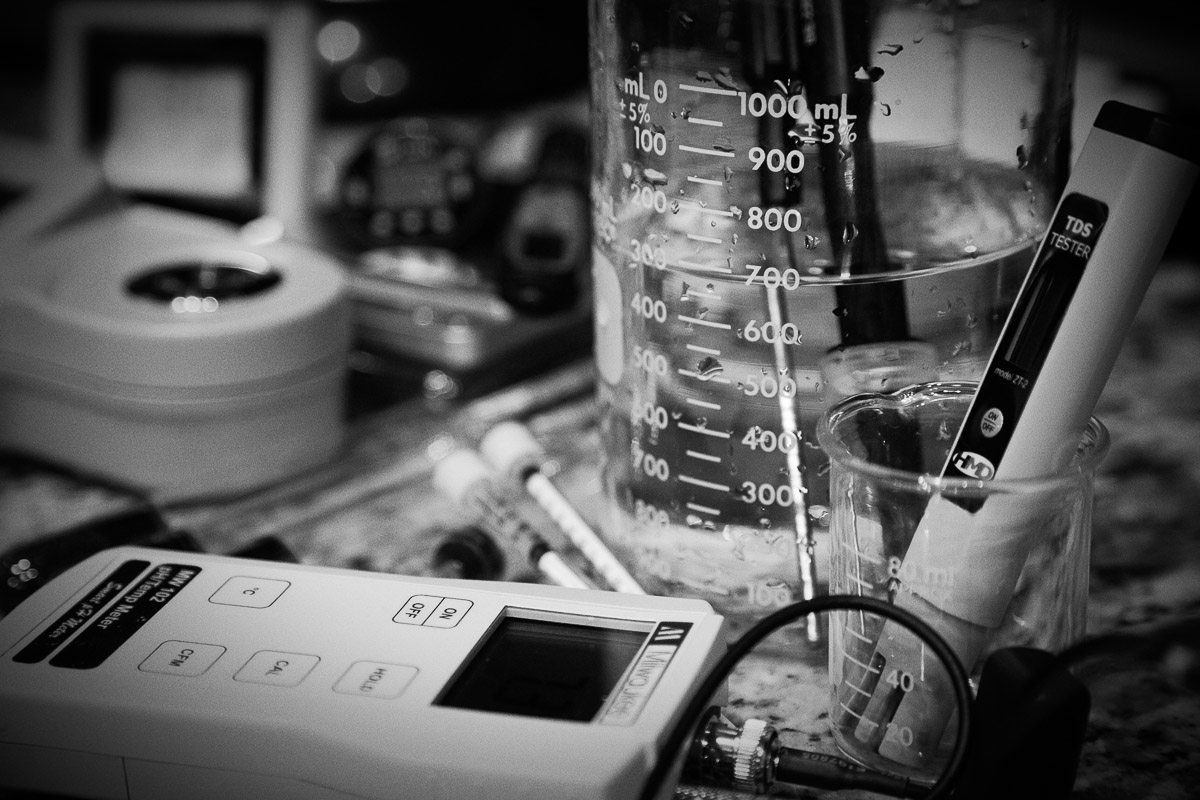
Garbage in = Garbage out. That applies to brewing water, and you need a report that can balance cations/anions in milliequivalents per liter (meq/L). I highly recommend that you get a Brewer (W-5A) or Household (W-6) report from Ward Labs, but you may be able to get an averaged report from your adequate local water supply. A regional report may require some tweaking, estimation, and seasonal management, as many municipalities blend water sources that vary widely, and often purge or flush systems with concentrated sanitizers that can linger at high PPM for days or weeks. If your shower smells like a pool in the hot sun, you probably have too much chlorine/chloramines, and there is no spot report to check for next weekend's brewday. There are also test kits that will get you within 2% accuracy of a lab report. The benefit is the ability to measure on the fly and address seasonal changes in your water immediately.
If Bru'n Water were a stand-alone application, this tab (and Sparge Acidification) would be the “Preferences” or “Settings” option. Once you have entered this information, you will not usually need to return to it. Set it and forget it.
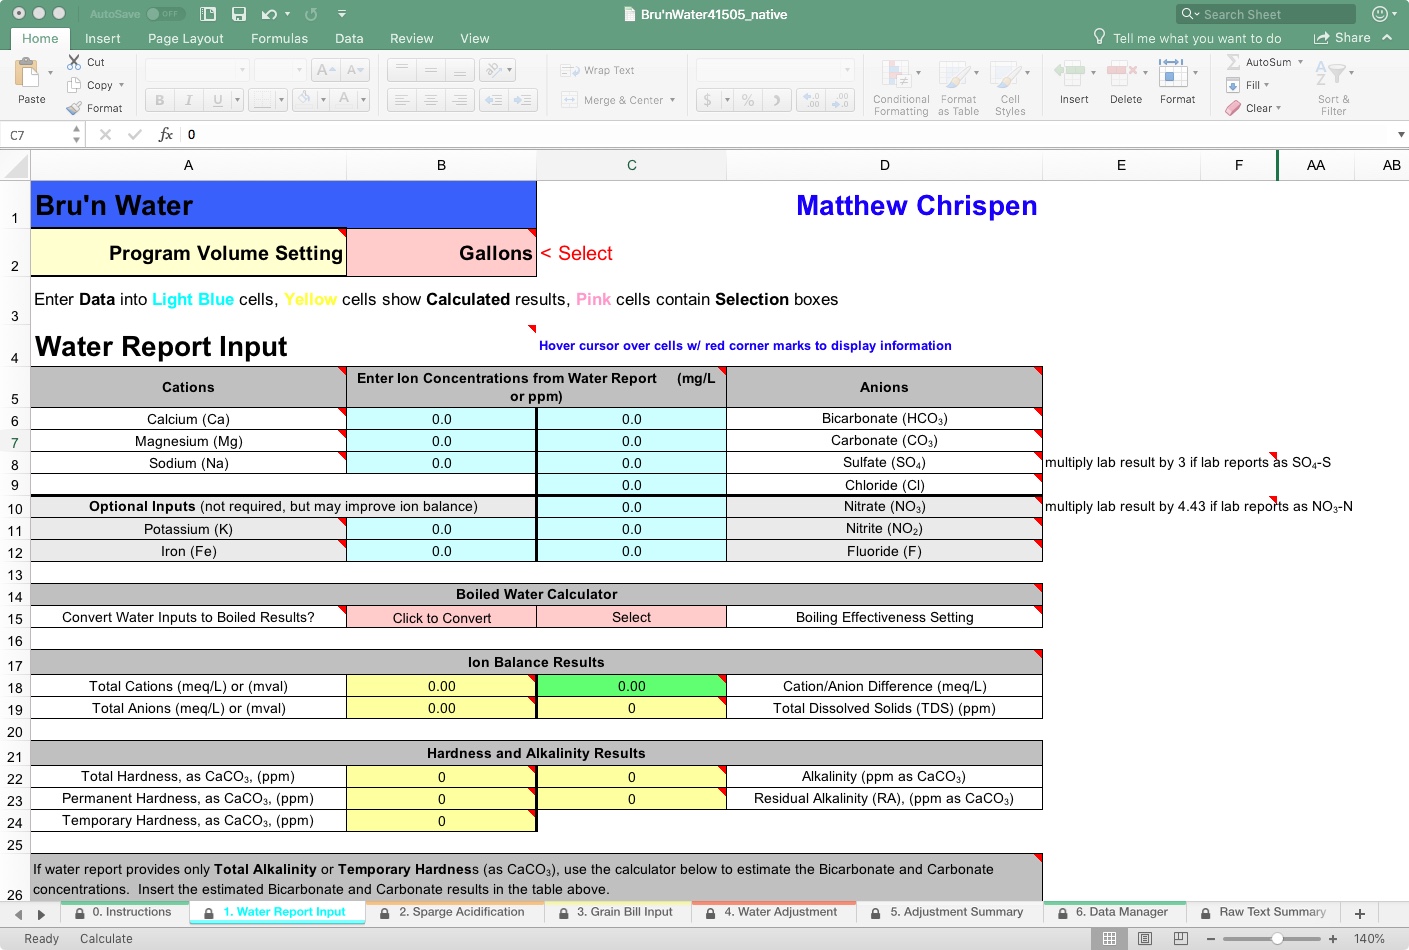
The top half of this page (hint: zoom in on the cells) starts with the ion constituents (anions and cations) important to brewing. Bru'n Water supports both Metric and US volume standards, as well as common commercial brewery volumes. Use the drop-down to choose your preference. For this walkthrough, we will use Gallons.
It is a good idea to have your water lab tested as close as possible to your brewing scenario - meaning post filtration (activated charcoal, RO, DI) and seasonally if using your tap water source without a reducing filter of some kind. Using that report, enter the information into the Light Blue cells, paying attention to the notes following the Sulfate and Nitrate entry. If you want to get laughably serious, send for another lab test after every filter change. Filters do vary, but at RO levels, it is nominally in the billionths.
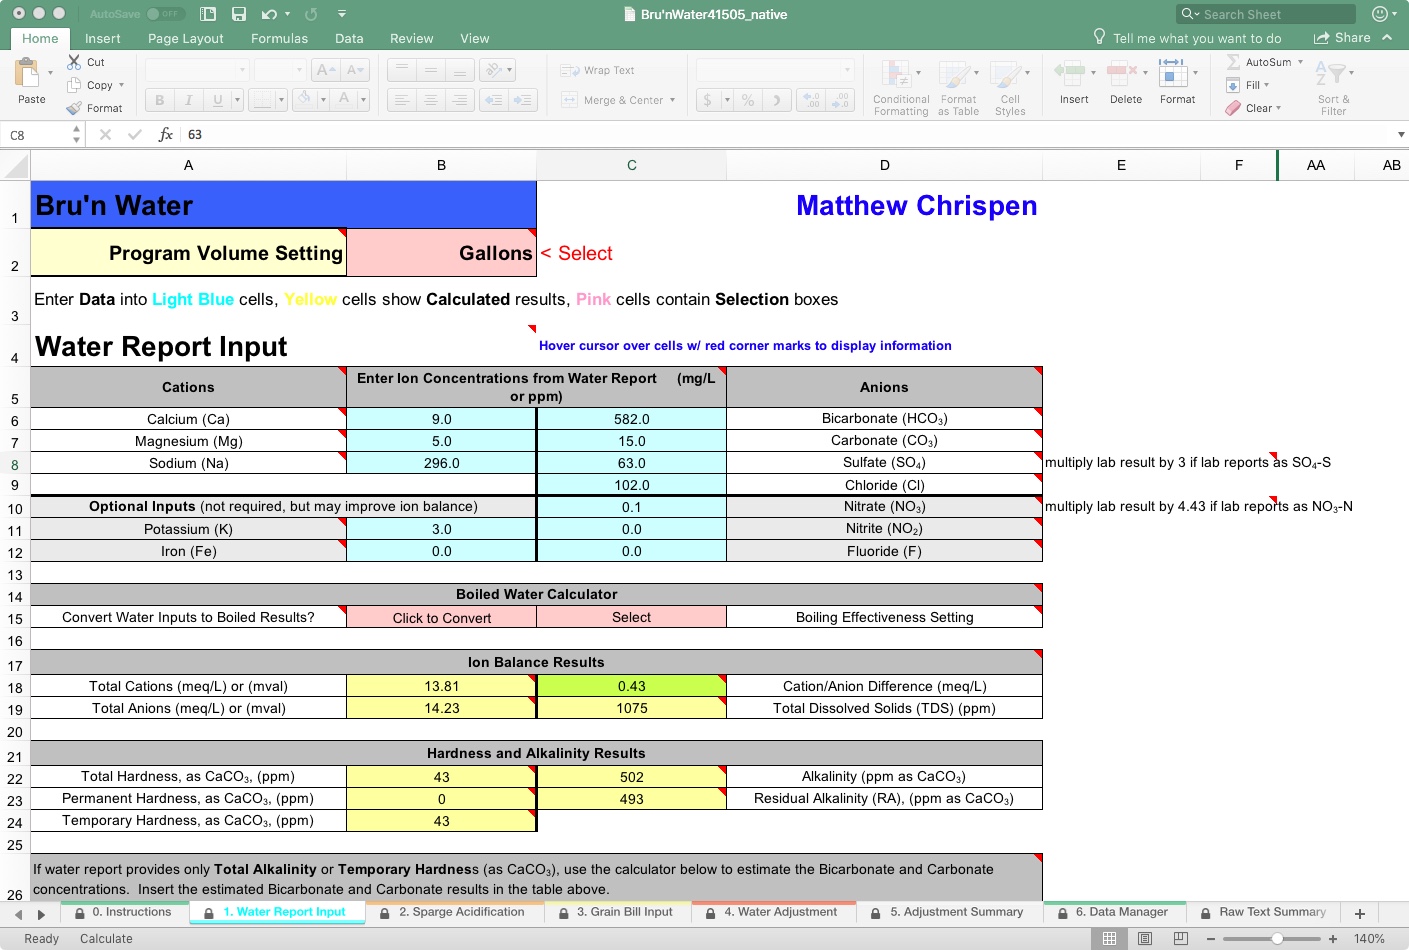
Here’s my gawd-awful water from outside of Bastrop, Texas. Please go ahead and laugh. I’ll wait.
New Feature: Convert Water Inputs to Boiled Results?
On line-14, you will see this feature, which attempts to estimate the effect of pre-boiling to reduce alkalinity. Clearly, my tap water, which is extremely high in alkalinity, might benefit from boiling, as boiling causes chalk (calcium carbonate, CaCO3) to precipitate, dramatically reducing alkalinity. However, my water is calcium-deficient, so I would need to add a calcium salt before boiling to be effective. The user would select a “Boiling Effectiveness” setting. For this reason, I get no result when I “Click to Convert.” A tooltip (look for the red triangles on cells) is available to help make the choice.
If you pre-boil for low-oxygen purposes, this may be a valuable tool for determining the resulting alkalinity and the calcium loss due to chalk precipitation. However, in most cases, you will not adequately cool the water to force complete precipitation, thereby avoiding the risk of DO uptake.
On line 17, you will find the Ion Balance Results section. Here we see the math result needed to determine if the provided water profile balances. Generally, you want the Cation/Anion Difference to be below 0.5, and that field is color-coded to provide a warning. As mine is at 0.43, we can proceed; however, using the tools in the lower section, we may be able to tighten up the water profile. The cell will turn red if it is out of balance, and your resulting water chemistry will be unbalanced. Here, balance may result in several problems, but most of the time it affects the general accuracy of the later water adjustments and recommendations. It is also a measure of the report, and many municipal water reports will not balance because the tests are not measured from a single sample but represent an average of many samples under various conditions.
Under the heading Total Alkalinity as CaCO3, Ward Labs may have incorrectly estimated bicarbonate and carbonate. This is also indicated in the previous area by the TDS, which does not match my report. I am working from an older Ward Labs report. AJ DeLange has since worked with them to correct their estimation resolution, but it is good to double-check.
As you can see, the spreadsheet estimates that my bicarbonate and carbonate levels are 602.4 and 5.5 ppm, respectively. So if I go back to the top area and make those corrections, you will see the delta with conversations with both Martin Brungard and AJ DeLange with better correction algorithms. So I will go with it. A more detailed lab report would include potassium and iron and other -ions that may bring my report closer to a perfect ratio.

Here, accuracy is a distinction without much import. Having an acceptable Cation/Anion ratio is more critical than achieving accuracy within +/- 1 ppm for each ion constituent for our purposes. Accuracy relative to mash pH within 0.1 units is acceptable to me, assuming I am doing a regular beer. Since I use RO water, this page is less important to me personally, but I keep it here for the occasional blending step. The ratio suggests that I have some additional cations that are not in the report or are underestimated.
At this point, I highly suggest SAVING!
Tab 2: Sparge Acidification
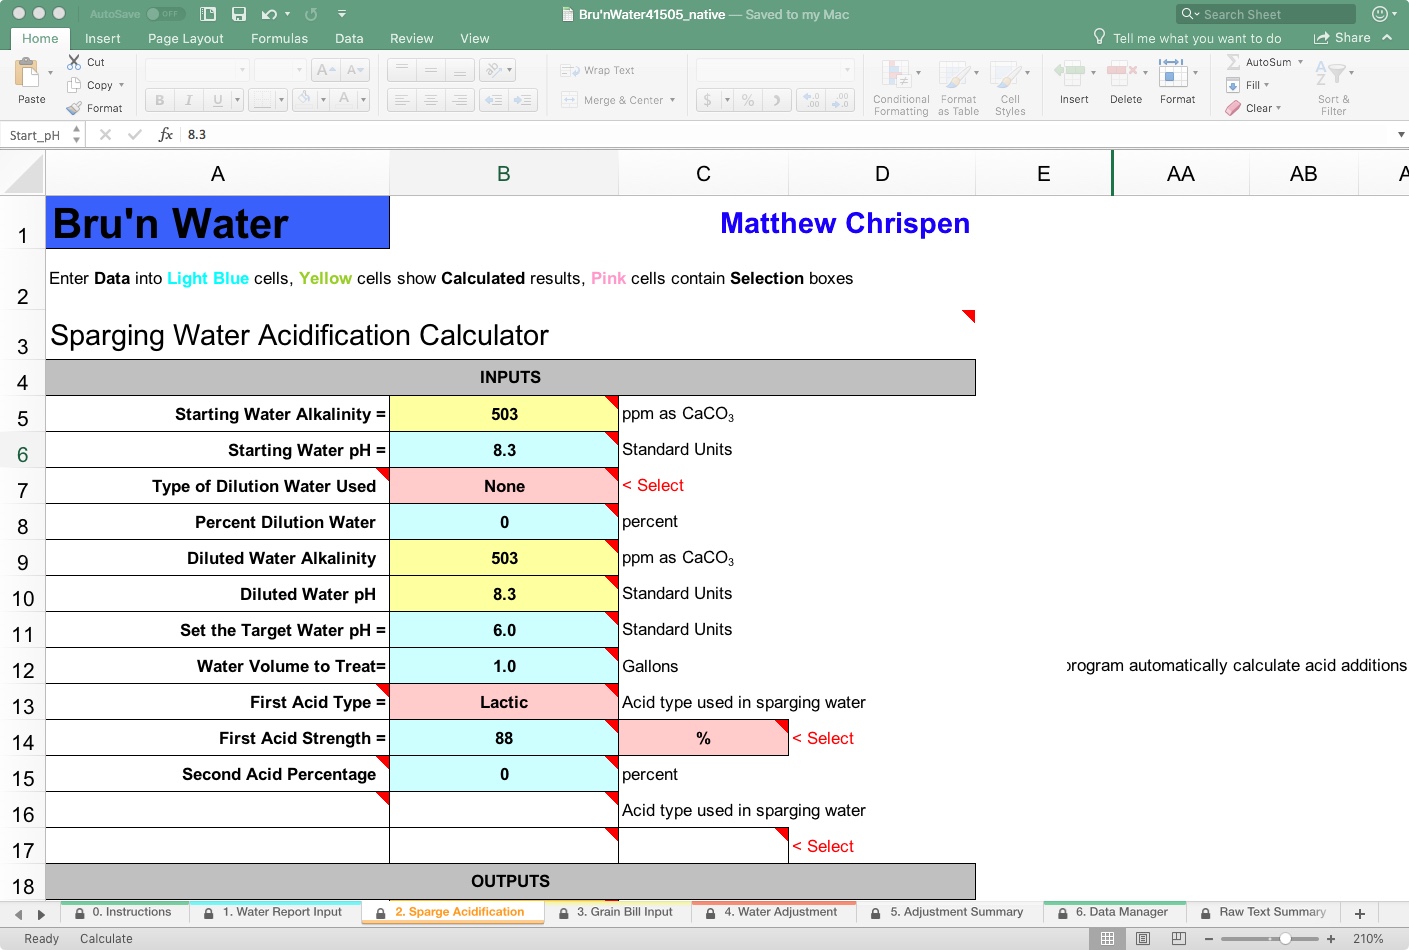
Click on the “2. Sparge Acidification” tab, and you will find that many variables carry over from the Water Report Input tab. Here, we begin to see the critical variables for traditional lauter methods, such as continuous sparging. We are now jumping ahead procedurally (for a reason) to the last stage of the mash, as this drives results for the Water Adjustment tab. The lauter, or sparge, is the rinsing of residual sugars from the mash by adding water to the top of the mash while draining the sweet wort into a boil kettle from the bottom.
It is essential to understand that as fresh hot water is added at the top of the mash (fly sparge), it moves through the mash bed in a gradient, diluting any remaining buffering capacity of the malts and potentially raising the mash pH along that gradient into a range that risks tannin extraction (alkalinity increases if the sparge water is not treated). If you have any substantial alkalinity in the sparge water, this pH move can be dramatic, and risk husky astringency in the finished beer.
Many professional texts recommend acidifying (or reducing the alkalinity) of the sparge liquor to ensure the mash pH never exceeds 6.0. By adding acid, we neutralize the liquor's alkalinity, thereby reducing its ability to raise the mash pH as it concentrates at the top and moves through the mash bed. To be clear, we are talking alkalinity and not sparge water pH.
No-sparge brewers can ignore this section as there is no lautering step. Your mash pH has already reached equilibrium by the time you mash out, even with the high water-to-grain ratios, and your final mash pH will be your pre-boil kettle pH.
Batch sparge brewers may wish to ignore this section, as the runoff occurs very quickly and there is much less time for pH swings in the mash. However, consider that an elevated pre-boil pH in the kettle (assuming moderate to high alkalinity in your sparge water) may affect hot break formation and might cause more intense, harsh hop character (hop utilization is affected by wort pH), though opinions vary here. Again, a personal choice that should be made with experimentation and critical evaluation.
Another benefit of sparge acidification is a shorter time to the hot break in the boil. As wort boils, pH naturally lowers, and proteins denature and coagulate to form a hot break at pH 4.9-5.2 (at room temperature, not mash temps). Longer times in this range may yield more hot break material left behind in the kettle. High boil pH is alleged to produce a more pronounced and harsh hop character and may extract more polyphenols (tannins and grassiness) from the hop organic material. All of this is a matter of personal preference and experience.
You will find that some breweries use a higher boil pH to increase hop utilization, while others prefer a lower pH. This tab can provide you a vector for experimentation but do take good notes. Note that boil intensity can also encourage hot break formation. Some brewers prefer a vigorous boil throughout, some simmer (even partially covered) and then ramp to a vigorous boil at the end of the boil period. A medium to vigorous boil will also encourage break formation.

As you can see, we are working with Starting Water Alkalinity, and my tap water is just stupidly alkaline. If your Total Alkalinity is above 160 ppm as CaCO3, you may consider dilution with RO or Distilled Water for most beer styles. I typically use RO, so I set the “Type of Dilution Water Used” to RO with 100% Percent Dilution Water.
This dramatically impacts my Diluted Water pH. I tend to set my Target Water pH to just a few units above or at my desired mash pH. Note that without an RA calculation based on my mash bill, this means nothing. We are preloading base parameters that impact later tabs. From my experiments, I prefer the resulting lower kettle pre-boil pH. Leave the Water Volume to Treat field at 1.0 gallons, as this allows the tool to calculate additions in the future tabs automatically. Next, choose your acids (can have up to 2), and I use 88% Lactic acid right now in my brewery.
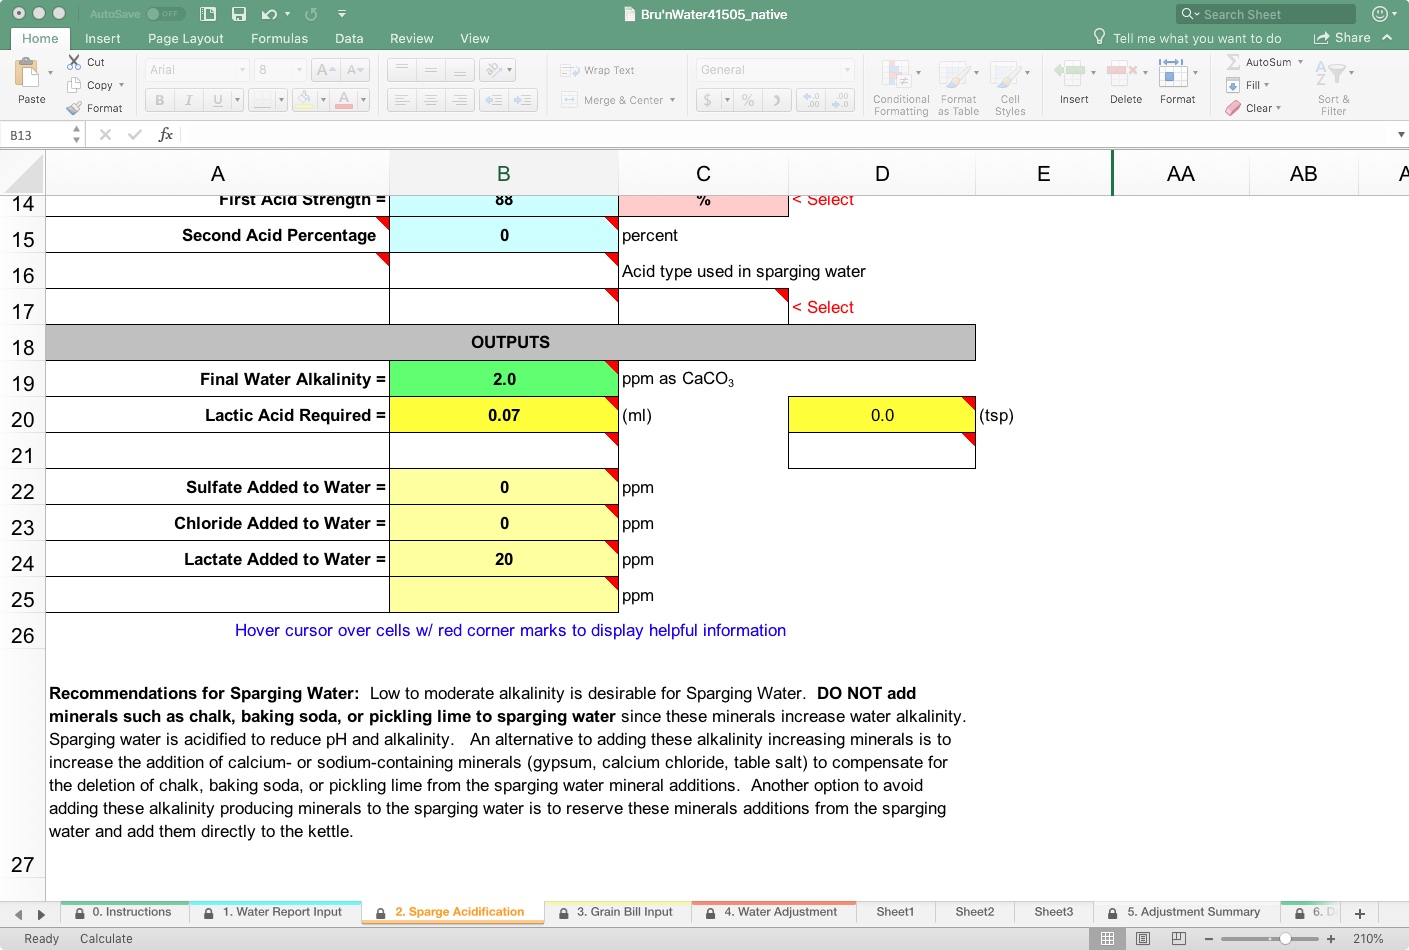
In the lower area of the tab, you will see the Outputs section, as well as some specific recommendations. Mainly, it makes little sense to add alkaline salts into the sparge water, because it will require additional acid to neutralize that alkalinity to remain within your chosen mash pH.
Acids add residual compounds, such as lactate, that may affect flavor, and you may wish to minimize or even maximize, depending on your goals. You will see later that those are calculated, and warnings are presented if they stray into perceptible threshold levels.
Our final liquor alkalinity is nominal at 2 ppm as CaCO3 in this demonstration, indicating that 0.07 ml of 88% Lactic Acid is needed in the sparge. In practice, RO or DI water (without alkaline salt additions) needs no acid here and will have minimal impact on mash pH over a long lauter. Alternatively, you can add acid to maintain a consistent mash pH throughout the sparge.
Tab 3: Grain Bill
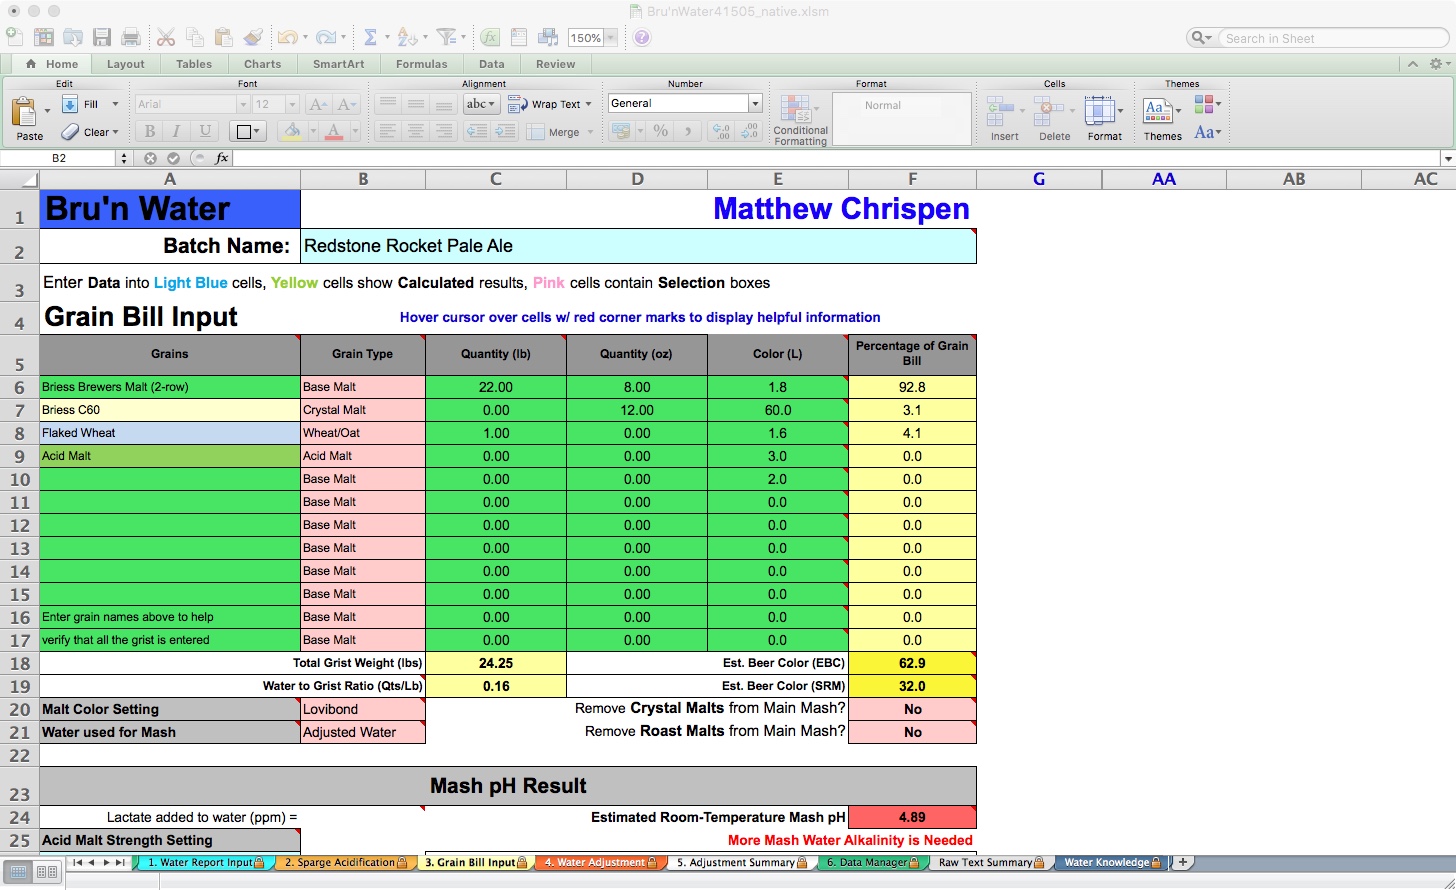
Remember garbage in = garbage out? This particularly applies to this section. You need to have your grain bill established and ensure it matches your recipe notes or software. I tend to build a recipe in Beer Smith and copy it into Bru’n Water. If you make changes on the fly on brew day, you need to return to this tab and make identical adjustments.
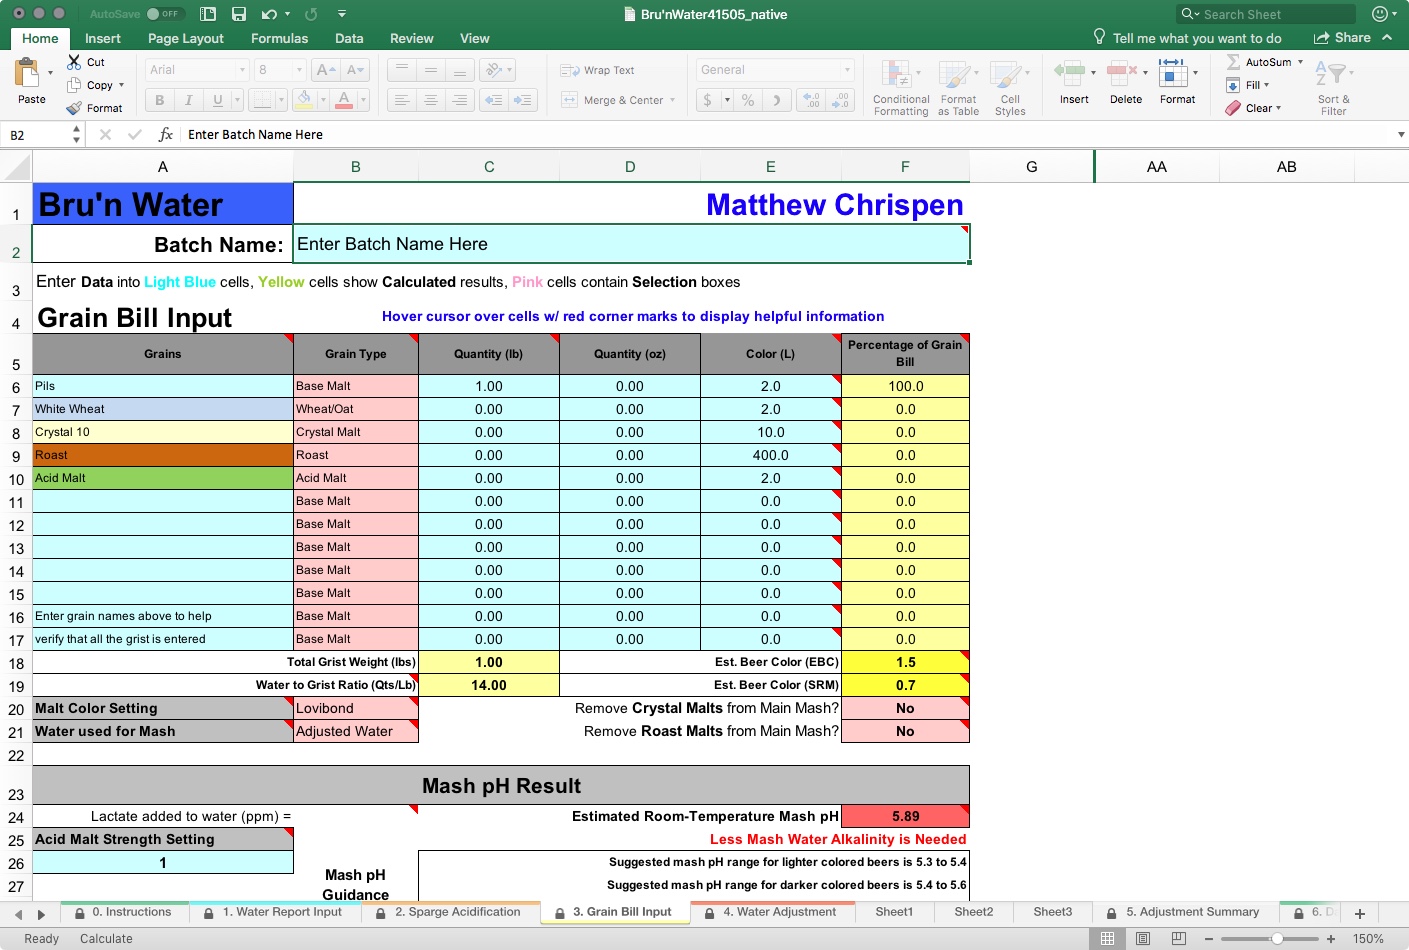
Things that you need to consider include base grains, crystal/caramel malts, roast malts, and acid malts, the quantity (by weight), as well as the estimated Lovibond on the malt. Note that BeerSmith uses SRM and Lovibond interchangeably. I have had better results looking up malt specification sheets and using an average Lovibond value than just copying over the BeerSmith SRM number. I find it helpful to modify BeerSmith’s malts to match the vendor's malt analysis sheets.
To ensure continuity, your Total Grist Weight should match your software’s total weight. For now, ignore the water/grist ratio and the Estimated Room-Temperature Mash pH.
Let’s add a basic recipe and take a look at the results.
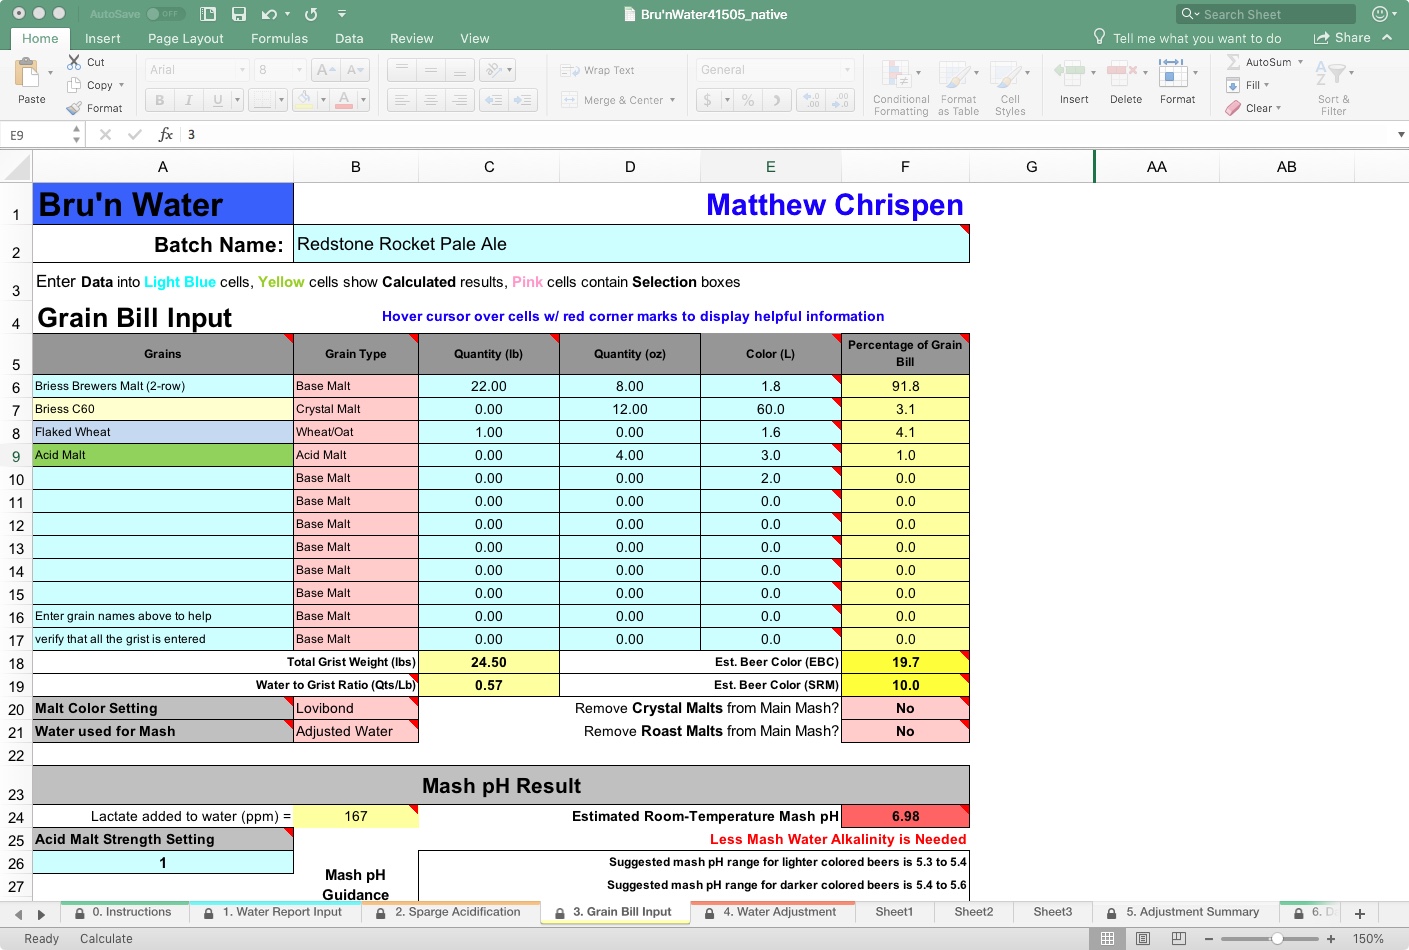
This pale ale is a fairly straightforward base to play with a variety of hop varieties. Suppose you want a little more malt backbone, up the crystal. I like something on the drier and crisper spectrum, with moderate hop character and a lot of hop aroma.
Make sure to identify your grain type in the spreadsheet, as the models for acidity vary between types. This recipe has a large portion of base malt, which will drive the mash pH. One new addition to the spreadsheet is “Wheat/Oat” as a selection, removing the need to treat them as base malts. I do not see non-malted wheat or oats, and they may have different levels of acidity compared to malted grains, so consider that in adjunct beers.
Mash pH Result
We will return to this tab after we have filled out the Water Adjustment tab.
Troubleshooting mash pH measurements and Bru'n Water starts with this tab. I often don't pay attention to which maltster's base malt I am using, or I need to substitute or blend base malts to achieve the required amount. I have seen batches of pale malt, even from the same source, that are much more acidic than usual. Bru'n Water also allows you to adjust the acidity of acid malt, useful if you have been making pH measurements. It is also very easy to transpose a number when copying over from BeerSmith or other programs. Double-checking essential these numbers with malt analysis sheets before moving on is essential for fine adjustments!
Tab 4: Water Adjustment
Before we move on, a few very general rules about selecting a target water profile for a beer:
- Historic Water profiles tend to be mythical and don't represent modern municipal and even well waters. Only use one after you have done the research and understand why you want to use it. Bru'n Water provides municipal water profiles for many historic regional areas, as well as de-carbonated (boiled) estimates that simulate brewery treatments. Consider color-based profiles as a starting point, unless you have a specific need. Note: Over time, you will get a sense of the proper adjustments for the nuances of the beer that you are attempting. For example, starting with a base of 50 ppm Ca, you might want a higher sulfite to chloride. So start there and adjust the additions until you reach a reasonable mash pH. Make minor adjustments when you rebrew and refine that particular recipe.
- A great starting point is matching color-based target profiles to your beer’s general color. They work very well, and you can constantly adjust in subsequent brews.
- There are differing opinions here, but Residual Alkalinity (RA) is not a target; it is a description of the buffering capacity of a specific mash and water profile. Targeting RA should be done between very similar beers and has little practical use in a discussion of a simple water profile. I find actual alkalinity or bicarbonate levels to be more descriptive, that said, RA as a reference point can be a great part of your documentation and quality checks.
- Sulfate: Chloride ratios work within a specific, albeit relatively wide band of concentrations. In edge cases, it is irrelevant and confusing, and without a reference point, we don't really know what you are saying. A 1:1 ratio at 10 ppm will be a different beer than one at 200 ppm of sulfate to chloride. I tend to keep hoppy beers in mind as between 2:1 and 1.5:1 at 80-100 ppm chloride reference, and malty between 1:2 and 1:1.5 at 80-100 ppm chloride reference. Of course, customize salts to your taste and dial in your optimum ratios, and be conscioussignificant of excessive calcium in the mash.
- Prioritize Sulfate and Chloride as the significant influences on mouthfeel and flavor. Secondarily, explore Sodium and Magnesium as seasoning or tweaks to your profile, depending on your goals. Sulfate and Chloride account for 95% of the malt and hop flavor and mouthfeel, assuming proper mash pH.
- Please do not use chalk or pickling lime as calcium additions, unless your Estimated Mash pH is too low. They raise mash pH, which is necessary only in dark, crystal, or roast-heavy recipes. You will need to offset the alkalinity with additional acid to achieve an acceptable mash pH in a pale beer, but this can risk off flavors from the acid residuals (lactate, etc.). Some brewers prefer a higher mash pH (5.6-5.8) for stouts and porters to enhance the roast and nutty character.
- Despite my garbage-in = garbage-out statements, this is not a precision exercise. Mash pH varies and stabilizes throughout the mash, and its correlation with a tool like Bru'n Water depends on when you take your measurements and the calibration and accuracy of your pH meter. Bru'n Water gets me within 0.1 pH units of my 30-minute readings nearly every time, assuming I am entering the correct information and that there is slight variation in acidity across the malts I am using. If I mess up my grain bill in the spreadsheet, the Estimated Mash pH will not be correct.
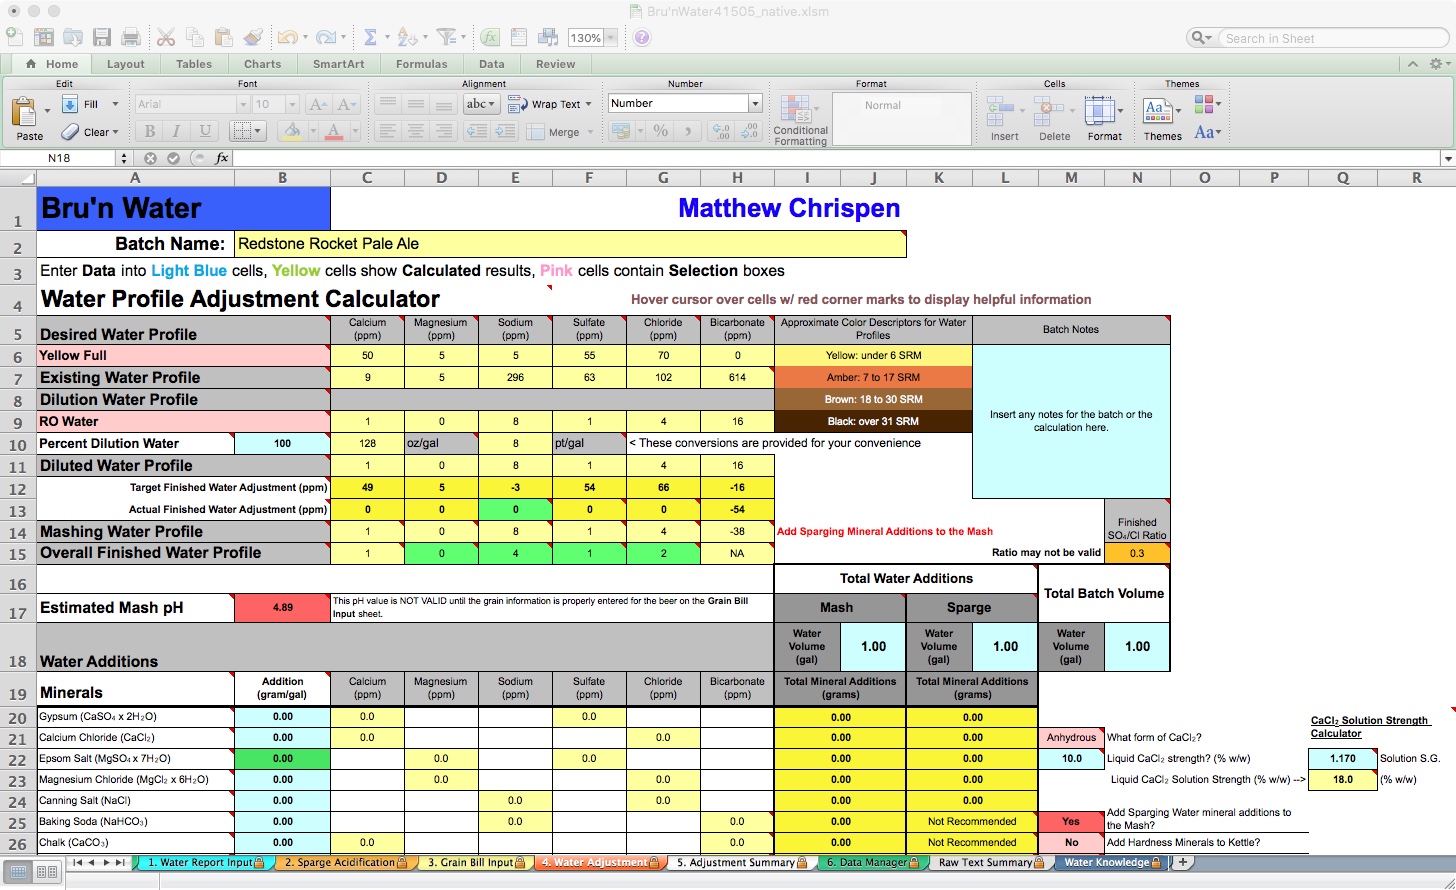
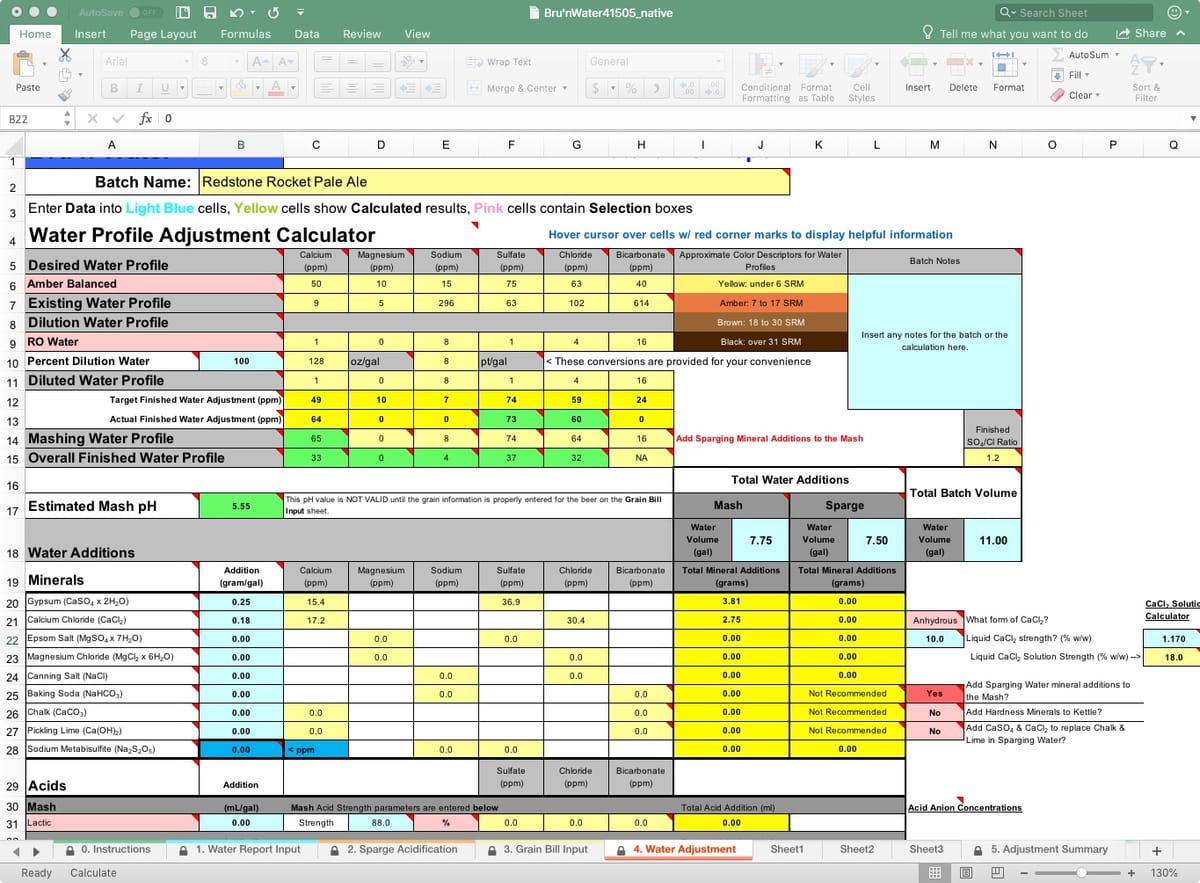
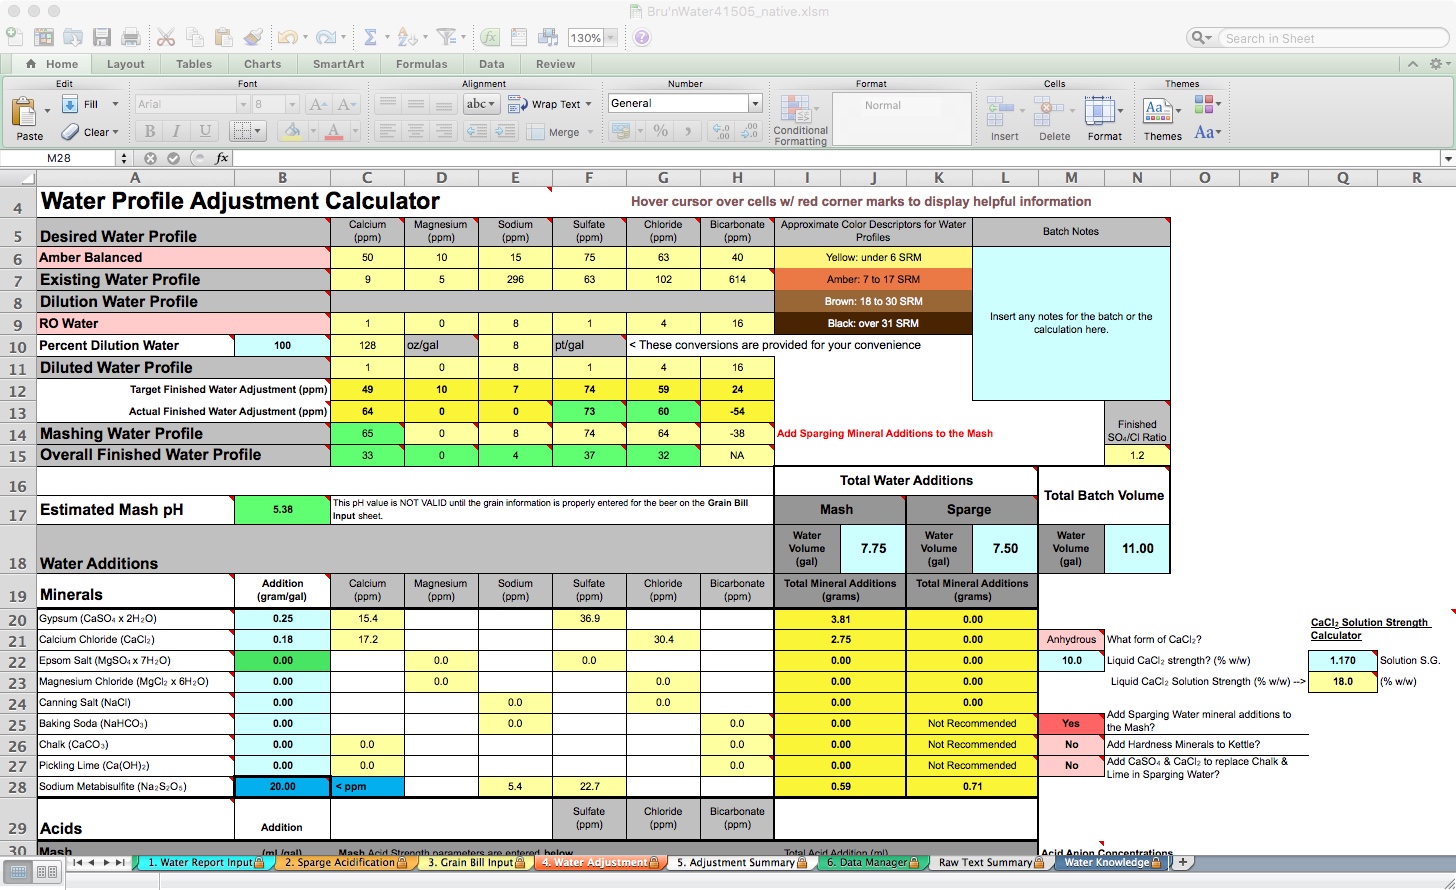
On this tab, you will see several rows representing Desired Water Profile, Existing Water Profile, Dilution Water Profile, and Diluted Water Profile. These are all water-related before introducing the grains. The Mashing Water Profile and Overall Finished Water Profile follow as grain, mashing processes, and boiling results. For the most part, I focus on the Desired Water Profile and Diluted Water Profiles. The Overall Finished Water Profile may show a reduction in ion content due to dilution from your sparge water additions, particularly calcium and magnesium.
My spreadsheet defaulted to the Yellow Full profile and is pulling in my tap water report. I need to change the target profile to the one I desire and set my dilution water to 100% RO. Then I will work with Gypsum and Calcium Chloride additions to match my Actual Finished Water Adjustment Desired Water Profile. If you are using your tap water, don't dismiss dilution to achieve both your desired mash pH and flavor intentions.

Because my recipe’s color is more amber than yellow, I will choose Amber Balanced. Immediately, I notice that my Estimated Mash pH is 5.34 without any mineral additions. However, we have not yet entered the Mash or Sparge volumes, so the prediction is not accurate.
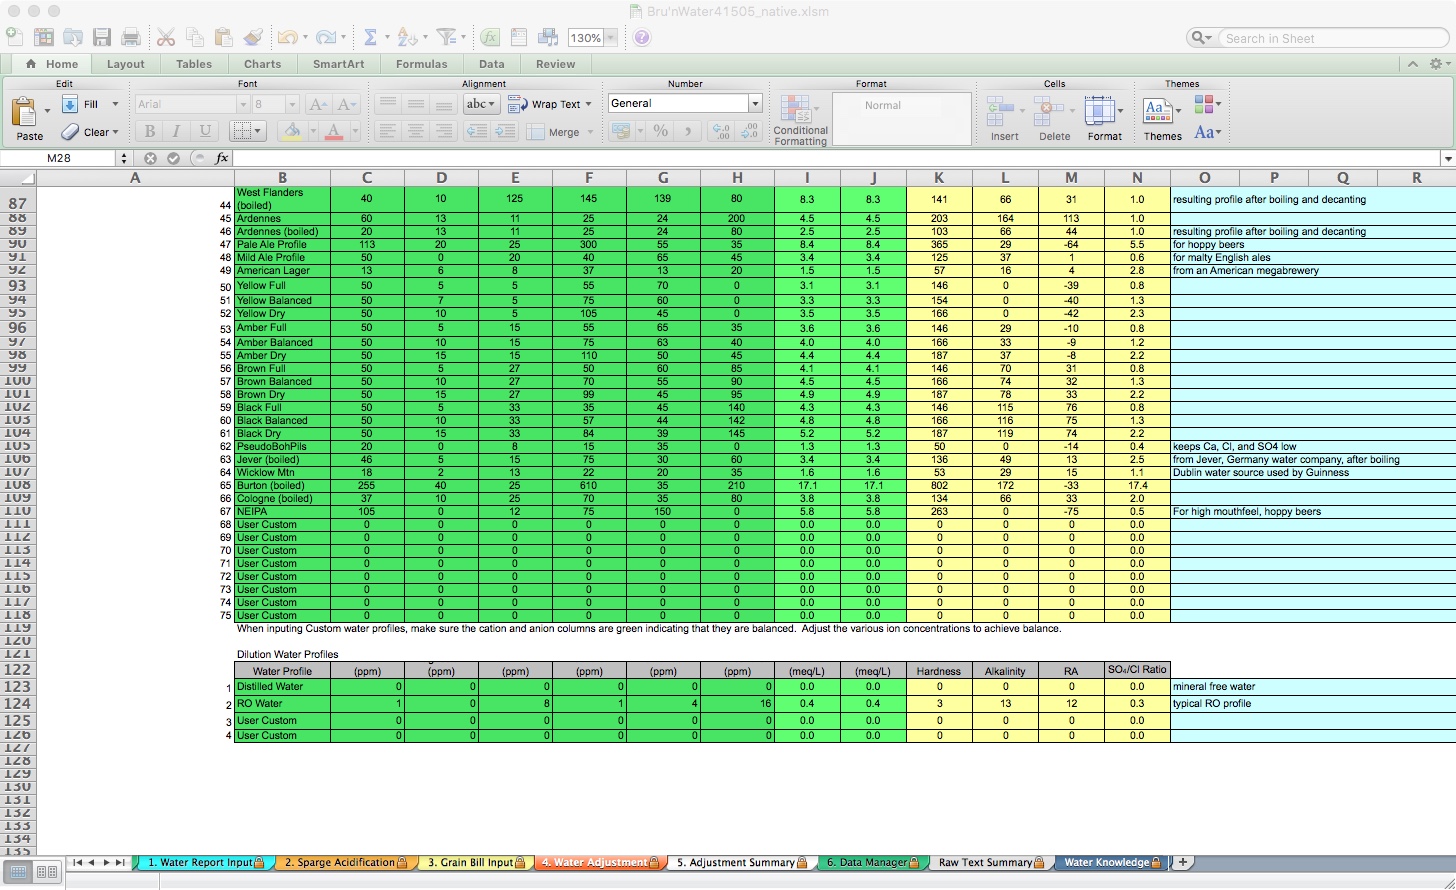
If you have a special personal water profile, you can edit the User Custom lines in the table at the bottom of the tab on lines 68-75. Below that, you can customize dilution water profiles, for example, if you use store-bought spring water. Fill out that water profile, and you can select it for both mash and sparge dilution choices.
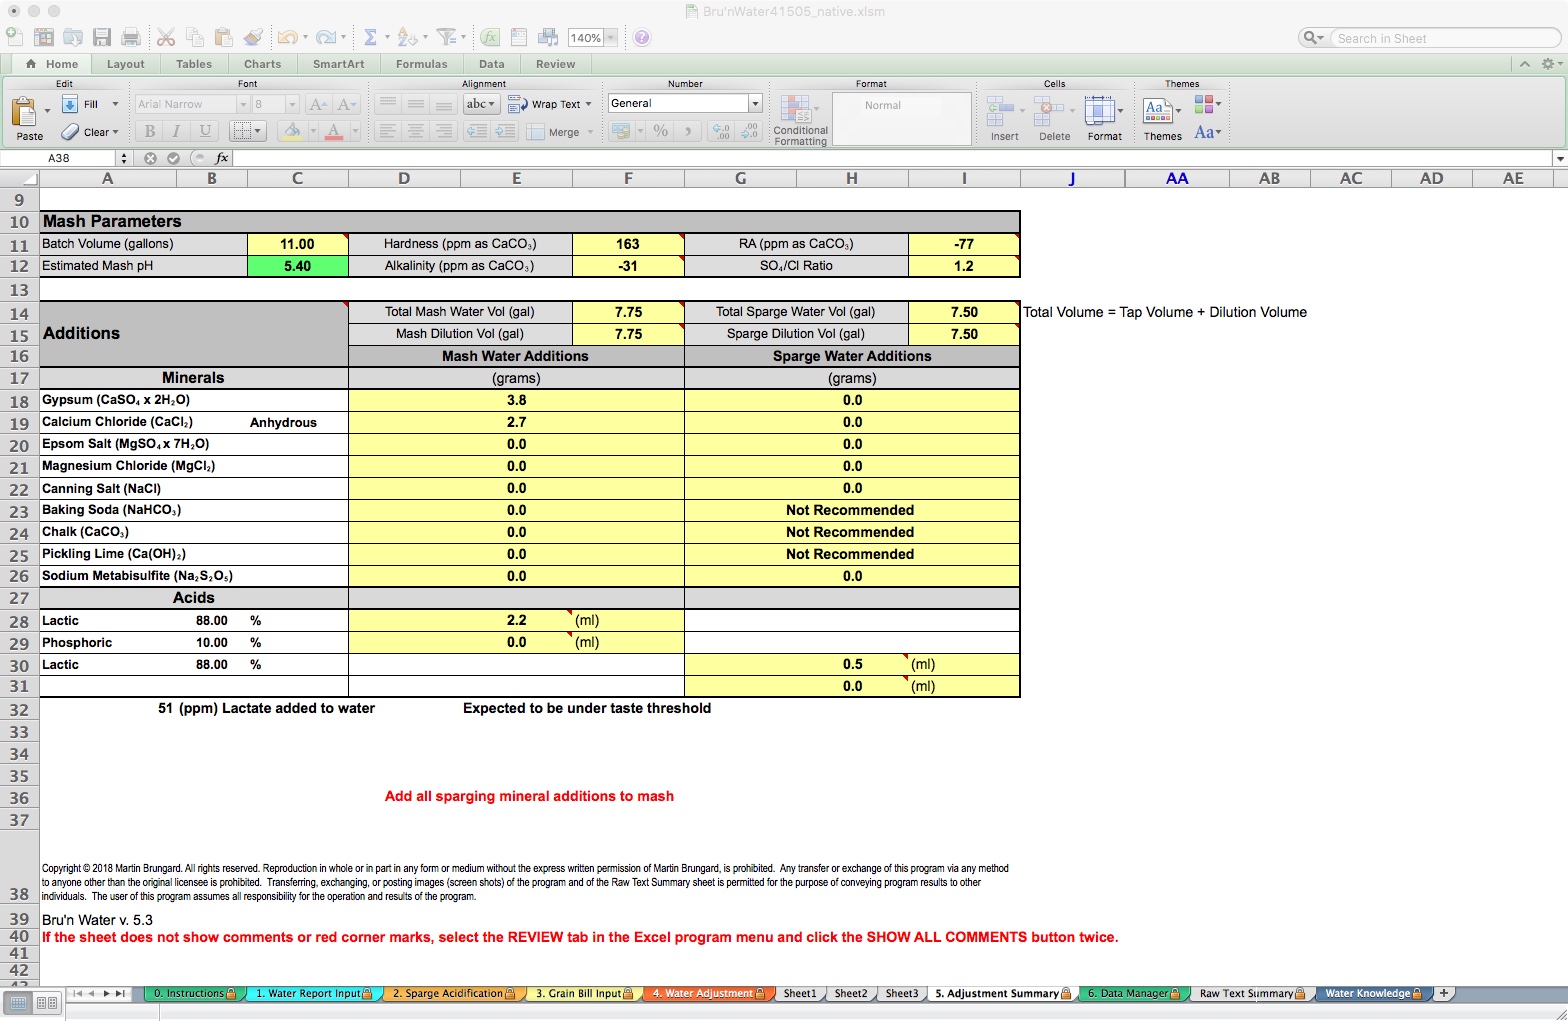
BeerSmith estimates 7.75 gallons of strike water and 7.4 gallons of sparge water, which I rounded up for simplicity. I will have a little excess water, but it will be close enough. This is entered into the spreadsheet under the Total Water Additions, Mash, and Sparge fields, with a Total Batch Volume of 11 gallons. Now the Estimated Mash pH field shows orange (high side warning) with a pH of 5.56. Now we add minerals, following the gram-per-gallon amount indicated under the Water Additions section. Total salt additions by weight are calculated in the yellow columns under the Total Water Additions section.
By adding 0.25 gram/gal of Gypsum and 0.18 gram/gal of Calcium Chloride, my Actual Finished Water Adjustment is pretty close, except for the magnesium and sodium levels. Because of the hop levels of this pale ale, I am not concerned about subtlety, so I will not address magnesium or sodium here. My Estimated Mash pH shows green (good) at 5.41. I can stop here and move on. For illustrative purposes, I decided to replace the Acid Malt with 88% liquid lactic acid.
To do this, go back to the Grain Bill Input tab and remove the 4 ounces of Acid Malt from the calculation by setting it to 0 (leaving the reference is helpful for future iterations). Now, when I return to the Water Adjustment tab, my mash pH has risen to 5.55. It still shows green for acceptable, but I want to adjust to 5.4. Make sure to remove the acid malt from the BeerSmith recipe as well!

By adding 0.29 mL/gal of 88% Lactic Acid, I have adjusted my Estimated Mash pH to a perfect 5.4. In the mash tun, this will measure somewhere between 5.37 and 5.43 pH at 20-30 minutes, good enough for me. You can also see that I will add only 2.25 ml of lactic acid to the strike water, and I may choose to add 0.5 ml to the RO-based sparge water.
Also, note that the spreadsheet defaults to “Yes” for Add Sparging Water mineral additions to the Mash (located below the Total Batch Volume area). This reduces complexity and maximizes available calcium for the mash. You can split the minerals between the mash and the sparge, but your acid requirement will likely increase. I only split mineral additions between Mash and Sparge when I have excessive calcium (over 200 ppm) to moderate a drop in mash pH.
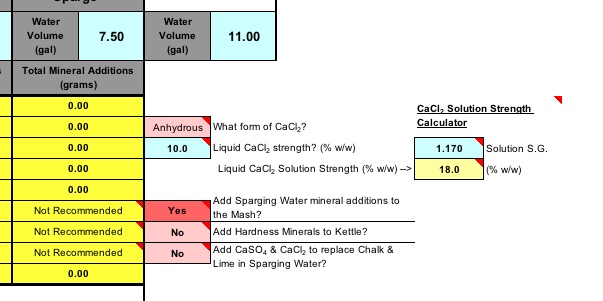
There are additional options, such as a calculator for hydrated Calcium Chloride in a saturated solution, as anhydrous calcium chloride will hydrate over time when exposed to atmospheric humidity, which can throw off weight measurements. You can also choose to add Hardness minerals to the Kettle or even override, allowing alkalinity minerals into the sparge.

Note that the acid addition calculation shows the residual lactate from my lactic acid additions.
Tab 5: Adjustment Summary
The Adjustment Summary is a convenient page to print out for your brew day. It shows concise information unladen with choices. I use this sheet to take notes, too. A couple of items of note: Physically, there cannot be a negative value for Alkalinity (negative CaCO3 = excess acidity), however, there can be a negative RA. The spreadsheet uses this to drive the acid model, and, for the most part, you can ignore these negative numbers. I mention this for clarity and accuracy.
You will see the volumes you set up for mash and sparge water, and below these, the specific gram measurements of the salts, and the ml additions for acids. An indicator also reminds us to “Add all sparging minerals additions to the mash” if that is checked on the Water Adjustment tab.
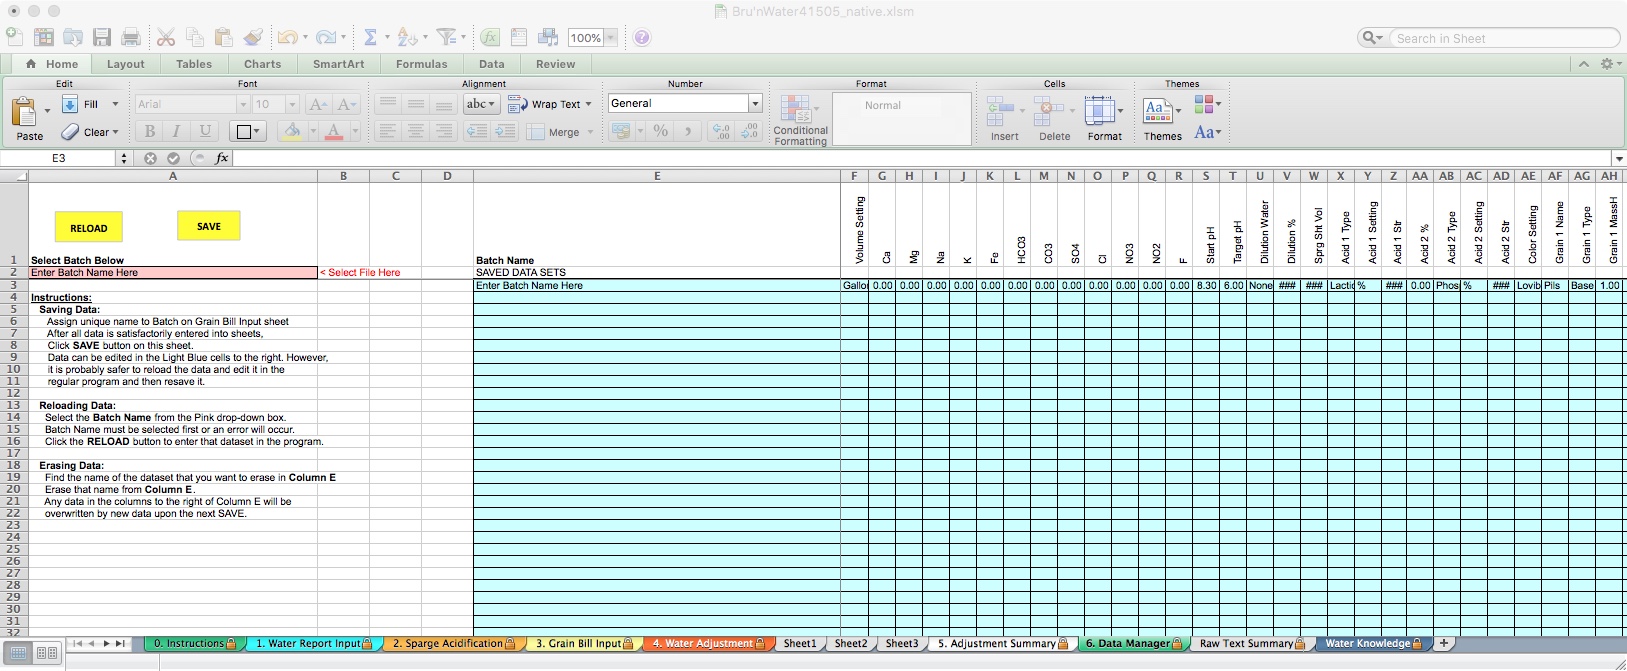
Tab 6. Data Manager
My favorite, relatively new addition to Bru’n Water is the ability to store batch data and multiple recipes in a single spreadsheet. This alone is worth a donation to unlock! This functionality saves the entire set of pertinent data, including information from the Water Report Input, Sparge Acidification, Grain Bill Input, and Water Adjustment tabs. Be aware that if you later change the Water Report Input and restore a previous Batch, you may need to go back and change your source water report.
As with the other pages, all of the blue fields are editable.
To save a batch, enter a name in the blue field labeled Batch Name. The first field defaults to “Enter Batch Name Here. Do not confuse this with the pink colored field. I generally name them after the Beer name I input on the Grain Bill Input tab, which matches my Beer Smith recipe name. I'll also make sure to match the batch number if I'm using that feature.
Note: If you have the previous subscriber edition with several recipes, you can easily cut or copy the entire pale blue area from the previous spreadsheet, and paste into the same area on the new spreadsheet.
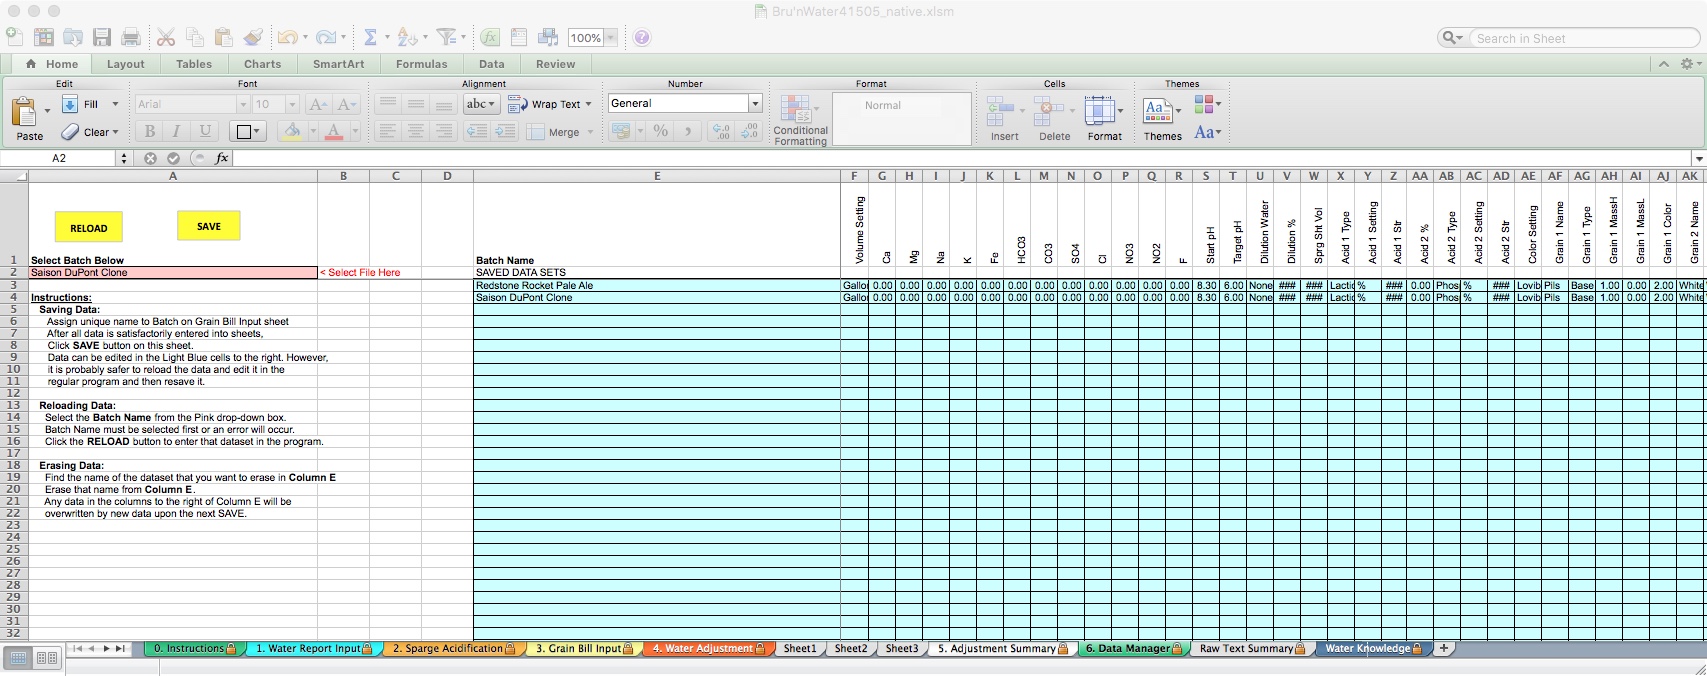
For demonstration purposes, I have added a second identical recipe and renamed it. To load a different recipe, click on the pink cell in row 2. A drop-down box will appear, and you can choose the desired recipe. This will load all of the data into the spreadsheet. You can save. If you do not wish to save changes and restore to the previous data points, you can do the same using the yellow Reload button.
Tab 7: Raw Text Summary

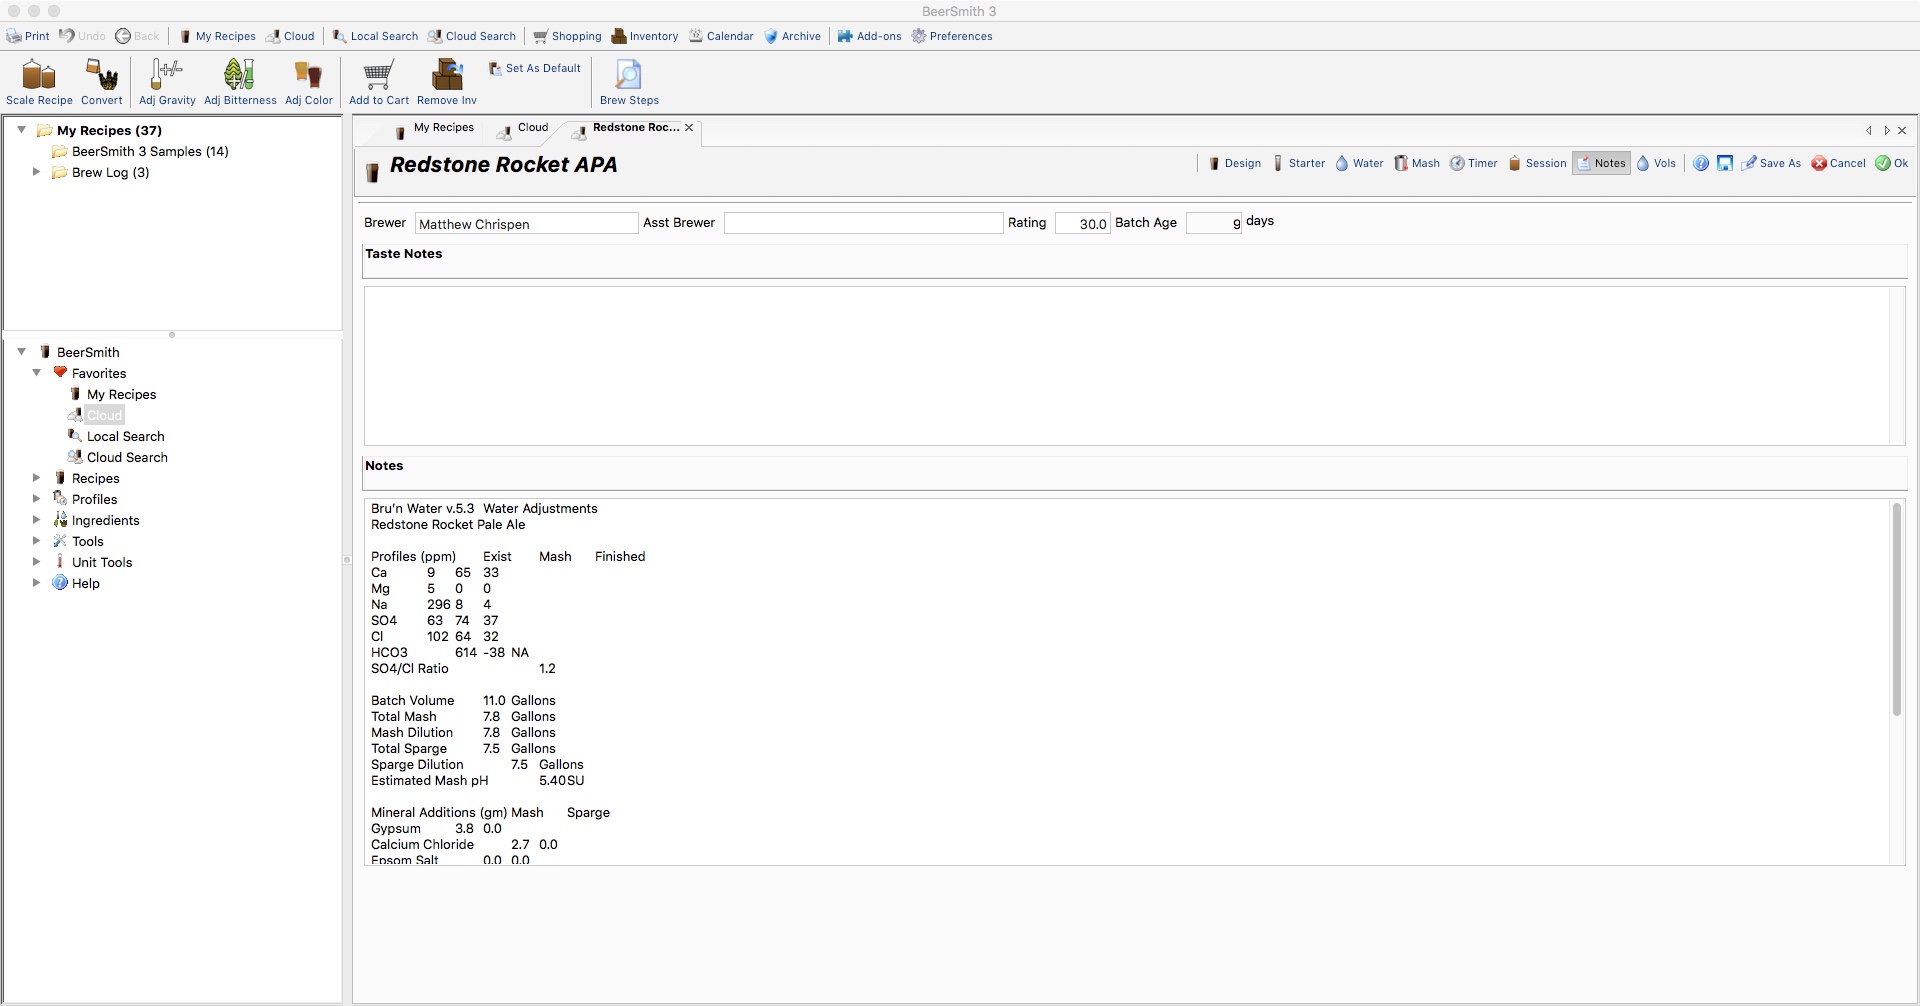
I like to keep information together in BeerSmith, and this tab lets me copy and paste the comprehensive Water Adjustments in plain text into the BeerSmith recipe notes. Highlight the desired information, open the recipe in BeerSmith, navigate to the notes area, and paste.
Tab 8: Water Knowledge
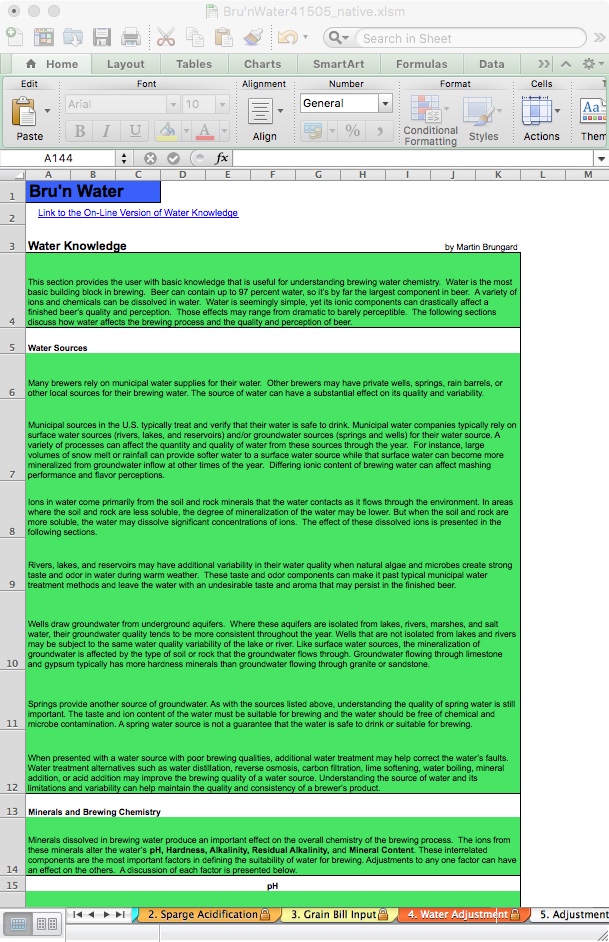
I find this tab a fast resource when working, although the online version is kept more up to date. If you prefer to read in Excel, it's there and handy should a question pop up.
Bru'n Water's Water Knowledge web page is perhaps the most concise and approachable brewing water chemistry information available. While it doesn’t go into great academic detail, it highlights the major topics and provides an introductory overview. Start here, and if you want or need more details and academic discussion, Water: A Comprehensive Guide for Brewers by John Palmer and Colin Kaminski.
Bru’n Water and Mash Chemistry Tips and Tricks
As you can see, Bru’n Water is a serious tool for managing your brewing water chemistry, but it is just a tool. In my brewery, Bru'n Water has gotten me very close to my Estimated Mash pH, confirmed by over 100 batches of beer and a good pH meter. That said, everyone will experience an edge case or enter something incorrectly into the spreadsheet, and a batch will drift outside their estimated target mash pH.
Tip 1: Adjusting Mash pH on the fly
Do NOT panic. I generally do not recommend making significant adjustments during your mash as it takes some time for mash pH to reach equilibrium, and you can cause wild swings up or down. Generally speaking, 15-20 minutes from grain-in, you should see the mash pH begin to stabilize. If you add a moderate amount of acid or base salts at that point, the mash pH will swing as the salts hydrate and diffuse throughout the mash. Do not just toss the salts on top of the mash; they should be thoroughly but gently incorporated, then let rest. Wait at least 10 minutes, perhaps less if you are circulating the mash, before taking another reading.
I prefer to estimate the acid and base required to move from my desired mash pH before brewing. After I print the Adjustment Summary, I return to the Water Adjustment Tab. There, I will add enough pickling lime (I prefer this over chalk) to raise the mash pH 0.1 units. I write this amount down on the sheet. I then zero that lime addition out and add a second acid addition to lower the mash pH by 0.1 units. I write this down on the summary sheet and zero out that acid addition. I now have a good idea of how much acid or base is required to moderate my mash if it falls outside my ideal range.
For the demonstration recipe, I note that I need 0.12 g/gal of Pickling lime to raise the mash pH from 5.4 to 5.5, and from the Adjustment Summary, that is a total of 0.9 grams. I reset this to 0.
For the acid, in the Water Adjustment Tab, I add acid until the Estimated Mash pH reaches 5.30. Here, 0.18 ml/g was necessary, and on the Adjustment Summary Tab, I note 1.4 ml of acid is needed and write this on the printout. I then reset that acid addition to 0. I only apply an adjustment if I measure more than 0.2 - 0.3 units outside of my target pH at 20-30 minutes into the mash.
A better solution, in my opinion, is to complete the mash with several mash pH measurements and not make an adjustment. Using this information, revisit the Grain Bill and Water Adjustments tabs and determine what is causing the delta, and note the changes when rebrewing the beer. This gives both a fundamental understanding of how your brewing system and techniques affect beer quality, and an understanding of how the spreadsheet works, its accuracy, and how to track improvements in the final beers.
Ask yourself the following questions:
- Am I confident in my room temperature pH meter readings? Did I properly calibrate my meter with fresh calibration solutions? Is my meter’s battery good?
- Did I enter the grains information correctly? There is generally a fair difference in pH between base malts, depending on the maltster or agricultural pressures. Did I get the right Lovibond average for my crystal/caramel/roast malts? Did I change my mill gap?
- Did I properly weigh out my malts for the mash? Did I properly weigh my salts? How accurate is my salt scale?
Tip 2: Dissolve Salts and Acid in Strike Water
As I use a RIMS system, it is convenient to add the salts and acid additions directly to the hot liquor tank while heating to strike temperatures. Martin Brungard also recommends this method. When you add salts, you will observe that some of them are hydrophilic (hard to dissolve), while others are hydroscopic (easy to dissolve). It takes a little time for the salts to dissolve fully, and you may need to stir or circulate. Once dissolved, the ions are immediately available and more quickly drive the mash pH toward your desired value. You may need to adjust your mash schedule, as you will see the conversion rate increase quickly. Still, the coarseness of the milling (which should be optimized for your system) will affect the availability of the starches to enzymes.
If you sprinkled dry salts into the grist or on top of the mash, the time to hydration, the rate of salt diffusion, and the lack of mash homogeneity will require stirring to ensure the ions are accessible to the entire mash and liquor. Of course, award-winning home-brews are made in many ways, and your mileage may vary. I get very consistent results by pre-dissolving the salts.
I also rest my mash before circulating for 10 minutes after I underlet the grain bed. I fill my mash tun to about ¼” above my false bottom with liquor, and position my circulation hose under that bit of water. I then add the milled malt on top and gently pump over my desired mash water volume to the bottom of the mash. This allows the malt to hydrate from the bottom up and forces any trapped air to come out of the mash as the water rises. Any flour and fine particles float up away from the false bottom and begin conversion as they hydrate more quickly.
This also means I have far fewer dough balls or stuck circulations due to fluffier, well-hydrated kernels. This static rest period is included in my mash rest or mash step, and I begin a slow circulation after placing my return hose at the top of the mash, just below the liquid level. Circulation speed is slowly increased to about ¾ of the pump's maximum speed. This gentle flow and careful mash bed creation allow wort to circulate at about a gallon per minute, with ions dissolved in solution available to the entire mash, and I get far fewer malt particles through my false-bottom, pump, and RIMS tube.
Static mashes (uncirculated) can hydrate unevenly; therefore, it is recommended to stir thoroughly for several minutes to incorporate the strike water and fully break down the dough balls. Starch is sticky and, when hydrated, forms a gel that can encapsulate malt and husk materials, preventing water from penetrating. This means that not all of the malt starch is converting. Mechanical action and a looser mash can eliminate that... but be gentle.
If the salts have been dissolved in the strike water, you will achieve more even incorporation, but if you sprinkle them into the mash, they may clump and concentrate, even after stirring. This may result in uneven mash pH throughout the mash: in a concentrated area of salts, the pH may be much lower than desired, but in the bottom corners or edges, where stirring is unlikely, the mash pH may be high. Of course, over time and repeated stirrings, the entire system will start to reach equilibrium as the ions diffuse through the wort (meaning a stable pH). Diffusion takes time.
A brewer friend of mine gravity-feeds his hot liquor through the false bottom after loading the cooler tun with grain. This mimics my procedure and minimizes his need to vigorously stir the mash, though he still performs a gentle stir 2-3 times throughout the mash. We have seen minimal differences between adding the salts to the grains or to the strike water over a 60-90 minute single infusion mash, but in the world of short and shoddy, with very short mashes, I suggest treating the strike water first.
Thin mashes, such as No-Sparge, will reach mash pH equilibrium more quickly, but there is a point at which very thin mashes may be less efficient in conversion. Some speculate that this is due to the dilution of calcium and malt phosphate in the mash. Thicker mashes have the opportunity to concentrate calcium availability, enhancing enzymatic activity, where a No-Sparge mash water may halve that concentration. Fortunately, Bru'n Water can help you with no sparge setups.
Any subsequent addition of salts or acids to adjust mash pH needs to be thoroughly stirred in to incorporate and diffuse. Wait until the salts have fully hydrated, then check your pH. You may wish to extend your mash period slightly to accommodate.
Tip 3: Low Oxygen Features
This version of Bru’n Water includes added Sodium (or Potassium) Metabisulfite, which is used by brewers concerned with Hot Side Oxidation (HSO) to scavenge free oxygen in the mash and boil. It is fast-acting, and it is recommended to use only the amount necessary to address any splashing or O2 ingress throughout your hot-side processing (liquor, mash, boil, whirlpool, and chilling) and into the fermenter.
Remember the Boiled Results option on the Water Report Input tab? Low-oxygen brewing recommends pre-boiling your mash and sparge liquor to remove dissolved O2, then cooling to strike temperature and dosing with metabisulfite to scavenge any O2 that may have been absorbed. If you are not working with RO or DI water sources, this may help estimate the reduction in calcium and carbonate ions during the pre-boiling period. However, most LO2 brewers do not chill the boiled water sufficiently to allow complete precipitation, which prevents DO uptake. Take that into consideration. To be clear, you make your mineral additions AFTER the boil or DO-reduction phase to reduce precipitation that is difficult to account.
On the Water Adjustment Tab, you will see a blue field. Note that it is given in PPM and not grams per gallon. My Brew-Magic system requires about 15 ppm metabisulfite to minimize O2 uptake during the mash and mash out, with an additional 5 ppm added to knock out wort to the fermenter (tested with a DO meter and boiled water). Please note that the spreadsheet adjusts the mash pH for the addition, but does not appear to adjust the -ions in the Overall Finished Water Profile. The line indicates that, for 20 ppm, I may need to change my water profile to accommodate 5.4 ppm Sodium and 22.7 ppm Sulfate. The mash pH is lowered as metabisulfite is oxidized to produce sulfur dioxide gas and a small amount of sulfuric acid.
The Adjustment Summary tab is then updated to reflect both the Mash Water and Sparge Water additions of Sodium Metabisulfite. If you use Potassium Metabisulfite, ignore the sodium impact. You will receive the same amount of potassium ions as you would sodium ions.
Note that after pitching your yeast and chilling your wort to pitch temperature, you should immediately oxygenate the cold wort. This will immediately decompose any residual metabisulfite in the wort that could cause issues with your yeast. Try to hit around 8-10 ppm residual DO in the wort. The hydrated or active yeast will quickly scavenge free O2, and the cold pitching temperature will dramatically slow oxidation of malt compounds during yeast growth.
Tip 4: Managing your Dry Minerals
I suspect that many of us keep our mineral salts out on the shelf in a garage where temperature and humidity can swing wildly over the seasons. If so, consider making saturated solutions of some salts or storing everything inside a temperature-controlled environment in sealed containers.
Many salts will take up a small amount of humidity when exposed to the atmosphere, and as such, are subject to chemical changes in the presence of water and oxygen, even in tiny amounts. Using solutions with fresh salts allows you to take full advantage of hydrated salts without their degradation or oxidation.
For example, pickling lime degrades to chalk when exposed to humidity and air. Chalk doesn’t readily dissolve at mash temperatures and pH, and is far less effective than pickling lime. If you choose to use chalk, you should read this from Kai Troester.
Anhydrous Calcium Chloride (the form sold by most LHBS) can easily absorb enough humidity from the air to liquify, making weight-based measurements less reliable. By creating a solution, we produce both free calcium and free chloride ions. Note that hydrating Calcium Chloride is exothermic, so handle carefully. It will get hot to the touch.
To make a saturated solution, use 1 liter of distilled water with 357 grams of Anhydrous Calcium Chloride. Adjust your BWS spreadsheet’s Water Addition tab to indicate you are using the solution, and it will give you the dosage in milliliters as appropriate. Or you can calculate, by volume, that 1 ml of a saturated solution will yield 0.357 grams of calcium chloride! Divide the dry weight indicated by Bru'n Water, and use that number in milliliters to dose. FYI - identical results for table salt (sodium chloride).
Gypsum is hydrophobic, and its solubility varies with temperature and pressure. Crystal may precipitate or form in the jar/bottle. I prefer to use dry weight for this salt.
Tip 5: Relax
For a few years, as I got my head around mash chemistry, I took a ridiculously fanatical approach. I measured mash pH 4-5 times during the mash, again at pre-boil, again at post-boil, and iteratively throughout fermentation. As I got into low oxygen techniques, I turned this up to 11, my brain running toward high-stakes gambits to create the best-damned beer possible. This, combined with repetitive brewing recipes and uber-critical evaluation, took all the fun out of brewing beer. I have, with some difficulty and anxiety, stepped back from my hyper-analytical brewing process, and now brew, but still following the techniques and principles espoused here.
Brewing beer is not an all-or-nothing proposition, and there are aspects of brewing that are simply beyond our control. Yeast can mutate, or a batch of malt can be slightly out of specification. We should lower our expectations to the point where stress is minimized, while maintaining enough awareness to anticipate and intercept a key problem. This does mean taking detailed notes, keeping a journal (hooray for BeerSmith notes), and then reflecting on what went wrong and course-correcting the next time. I highly recommend drinking a nice beer, mead, or cider during this, but not during the brewing.
You may also want to minimize complexity to make your brew day more straightforward. I know people abandoning expensive 3-vessel RIMS/HERMS that are fully automated and going back to a single kettle, a propane burner, and a big cooler mash tun. I've made a few small-batch extract beers. Take the effort to make sure this is a fun and rewarding hobby.
Brew the best beer that you can, but accept that this is a hobby. Be competitive, but don’t nurture an ulcer along the way!