Bru'n Water Free Spreadsheet 1.16 Walkthrough
This article has been superseded by a new tutorial with the release of 1.17a. For the latest, please visit https://www.accidentalis.com/brun-water-spreadsheet-tutorial-free-edition/
There are a number of water calculation tools on the internet for brewers, including EZWater Calculator, Greg Noonan’s Water Witch, Palmers Mash RA spreadsheet, internet sites like Brewers Friend (the mash chemistry written by Kai Troister). I have gravitated toward Bru’n Water as I spend a great deal of time on Homebrewtalk.com, and find that Martin Brungard and A.J. DeLange to be extremely patient and generous as they give advice. I also find that Bru’n Water and Brewer’s Friend are the easiest to use and provide good results. My advice is to choose one that you are comfortable with and stick to it – this removes a variable in your brewing.
Martin Brungard’s Bru’n Water spreadsheet is an excellent modelling tool for managing your brewing water. Below, we will walk through the FREE version of the spreadsheet with specific examples, and point out the areas that give you options. If you donate, you will receive the advanced spreadsheet and details are later in this walkthrough. The spreadsheet can be downloaded here: https://sites.google.com/site/brunwater/home/files . Look for the red “download” arrows at the bottom of the page.
What you will need:
- Your water report with the variables important for brewing. You can build a list from the spreadsheet. Ward Labs is an independent testing facility, and provides a brewing specific report. My Ward Labs report will be used in this tutorial.
- A computer with supported spreadsheet software. M. Brungard lists the requirements on his website.
- A recipe and some understanding of what your target water profile might be.
Note: Clicking on the images below will open a larger and more legible version in your browser.
Step 1:
At the bottom of the spreadsheet you will see a variety of colored tabs. The first, and an important tab, is “0. Instructions” which provides details on water chemistry, as well as information on using the following worksheets. PLEASE READ! Bru’n Water looks complicated, but it’s not that difficult to use once you enter the basic data and learn how the program works. You probably won’t be able to use the program instantly without reading the instructions!
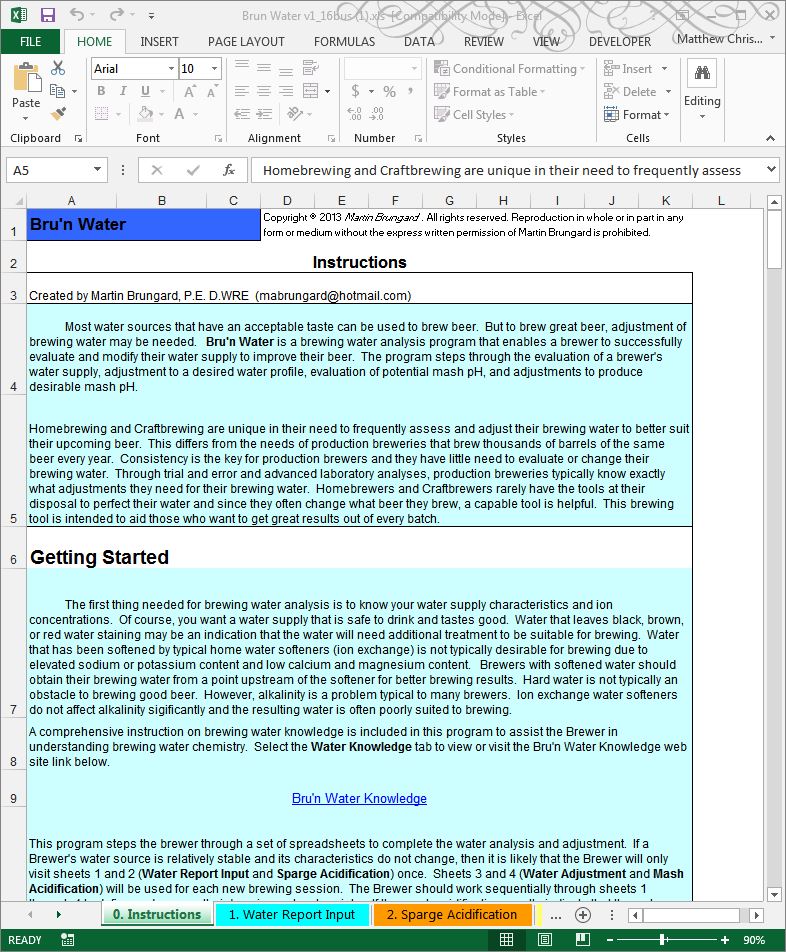
Click on the worksheet tab at the bottom of the screen named “1. Water Report Input” and get your water report handy. As mentioned, I have my Ward Labs Report and will put in the pertinent information from my report in this example.
Be careful to follow the instructions in the spreadsheet, especially when inputting Sulfate and Nitrate concentrations. These may need to be modified, depending on the metric presented in the water report.

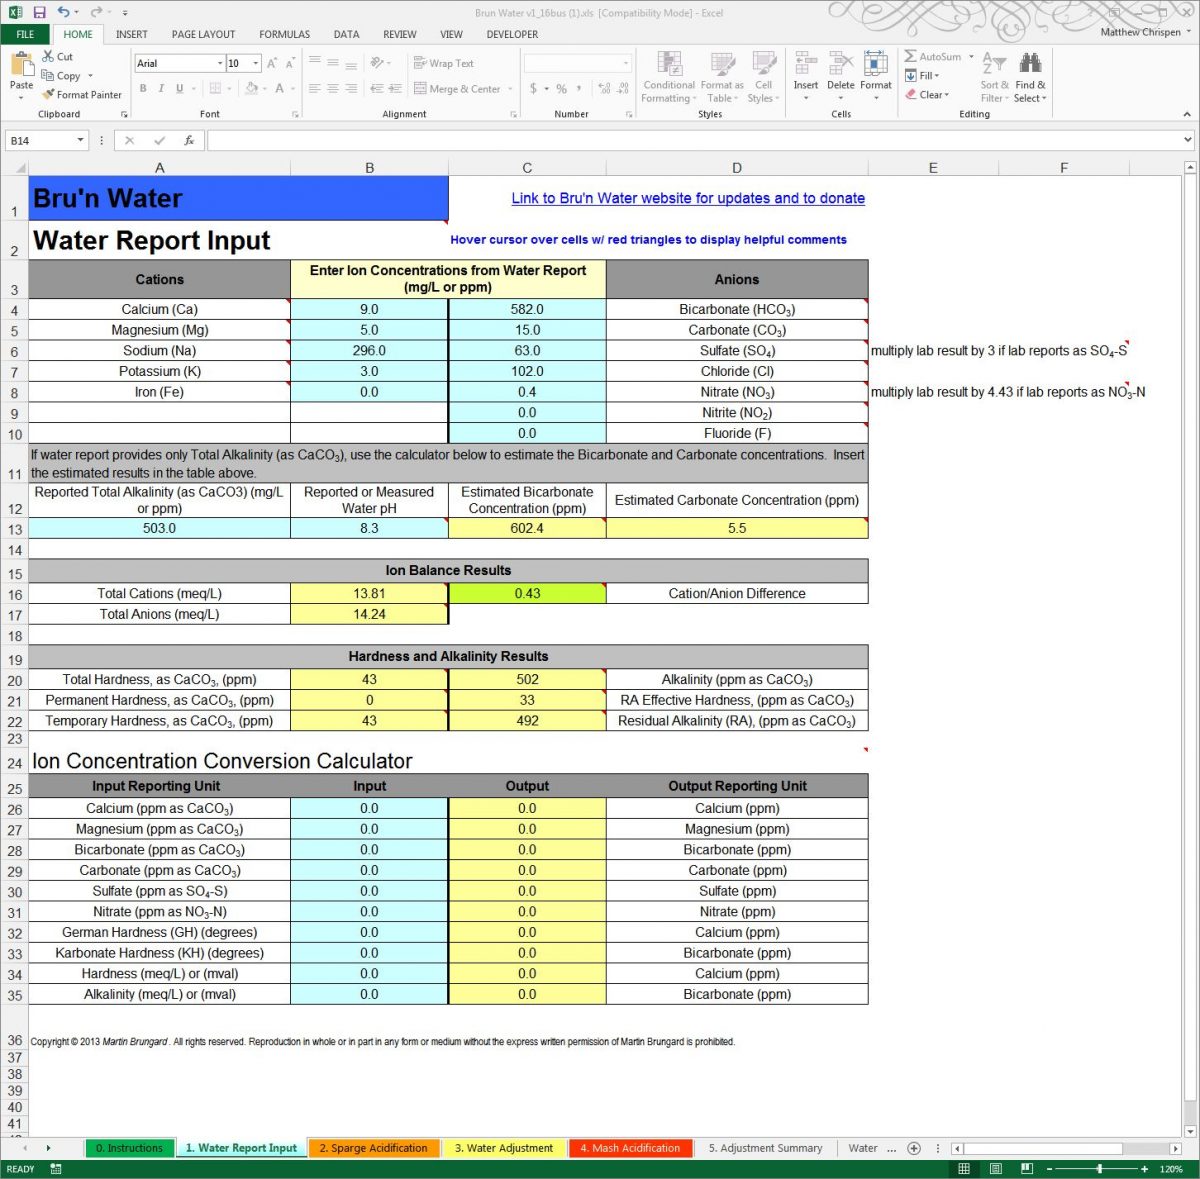
Comment from AJ DeLange: "Whenever alkalinity is available in a water report use the alkalinity value rather than the bicarbonate/carbonate numbers which are calculated from the alkalinity. In the case of Ward Labs reports, such as the one given as an example here, the bicarbonate and carbonate are calculated incorrectly. For pH 8.3 and alkalinity of 503 the bicarbonate is approximately 607 and the carbonate 5. Specifying 582 and 15 to the spreadsheet have to confuse it as that ratio is not possible at pH 8.3 (the spreadsheet should ask for alkalinity or be modified to check for incorrect data like that in this example)."
The spreadsheet has some interesting information and tips embedded. Hovering the cursor over cells with the red marks in the corner should pop up comments that can help guide what you should input or understand in that cell.
In the case of my water report data from Ward Labs, you will notice that I needed to modify the sulfate and nitrate values from the report results to use in the spread sheet.

First thing to notice in my water report is that I have ridiculously high levels of sodium in my water. Roughly equivalent to 2 grams per gallon. This alone renders my filtered tap water worthless for brewing, even as a diluent. But using the section below the Ion Concentrations tables, I can get a sense of how accurate the laboratory report is. That green box for Cation/Anion difference stays green under .5, and shows that my lab report balances well. A balanced water report result suggests that it is more likely that the reported results are reasonably accurate. This is very important when using statistical reports from municipal water companies where water ion concentrations (including chlorine/chloramine) may fluctuation seasonally. I strongly recommend a Ward Labs report for brewing!
An important result from the water report is that the spreadsheet calculates the Alkalinity as CaCO3 at 502, the RA Effective Hardness at 33, and the Residual Alkalinity (RA) as 492. This is a tremendous amount of alkalinity for a mash to overcome.
For these two primary issues (high sodium and alkalinity) – I utilize Reverse Osmosis treated water and build my brewing water from scratch using mineral additions. If your water report shows ions that are very high like my water, you may need to employ dilution or replacement of your water with R/O or distilled water to make it more suited for brewing. Please be aware that if my water had low sodium and a more modest bicarbonate content, I might have been able to neutralize the bicarbonate with an acid addition.
Remember I said you need a mashing recipe handy? With that recipe, we need to jump out of sequence on numbered tabs. You will enter the grain data for your mash on worksheet 4 (Mash Acidification) since that data is needed to help predict a mash pH. I jump to that Mash Acidification sheet out of order because the worksheets 2, 3 & 4 are linked. The grist is highly influential on the mash pH.
You will also need to figure out how much strike and sparge water your recipe will require. Those volumes are necessary for the calculations. I use Beer Smith to calculate those volumes for my brewing – you can use your preferred solution.
Let’s pick a standard imperial stout grist, because I know the roasted grains will impact my mash pH, and require some adjustments in alkalinity with R/O water.
For 5.0 gallons,
14# Pale Ale 2-Row (2.0 SRM)
1# Caramel/Crystal 60 (60.0 SRM)
1# Roasted Barley (300.0 SRM)
12.0 oz Black Patent Malt (500 SRM)
8.0 oz Chocolate Malt (350.0 SRM)
The rough water needs are 5.6 gallons of strike water and 3.87 gallons to sparge. I have a 15 gallon system, so your infusion and sparge volumes may differ.
Step 2:
Flip over to the red “4. Mash Acidification” worksheet and enter your grains. You will need to know their color (Lovibond) rating. For now, ignore the mash pH results, but double check your grain weights, Water to Grist ratios and estimated color. This should closely match your recipe's expectation. If it does not, please double check your work. Make sure to choose “Adjusted Water” in the “Water used for Mash” box in the Mash Acidity Results table. We will return here for the results after the water adjustments are entered.
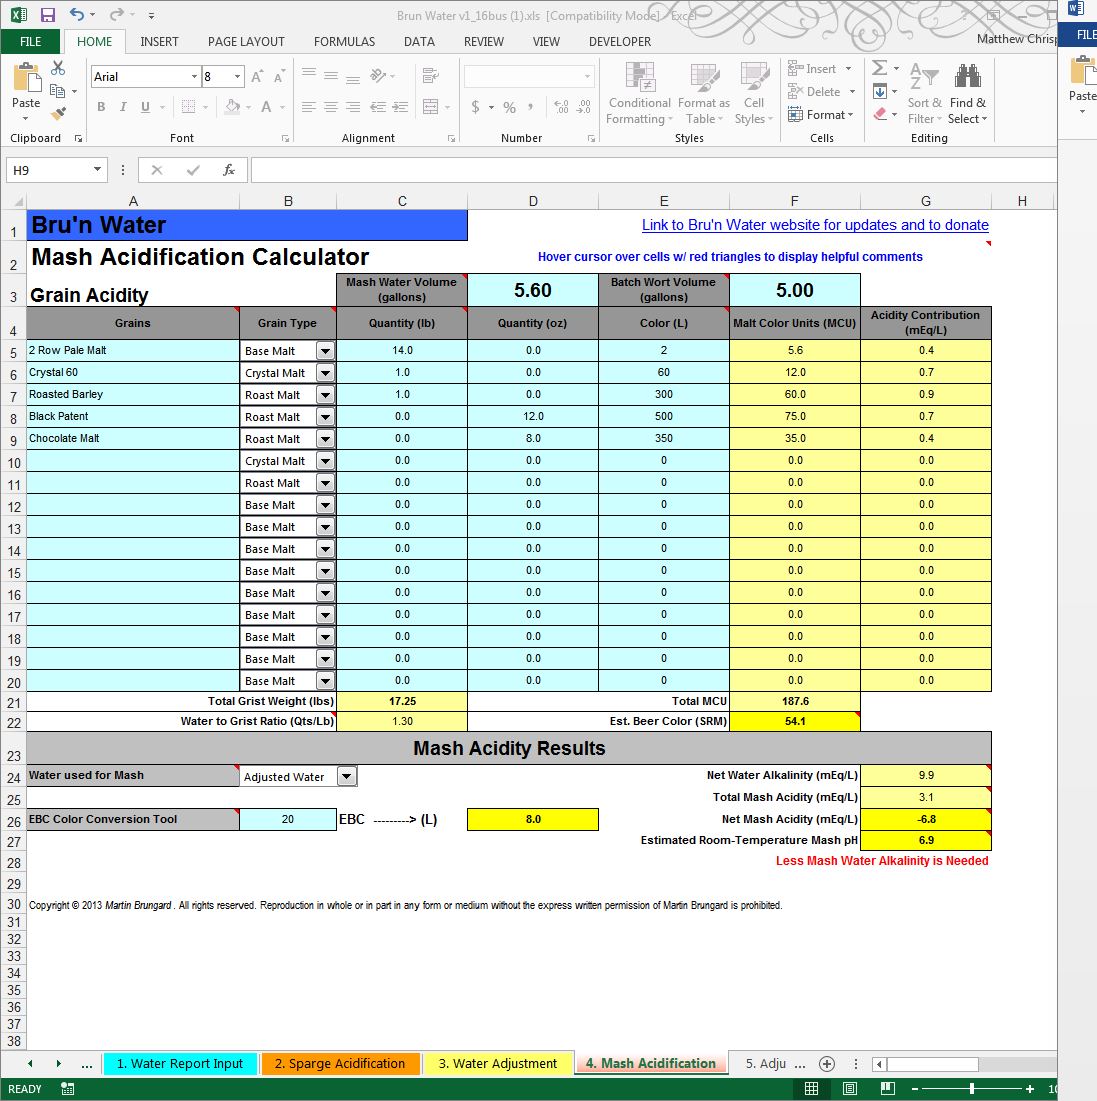
Now that the recipe is entered, We need to return to the yellow “3. Water Adjustment” worksheet. Here we will make decisions about treatment of our mashing and sparging water which may include dilution with R/O or mineral additions.
Step 3:
First, consider and select your target water profile. Please don’t take the profile as anything more than a suggestion, but use it as a starting point. For brewing a Pale Ale, you might try the “Pale Ale Profile”, brew with it, and determine you prefer more or less sulfate or chloride. The ion concentrations are just starting points. All water profiles can be edited in the table at the bottom of the Water Adjustment page.
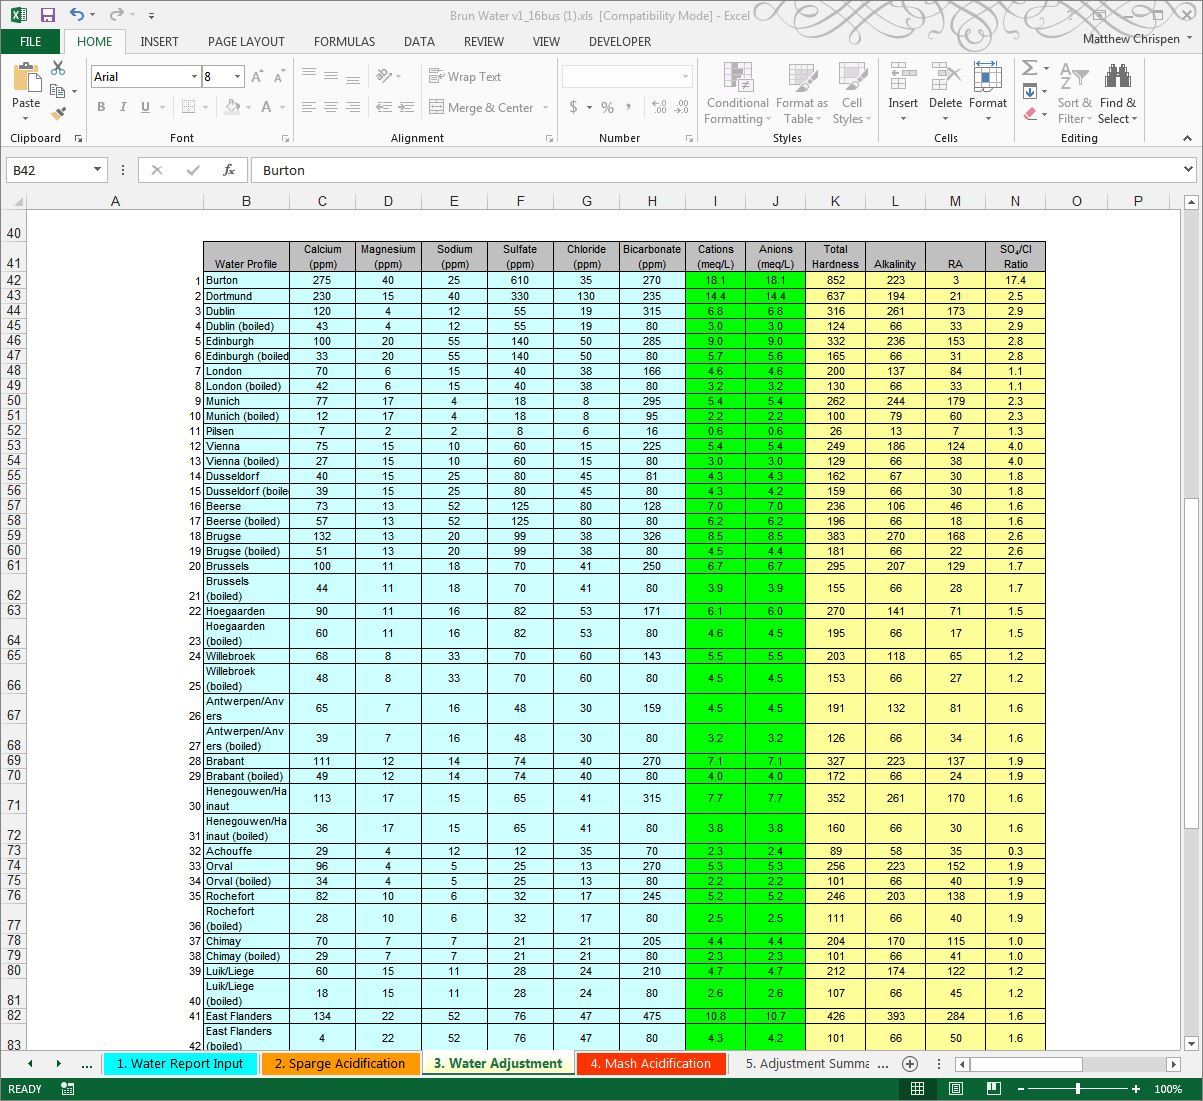
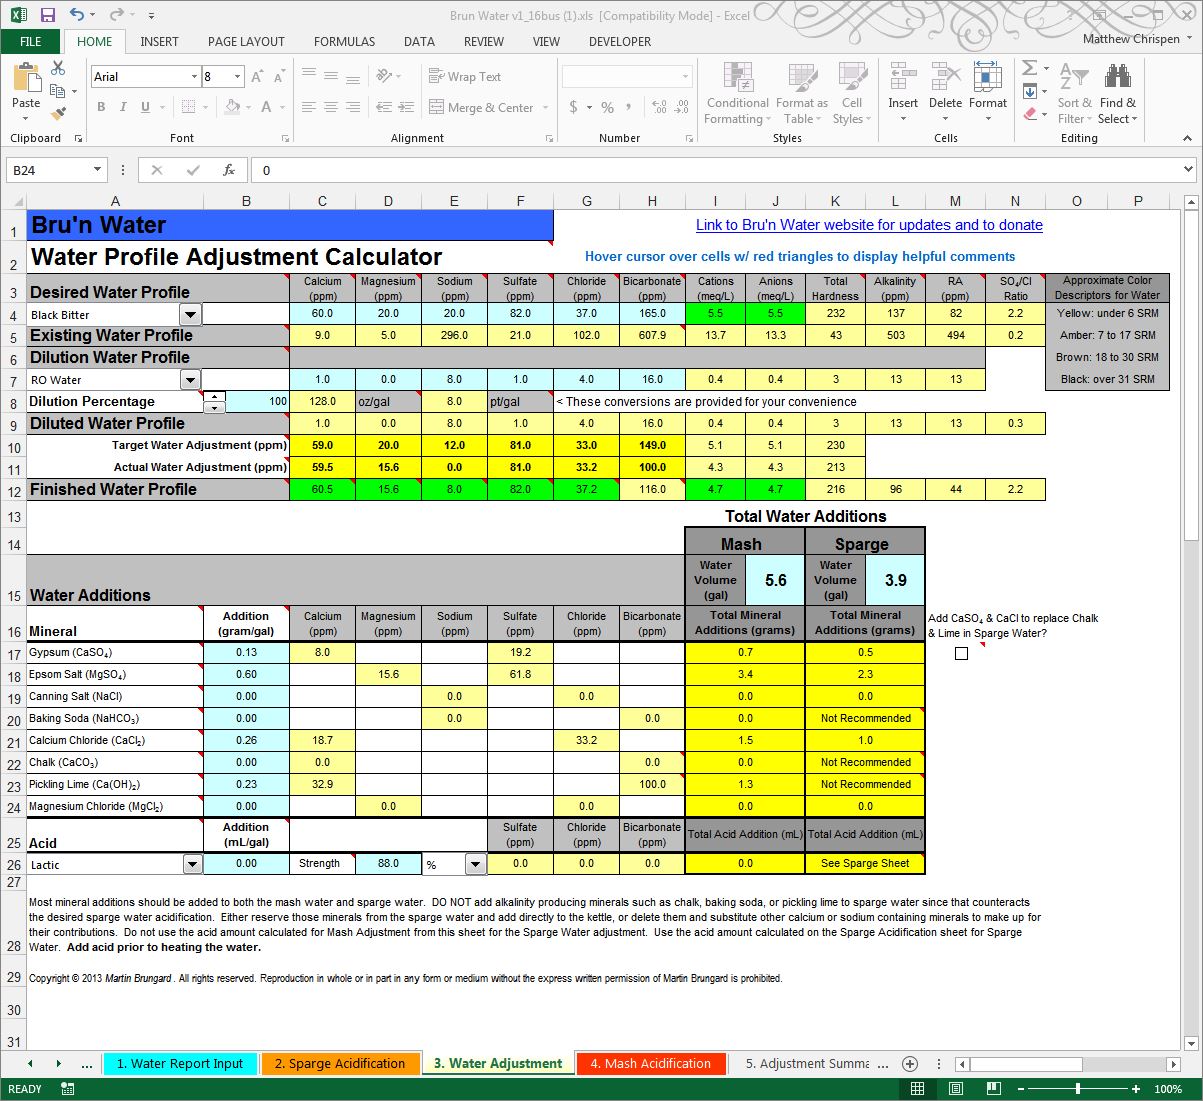
Since I am brewing an Imperial Stout, I picked a profile that enhances dryness to offset some of the sweetness from a high gravity beer. The drop-down box under the Desired Water Profile heading is where you select target water profiles. In my case, I selected the “Black Bitter” profile to provide a relatively high level of sulfates. Alternatively, you could choose a city profile such as Dublin or Edinburg profile, however those profiles may not work well. The water profile establishes target ion concentrations in parts per million, and gives you a quick comparison of your existing water to that target profile. Each ion heading has a pop-up note that guides you, and provides some information on what each ion does.
My water, again – is too high in sodium and bicarbonates, so I am going to dilute with R/O at 100%. Since R/O doesn’t remove absolutely everything, Mr. Brungard’s preset has left in a few ions. You can modify this if you choose based on your rejection rate or a post R/O water report, but it really is unnecessary. R/O is generally less than 40 ppm in total dissolved solids, so essentially you have a blank slate. Deionized water is completely free of ions, but that is a more expensive water source for brewing. After the dilution is setup properly, we need to then start adding in minerals and watch the “Finished Water Profile” line for feedback. Don’t forget to input your Mash and Sparge water volumes on the Mash Acidification sheet.
If you have a reliable water report, and the water has excessive ion concentrations for your Desired Water Profile, you can increase the Dilution Percentage to reduce those concentrations. For many people, their municipal water is acceptable for brewing a few styles, and dilution with R/O or Distilled water may help target desired profiles they could not otherwise achieve. For example, high alkalinity in your water may be appropriate for a dark coffee porter, but not appropriate for a light colored lager, such as Pilsner. If you use any portion of your municiple water, please make sure to treat that portion for chlorine or chloramine removal before brewing. You can use Campden tablets, filtering through activated charcoal, or both.
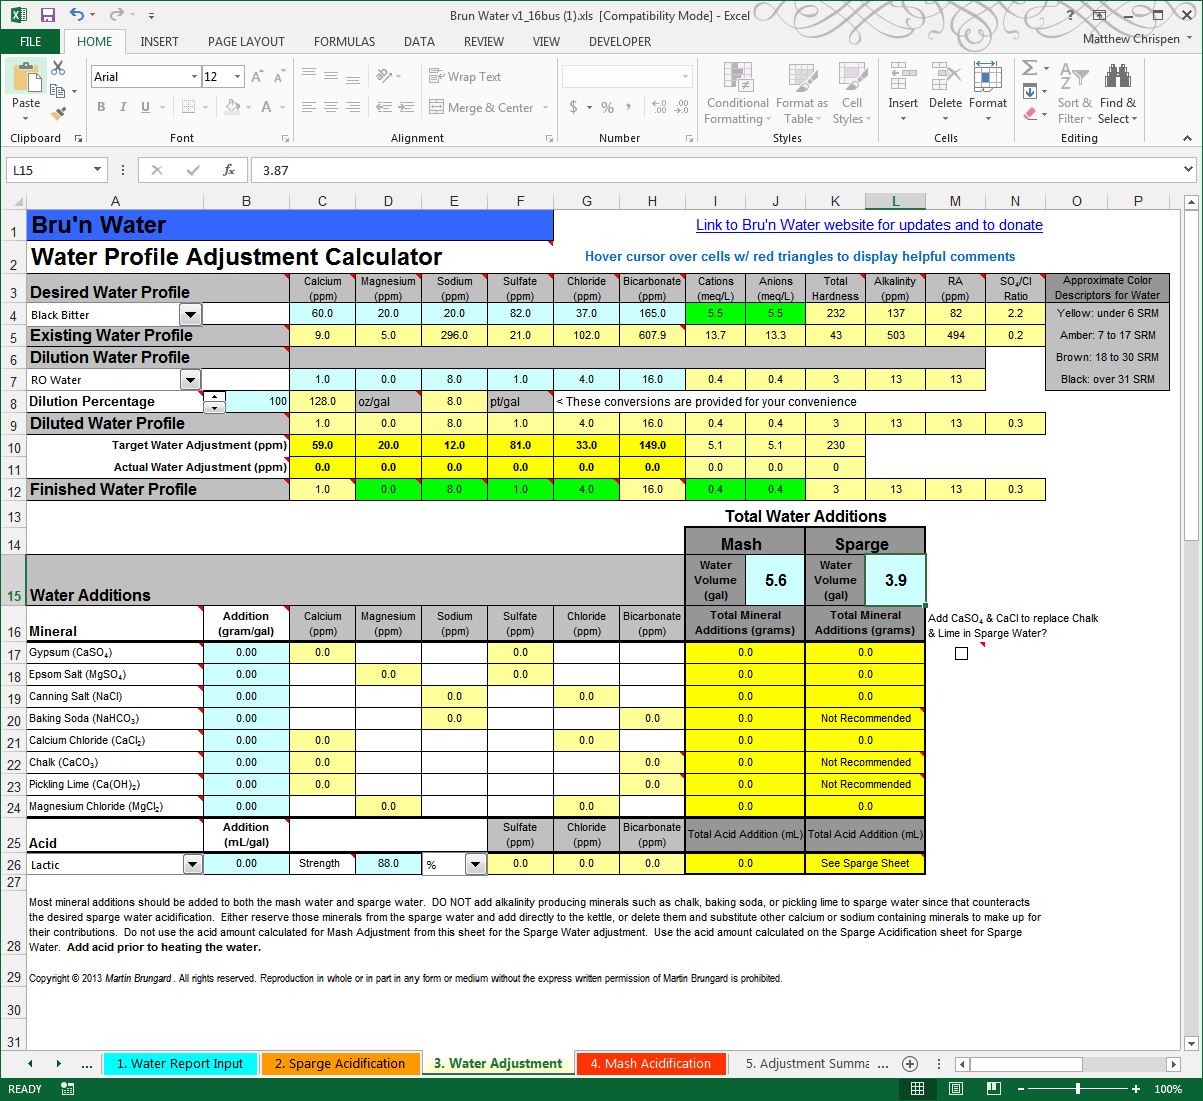
Because we are using mineral ions for FLAVOR, we don’t worry about mash pH right now. We will adjust mineral additions, using grams per gallon to get close to the water profile. As such, we will focus on the mineral additions that do not impact carbonate or bicarbonate levels first, then adjust those after to help achieve the desired mash pH.
The primary drivers of flavor here are the ions Sulfate and Chloride with about a 2:1 ratio. While the ratio isn’t as important to brewers as in the past, it is helpful to understand the relationships as you choose minerals. The ratio should be treated solely as a guideline. Gypsum adds a lot of sulfate, so you will need to supplement while watching your calcium additions. Calcium chloride favors the chloride ion, but also adds calcium. In a dark beer, magnesium plays a flavor role, so Epsom is also added, but note it also affects Sulfate levels.
By playing with the amounts of various minerals, Gypsum at 0.13 g/gal (grams per gallon), Epsom at 0.6 g/gal and Calcium Chloride at 0.26 g/gal I can achieve most of the desired flavor profile, but remain deficient in calcium. This is very problematic as I want at least 50 ppm calcium and the profile suggests 60. Calcium is critical to a healthy fermentation and has desirable effects in the boil. I will make this up with an alkaline mineral, Pickling Lime. By adding 0.23 g/gal pickling lime, I achieve a more appropriate calcium ion concentration. I am also at this point largely ignoring the mash pH, but also aware that a dark beer will require less acidification and likely an alkaline addition to achieve the right mash pH. This thinking will come more naturally as you brew with the spreadsheet.
With the mineral additions I have chosen, the spreadsheet computes 0.7 grams of Gypsum, 3.4 grams of Epsom, 1.5 grams of Calcium Chloride and finally 1.3 grams of Pickling Lime for the strike water. We will further confirm the mash pH in the next step and make any final necessary adjustments.
Mineral additions should be weighed out carefully on a reliable gram-weight scale. A small error has a large potential impact! I add my Mash additions to my strike water before dough-in to ensure they dissolve, but you can just add them to the mash. The same would apply to the Sparge water additions, with a possible liquid acid addition. Also note that the spreadsheet recommends adding the Pickling Lime directly to the mash, and not into the strike water.
Step 4:
If we switch to the “4. Mash Acidification” worksheet, we will see that we have an estimated Room-Temperature Mash pH of 5.4. This is excellent as it falls right in the middle of the recommended range, and doesn’t require us to use any additional acids to hit our target mash pH. Changing the drop down to "Existing Water" in the "Water used for Mash" section will show you the impact of your mineral ion additions. Remember to return it to “Adjusted Water.”
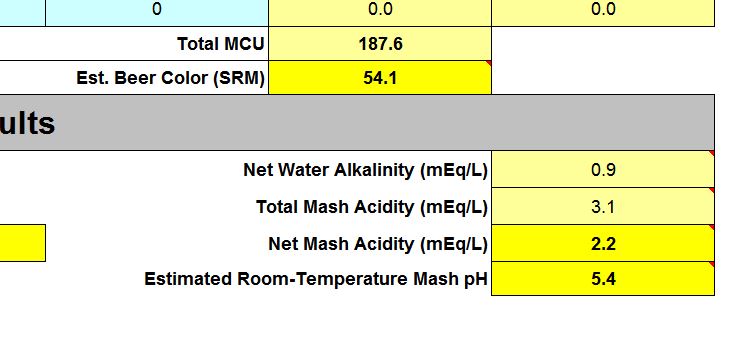
In this case, if the estimated mash pH is higher than 5.6, you should consider reducing the amount of Pickling Lime and choosing another mineral addition to up your calcium as necessary. If I had been brewing a lighter colored beer, I might not have needed the pickling lime and may have needed to add acid to the mash.
If your pH is below 5.2, then you may wish to consider adding more Pickling Lime and adjusting the other additions appropriately. Or you can consider steeping your roasted and crystal malts separate from the base malt mash. This creates some additional flavor challenges, but is something to consider. In the free version of the spreadsheet, you would just zero out the weights of the dark malts and observe the mash acidity change and rise. For example, steeping only the 12 ounces of Black Patent malt away from the base mash would cause the estimated mash pH to rise to 5.5.
When dealing with mash pH, especially with highly alkaline water, you may need to use liquid acid additions. The spreadsheet allows for those additions, but you will need to switch back and forth between the worksheets "Water Adjustment" and "Mash Acidification" to determine the Estimated Room Temperature Mash pH. More often, while mashing you will use lactic or phosphoric acid to adjust your mash pH downward, and lime or baking soda to adjust upward. Proper use of a pH meter will help keep you on target. Brewing often with your water, observing and tasting the results will help you determine the right course of action.
Step 5:
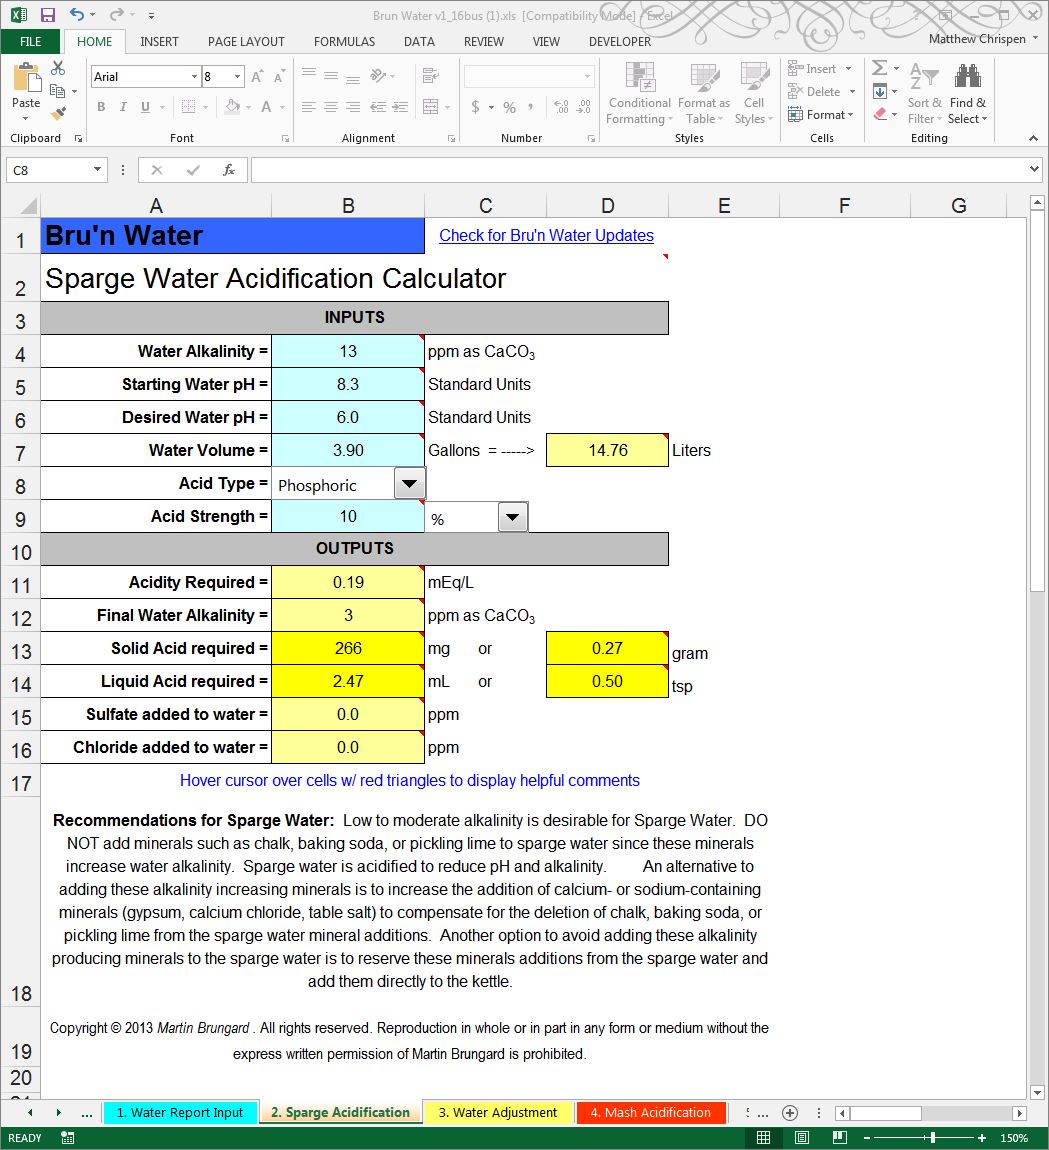
Since the calculations show we are in a good spot – we will move onto the “2. Sparge Acidification” worksheet. Here, you will need to know the alkalinity of your water in ppm as CaCO3. For those with a suitable tap water, the alkalinity of the tap water is calculated on the Water Report Input sheet and is shown about half-way down that sheet. Enter that value as the alkalinity at the top of the Sparge Acidification sheet. Since I am using R/O water, I can use the estimate for R/O water alkalinity provided on the Water Adjustment profile table, which is 13. I then set my Water Volume to 3.9 gallons to represent the sparge water volume I intend to use in my brewing.
Select the type and strength of acid you will be using. The drop-down box lists the types of acids that Bru’n Water is capable of using. For liquid acids, enter the acid’s numerical strength value and use the drop-down box to select the strength setting as either: Percentage (%), Normality (N), or Molarity (M). The packaging for the liquid acid should provide the strength data. Solid acids do not use the strength settings and they can be ignored.
The Starting Water pH value is not very influential on the acidification results, so it is OK to guess at a value to input. For many tap waters, its pH is around 8. In some cases, water reports will include the pH. The final setting is the Target Water pH. Normally sparge liquor is neutralized to under 6.0 pH. The most important thing to monitor when setting the target pH is the Final Water Alkalinity. The final alkalinity must be less than 50 ppm to avoid tannin extraction. A safer result is to acidify the sparging water to around 25 ppm alkalinity. Alter the Target Water pH value to produce the desired Final Water Alkalinity. When the alkalinity is reduced sufficiently, the calculated acid amount is accurate.
The system predicts that I will need about 2.47 mL of 10% Phosphoric acid to reach a pH of 6.0 and a very low alkalinity of 2 ppm. As you may note, R/O water already has sufficiently low alkalinity and doesn’t really need to be acidified for sparging use.
If I had used my very alkaline tap water, the target pH would have to be much lower than 6 and the resulting amount of acid would have been substantially greater. With the sparging water acid quantity calculated, the remaining mineral additions will be calculated on the Water Adjustment sheet.
Step 6:
Finally, worksheet “5. Adjustment Summary” provides a printable summary of all of the calculations, additions and comparison chart of Historic Brewing Profiles from A.J. DeLange.
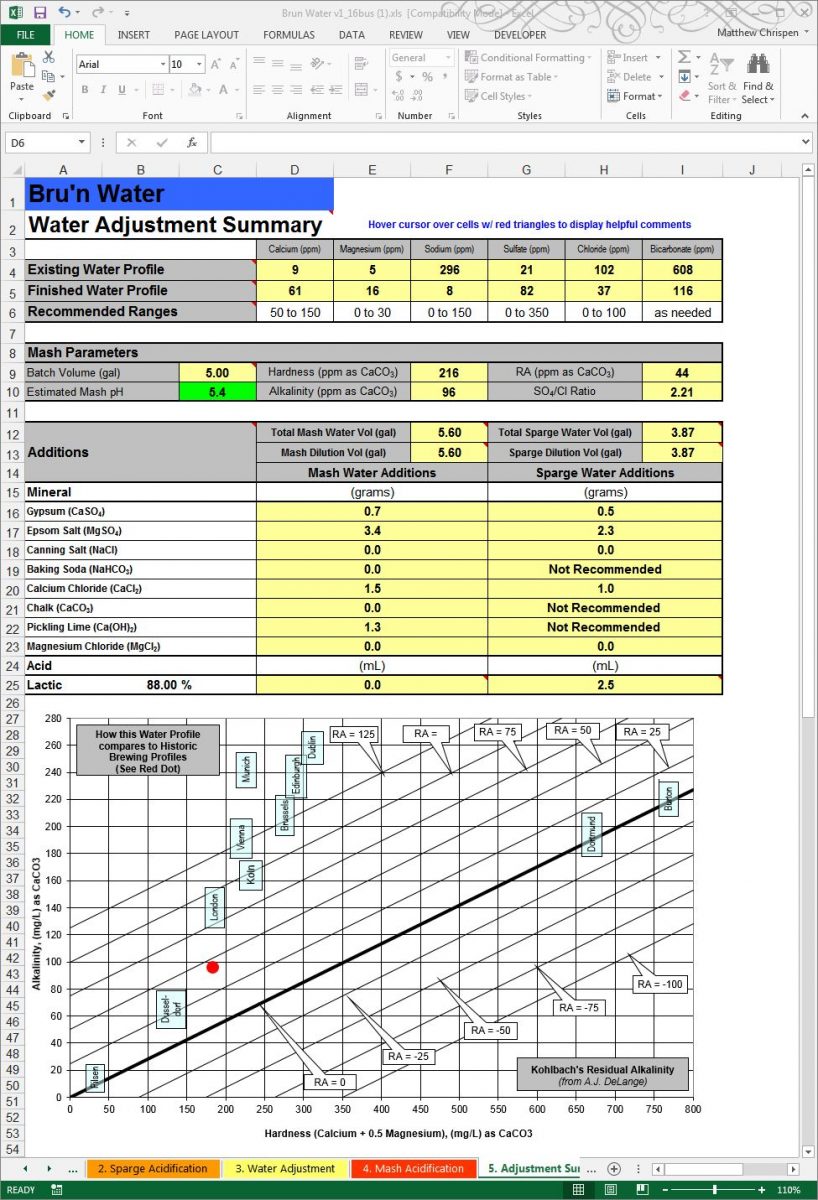
This summary sheet is extremely useful in the brew house. I print it out and tape it to my HLT as a reminder of the volumes I require, and the proper additions. It is a handy reference when I have my pH meter in hand looking at mash and sparge water pH.
A note about pH meters: There are two very important issues that you need to consider while using a pH meter, of any grade. Firstly, pH meters need to be calibrated before use, and during use if over an extended period of time. Your pH meter should have instructions, and using calibration solutions is fairly straightforward. Secondly, mash pH should be measured at room temperature. While it seems like an extra step, nesting two small bowls, the bottom filled with ice water, will cool a small sample down quickly. You only need a few ounces, filtered. I strain my sample through a paper towel to keep out the grits and fill a shot glass. Then test your sample. Give the probe some time to react, it is not an immediate reading. Using the same procedure every time should give you consistency. Cooling the wort will also extend the life of your probe and increase the accuracy of Automatic Temperature Correction (ATC) features. I check the mash within a few minutes of dough in, and about 15 minutes in. From there I decide if further samples are required, based on observation.
Conclusion:
You now have a guideline and process to manage your brewing water. You should spend the time and investment to brew the same beer, changing only the water profile. The differences can be staggering, and often the difference between a medal or a disappointing score in competition. M. Brungard has suggested the following experiment:
Create independent solutions of Gypsum and Calcium Chloride, at a ratio of a gram to 100 milliliters of cold water of each will work fine. Then pour a beer, something not too bitter (to avoid fatigue) but is very familiar, then dose with one or the other solution, measuring your additions, gently stir and taste. Take notes. Dose again, always tracking the concentration. Or split the beer into flights and increase the Gypsum in one and the Calcium Chloride in the other. This, alone, convinced me to treat my mineral additions as part of every recipe!
This experiment is even better when you are using a beer brewed with a specific profile. You can then tweak your mineral additions to achieve an optimal effect in flavor and mouth feel to your personal preferences. Just remember to take notes and scale the additions into your next recipe.
I strongly suggest that you download the free version and use it in a few brew days. Follow the instructions and recommendations closely and determine if the result is positive. I believe that you will see a better result in the brewing day, in the kettle (hot and cold break, hop utilization) as well as in the finished products. If you do – then make a donation and get the advanced spreadsheet. This is not Martin Brungard’s day job, and he deserves to get paid for his work!
The upgraded version of the spreadsheet adds advanced functionality and features:
- You can work in many standard volume scales, from gallons to hectoliters.
- Total Dissolved Solids calculation and more options for the Ion Concentration Conversion Calculator
- Better worksheet automation, importing key values between worksheets
- Sparge water dilution options, including accounting for mineral additions (from the Water Adjustment Worksheet)
- Option of adding Hardness Minerals directly to the Boil Kettle
- Mash Acidification options of EBC versus Lovibond for malt color
- Side by side comparison of EBC and SRM results
- Separate options for removing Crystal and/or Roast malts from Main Mash
- A “raw text” report worksheet that can be cut and pasted into the notes of your preferred recipe manager
- Personalized features include your name, and a place to enter your beer name
As previously mentioned, I manage my water spreadsheet by both cut and paste of the information into Beer Smith’s notes field, and save the spreadsheet in a folder with the recipe name and dates. M. Brungard has been very accessible and responsive to any questions, and I owe him many thanks for improving my brewing and for his input and help with this post!

